


How to Build a Multifunctional POS System in WordPress
Online selling is a necessity and people are enjoying shopping from home. eCommerce business designers are trying to make the buying journey more convenient for both sellers and buyers with eCommerce POS systems.
In 2020, the market size value of POS software reached $9.3 billion. It is forecasted to hit $18.1 billion by 2027.
Grand View Research
When someone buys products from a retail shop, the POS (Point of Sale Transaction) system is designed to track the transactional data like- product code, date, categories, and time. You will get the information in your database of the system. Basically, the POS system enhances the facility of an eCommerce and builds bridge between a physical shop and online shop.
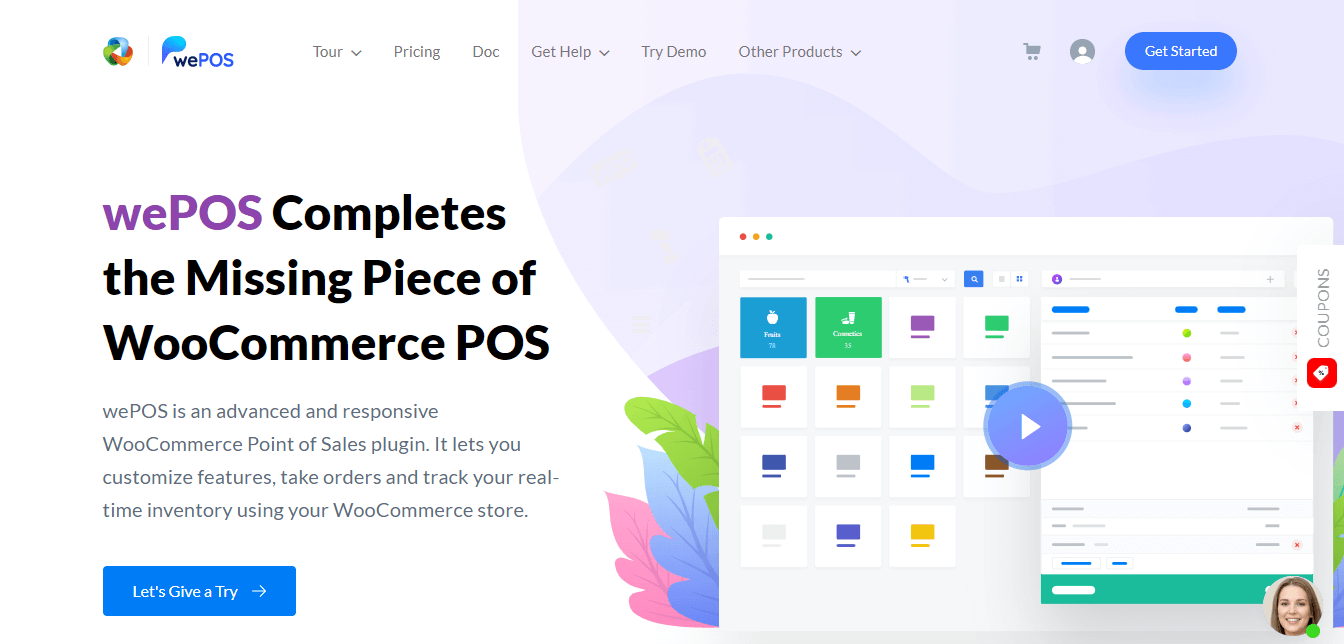
Today we will share how to build a POS system for your online store with wePOS and improve your sales than before. It is one of the best POS for WooCommerce.
Why You Need a POS System for Your Online Business

POS is the time and place where a customer pays for his goods. In this part, POS software is used to simplify the whole process of both selling and buying online. It assists to make transactions faster and smoother. The seller can serve the customers within just a moment.
POS system consists of one main computer which is connected with multiple checkout terminals, mobile, or fixed. According to the type of Business, the POS systems have multiple requirements.
An eCommerce POS system, such as Salesforce Point of Sale, is a digital solution that seamlessly connects a point-of-sale system with an eCommerce store. You can directly see detailed information about the transaction process and orders from customers.
How to Build a POS System in WordPress
Manufacturing your POS system will be a lot easier with wePOS. The following simple steps can make your job smooth. Why not have a look below?
- Step1: Install and Activate wePOS
- Step2: Calculate Tax for Fee
- Step3: Barcode Scanner Field Setting
- Step4: Set Custom Field in WooCommerce for Barcode
- Step5: Receipt Settings
- Step6: Add Products
- Step7: Cart Management
- Step8: Checking Out
Step 1: Install and Activate wePOS
Before building the POS system, you have to install and active WooCommerce. If you need any assistance to install and activate the WooCommerce Plugin, check this WooCommerce Tutorial.
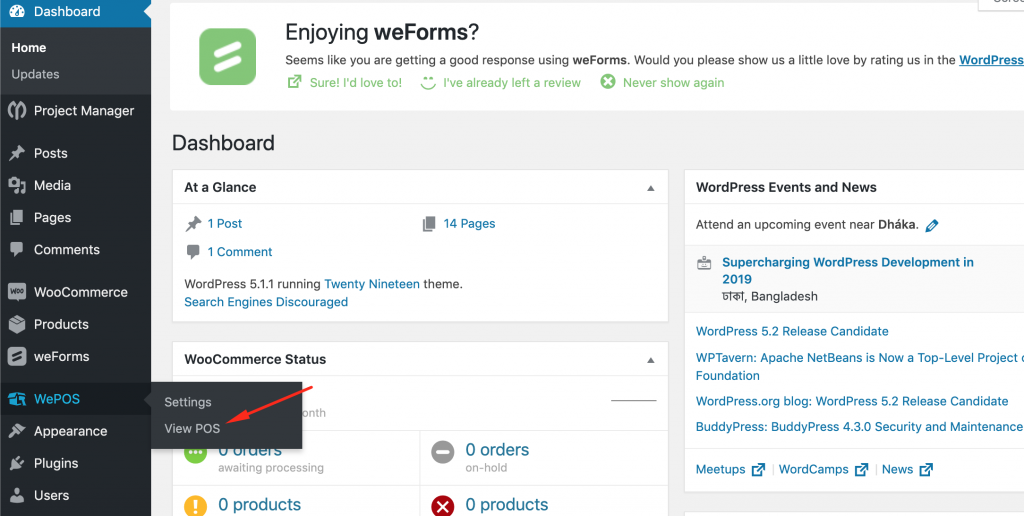
Now login to the Admin panel of your WordPress site. Go to Plugins → Add New and find wePOS from the search box.
Then click install, once it’s installed press the Activate button.

Have a look at what your wePOS dashboard will look like,
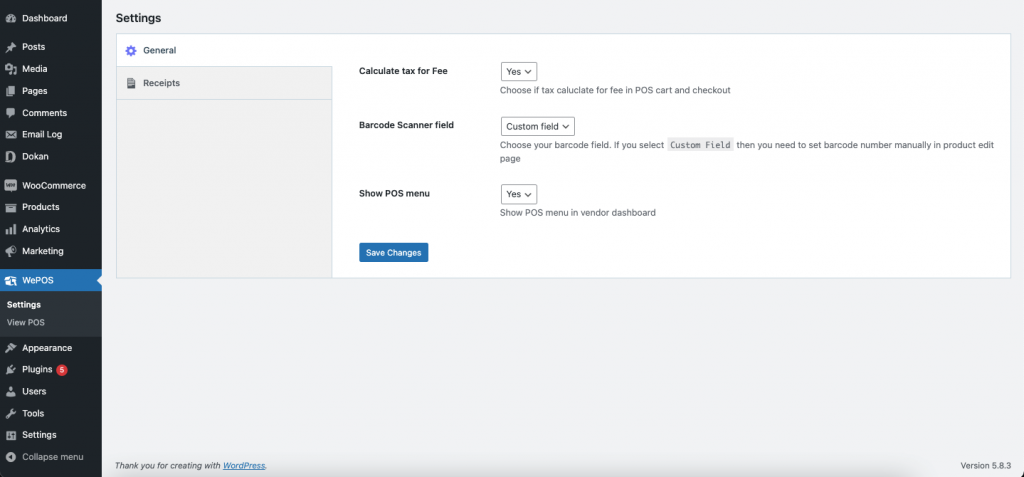
Note: “Show POS menu” will only appear if you have Dokan installed.
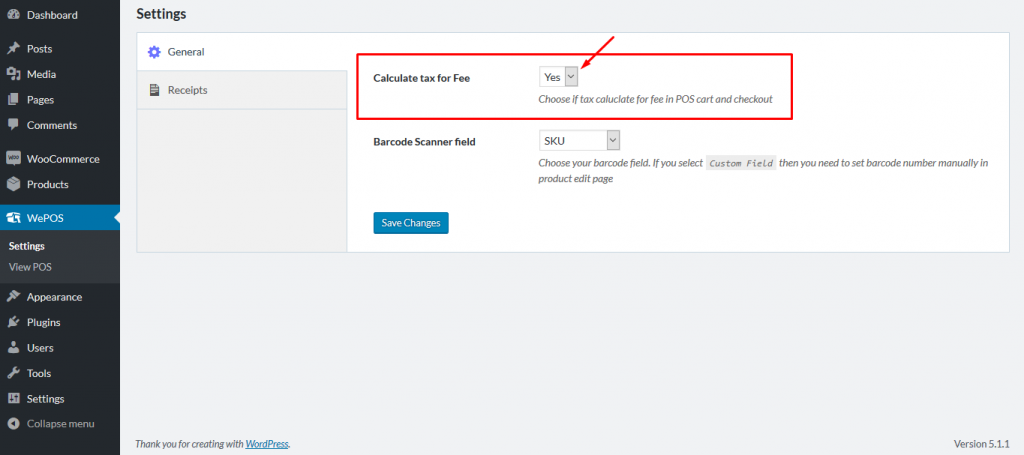
Step 2: Calculate Tax for Fee
Isn’t it necessary to add tax fees for your product and calculate them while a customer is checking out? Well, with wePOS that can be done within a few clicks.
From the dashboard, choose ‘YES’ to calculate the price with tax in the cart or checkout process.
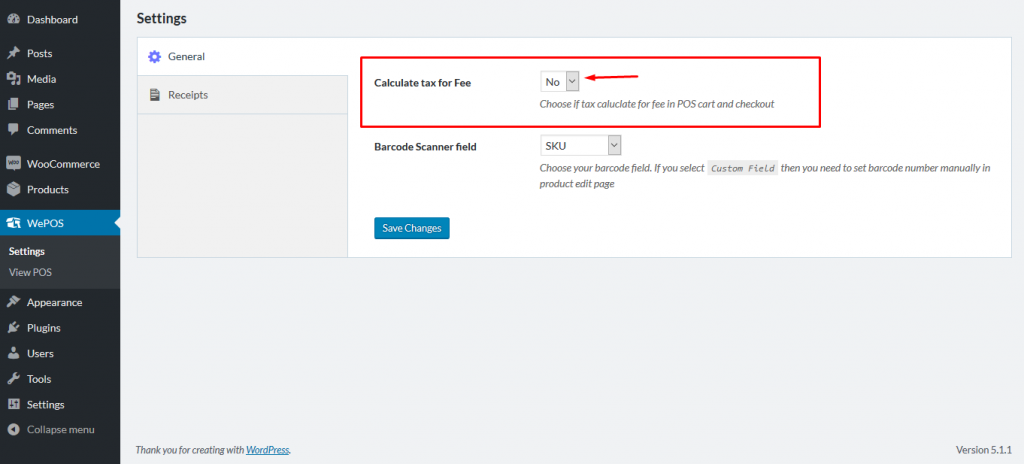
Select ‘No’ to calculate the price without tax in the cart or checkout process.
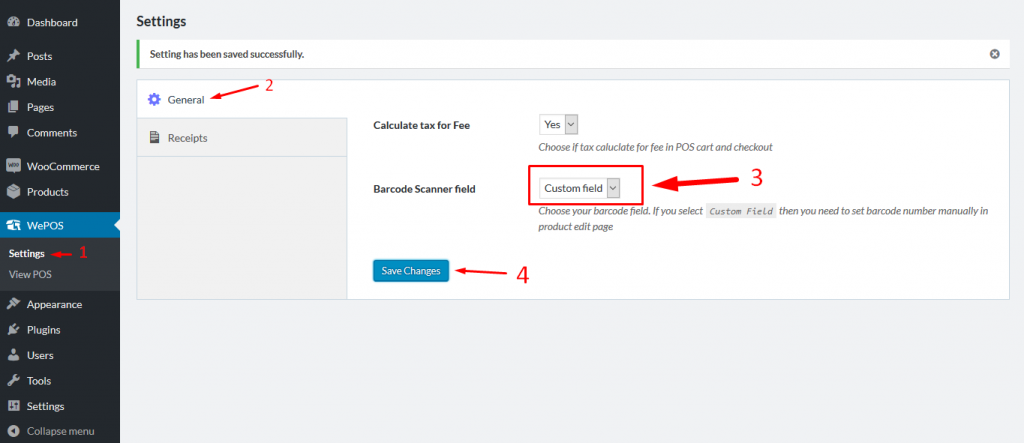
Step 3: Barcode Scanner Field Setting
Pick the barcode scanner unit field to get the correct data of the product when it will be scanned.
a. ID– If you use ID on products in the store.
b. SKU– If you use SKU on products in the store.
c. Custom Field– If you want to manually set barcode numbers for the products.
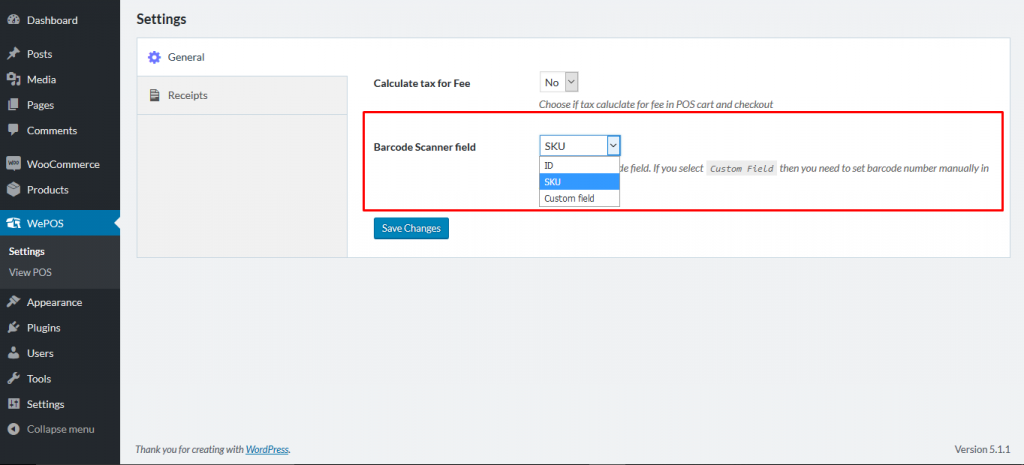
Don’t forget to click ‘Save Changes‘ after selecting the fields.
Enabling Tax: We have not introduced any feature in tax, rather we have used the tax feature of WooCommerce. Check out this documentation to know how to enable tax.
Step 4: Set Custom Field in WooCommerce for Barcode
You can set a custom unit for any product for a barcode reader. Firstly, choose ‘Custom Field’ from wePOS. Then follow the steps below-
Navigate to wePOS → Settings → Barcode Scanner field → Custom fields → Save Changes
The next step is selecting your products and setting the barcodes. When you are adding new products, you can do this as well.
Navigate to Products → All Products → Select products
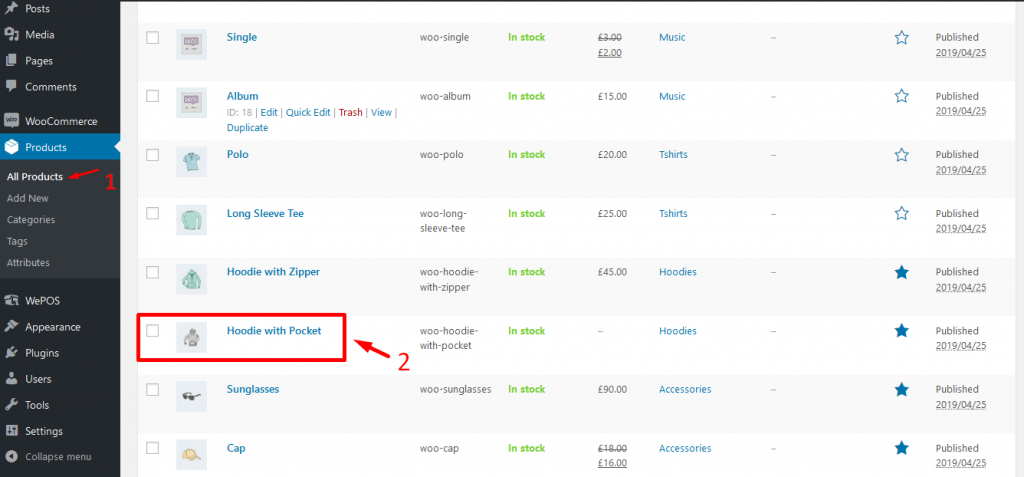
Now, a Product Edit Page will appear. Front the product data field you can set the custom barcode unit for that product.
Product data → Barcode → input unit for this product → Click update

Note: For the wePOS free version ” Receipt Settings” option appear here. In the wePOS premium version, you will find the Receipt Settings in the main menu.
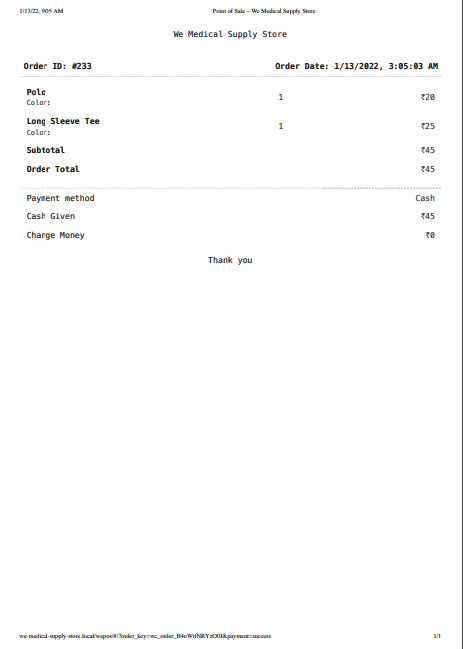
Step 5: Receipt Settings
If you want to add any note or essential information to the receipt paper, follow the sections-
Order Receipt Header
In this section, you can add your store information like Store name, address, mobile number, and so on.
Order Receipt Footer
On the footer, you can write any comment or news you want to spread among your customers.

Here’s the final output of your Receipt.
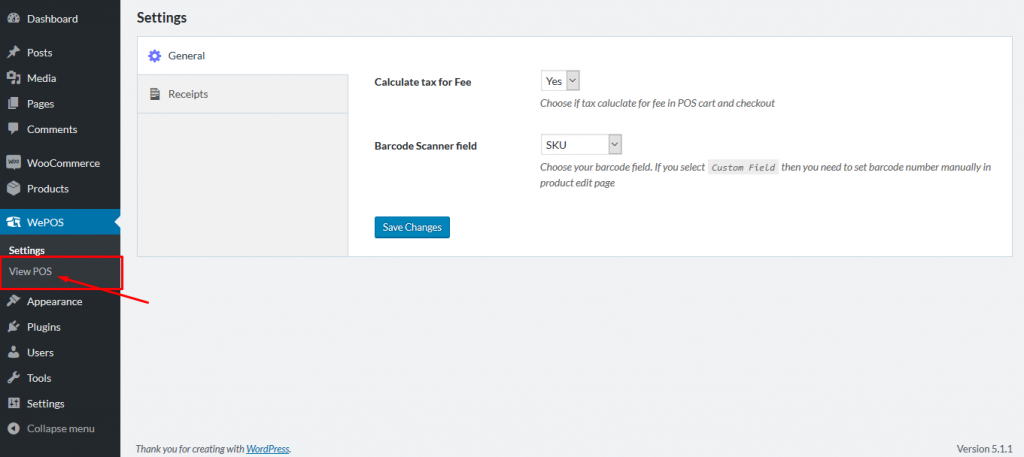
Step 6: Add Products
From the wePOS dashboard. Click ”View POS” to check the dashboard.
Now, a new window will open. You can view the product in a list or grid mode. For grid view, just click the grid icon beside the list view.
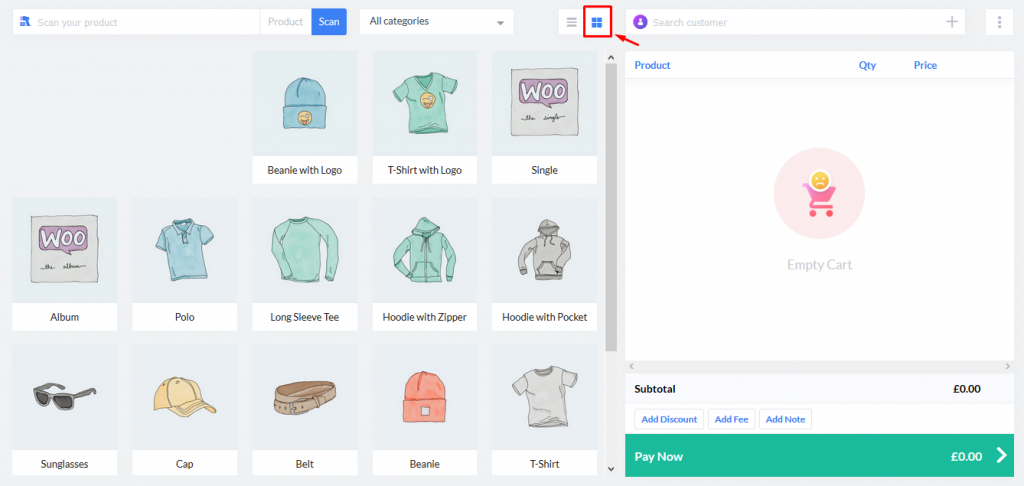
Come after the documentation to add your products in wePOS.
Step 7: Cart Management
View the cart of wePOS by following the steps
Navigate to – WordPress Admin Dashboard → wePOS → View wePOS
The frontend cart of wePOS will open. Managing the cart will be easier than before.
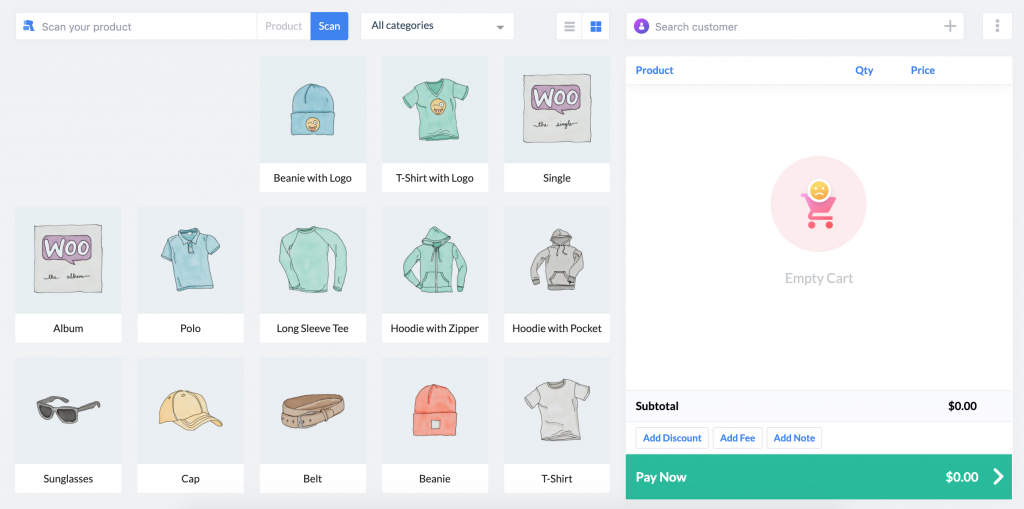
Check out the whole cart management process with wePOS.
Step 8: Checking Out
After adding products and customers click on the Pay Now button.

A checkout page will appear here. It will display the summary of your sale and total amount.
For navigating the Checking Out process go through the documentation.
This is how to build a POS system with wePOS plugin.
12 Must-Have Features in Multifunctional POS System
Before owning a POS you must look out for some crucial features. For your convenience, we have gathered some of them that will assist you at the checkout counter.
1. User Accounts and Access Permission
It is hard to maintain the sales checkout for a single person. In that case, you have to keep 2 or more people. If you want to track sales from each person then there should be individual user accounts.
The system you will use must ensure password protection for each user. Depending on your business type you can set the logged-in time and other restrictions.
2. Mobile Registers Facility
You must search for a cloud POS system that has a mobile app. So, you can maintain the software on mobile devices. If you want to ring someone in the store and prevent queues then mobile registers are for you. The advanced one will assist you to build pop-up shops.
3. Customer-facing Display
A display facing the customers increases the transparency of your shop. And, your POS system must have it. Buyers will watch how the transaction is happening. They can point out if there are any mistakes between the product calculation or price estimation. You won’t need that much budget, a clear view display will be enough.
4. Diverse Payment Gateways
Traditional payment methods like cash and credit cards are available in every shop. Choose a POS system that allows mobile payments. In case your purchasers want to split the payment through gift or other cards. Make sure you are capable of it through your POS system.
5. Return and Refund Facility
The success of your store depends on how you treat your customers after the product purchase. Shopper-friendly policies pull the consumers so easily. That’s why your POS system must create ideal return and refund approaches. Flexible options for product return and money refund facility will make more customers.
6. Inventory management
As you are managing a shop with a huge range of products then an inventory will save your time and make your deliverability fast. Whether you own 10 or 10 Million products your inventory will suggest the exact good for your customers. Inventory management is the next component that is a must-have feature for your POS.
7. Bulk Product Import Capability
This feature is related to your inventory management. If your retail management system doesn't allow bulk upload then it would be tedious to upload products manually. Proper goods uploading ensures easy navigation through your inventory.
8. Barcodes Facility
Make sure whatever retail management system you are going with is able to print barcodes. Plus, all of your products are trackable and tagged properly. Basically, barcodes assist the inventory system to find out where the item is. It not only helps to track when you are selling goods. Barcodes scan when any item ventures into your stock or ships it to another shop.

9. Transfer Stock Products
Suppose, you may have multiple physical stores, in that situation, stock transferring will be necessary. Your POS system must be capable of transferring stocks between store to store.
10. Easy Discount or Promotion Update
During festival season or special days, you will definitely run promotional activities like- Black Friday or Cyber Monday. Most of the time shop owners provide huge discounts. It will be hard if you update the discount price manually. The retail system should have the potential to update the price when instructed.
11. Dashboard for Overview of Your Shop
A dashboard provides a bird-eye view of your store that shows how everything is going on. This feature is a necessity for the owner as she or he can check the performance of the shop. Moreover, it helps to make data-driven decisions for the next update.
12. Proper Reports of Product, Employee & Clients
The reports of the entire store ecosystem assist an owner to know the situation. Firstly, the stock information is mandatory, it will indicate the worst and best-selling product, mention the most selling items, seasonal best selling product, and more.
Secondly, the evaluation data of store staff. List of top performers, who are fulfilling the sales target, and the employees who need improvement. Employee reports make sure who needs some assistance and who should be rewarded.
Lastly, your retail management system should provide the information about the clients who purchase the most. You can surprise them on special occasions and turn them into loyal customers.
Introducing wePOS- The Multifunctional POS Transaction System
For both small and medium WooCommerce retailers wePOS is a great solution. Mainly, it is a web-based POS system. With this WordPress plugin track real-time inventory and manage the orders of your store.
wePOS is particularly manufactured for WooCommerce. That means you can manage an online shop without any hassle. Just connect it to the store with official WooCommere and wePOS API.
Therefore, you can straightly attach it to your WooCommerce database. The biggest relief is you don’t need any third-party software for making a bridge. Moreover, you will not face any store data syncing challenges, any difficulty, or extra fees.
Let’s explore the features of wePOS to know the nitty-gritty details.
1. Based on REST API
wePOS is a single-page WordPress plugin that works smoothly. Where a manual POS system can not work fast and keep a long customer queue, wePOS can manage your inventory with lots of clients like one-way tickets.
2. Outstanding User Interface
Attractive and user-friendly UI assists to work fast, and wePOS has that feature very well. Navigation is easier for intuitive design. Inventory management will be done in an organized way.
3. Outlet and Counter Management
With wePOS, unlimited outlets and counters are manageable. All the outlets can be managed individually and have multiple agents for doing the job separately.
4. Your Cashier will Take care of the Orders
Keeping the privacy of your store in mind, wePOS has the option to create and assign cashiers on multiple outlets for each counter. Only the assigned cashiers will get access to the counter where you have assigned them. There is no doubt, that you can now have a secure payment on your store.
5. Reliable Login Panel for Cashiers
Cashiers can log into the system with the given credentials. They can watch the frontend and don’t have any access to the backend. wePOS works really fast which provides the cashier with an efficient process to increase productivity.
6. Straightforward Operating and Customization
Setting up your inventory and managing the whole process is super easy in wePOS for eCommerce owners. Your cashiers don’t require any training to understand the environment.

7. Advanced Receipt Builder with White-label
The style and every nitty-gritty detail can be changed in your invoice as you want. The white-label feature ensures you can make the POS system just your own.
8. TAX Calculation Added
Calculating TAX for your sales is tedious. No worries, when you are with wePOS, the TAX feature will assist you to evaluate the TAX and VAT.
9. Multiple Live Cart Management
Cart management can be a hassle when there are a bulk of orders in the queue. In that case, the Live Cart Management feature can be handled at the same time. That means you can initiate multiple clients' checkout processes. Moreover, you will not lose any data.
10. Advantageous Payment System
The payment system of wePOS is supportive whether your customers want to pay through cash, cards, and all other renowned payment gateways.
11. Shortcut Support
Shortcut Support key feature assists you to use the wePOS features quickly. For any physical store, it is necessary.
How Does a POS System Work at a Small Business?
Modern POS systems operate with computers, tablets, or smartphones. A POS system can work wherever your clients are. It can accept payments quickly if you have a stable internet connection. Let’s see the whole process of a POS system.
- Customer Decide to Purchase Product: A customer settles to buy products from your store.
- Cart Checkout Process: Then they will ask the sales executive to calculate the items and make the bill. The associates will scan the bar codes to figure out the price of the product from store inventory. In online stores, this process happens when customers click the check out button.
- TAX and VAT Calculation: After figuring the price, the POS system will add the TAX and VAT automatically before calculating the final amount.
- Payment: Customers now pay according to the bill through cash, card or other possible payment gateways for eCommerce stores.
FAQ on Multifunctional POS System
Answer: You will get a huge range of capabilities from a feature-rich POS software. Like-
– Billing and order processing
– Sales monitoring and reporting
– Inventory tracking
– Returns and refunds policy
– Store overall analytics
– Mobile device connectivity
– Cashier profile management
– Customer data management
– Employee management
– Loyalty programs
Answer: The main functionality of a POS system is to accept payments from the customers and track the sales. If you can set up your POS system, then you will get accurate sales reports, employee reports, and customer data.
Answer: There are some ways from which the FREE POS company gets money. One possible way is through the fees of credit card transactions. The POS company will cut fees from every transaction if it acts like your processor.
Answer:
– Multichannel POS systems
– Open-source POS systems
– Self-service kiosk POS
– Mobile point-of-sale systems
– Tablet POS systems
– Terminal POS systems
– Online point-of-sale system
– And more
Answer: One of the best POS systems that integrate with WooCommerce is Shopify.
Final Verdict on Multifunctional POS System
When you want to provide your customer with a smooth check-out process and manage your online business without any hassle, you must use an EPOS system. If you are not getting the expected sales from your eCommerce business then don’t hesitate to pick wePOS multifunctional POS system.
The updated features of this eCommerce POS system will assist you from purchasing to checkout state. Moreover, unlimited inventory and cart management lets you handle the crowd of customers within a short time.
If you have queries on how to build a POS system then we highly encourage you to drop your precious comment below.
Good luck with your online store!