
When and How to Use an Open Source POS System for WooCommerce Stores
An EPOS system is an Electric Point of Sale software that increases sales, productivity, and saves time simultaneously. It works as a till of the business that enables you to speed up customers serving rate through the fastest checkout, processes transactions, and manages inventory all on one device. You can even create your own loyal customer base by analyzing the sales reports provided by your EPOS system.
So, if you have a retail business, using an open-source POS system will be a bold move. Utilizing all the features of an EPOS system you can stay ahead of your competitors. But the question is which one to use and how to make the best use of it.
To guide you in this situation, today, we are going to share with you the best open source POS system and a tutorial to use it. So, keep reading this blog to unveil everything about an EPOS system.
Benefits of Using an Open Source POS System for Your WooCommerce Store

The main benefit of using an EPOS system that retail business owner finds is the flexibility. It really simplifies the customer processing system in a hassle-free automated way. Apart from this benefit, it is liable to –
- Ensure Your Customer Satisfaction
- Manage Your Inventory with Ease
- Analyse Sales Report for Better Business
- Save Your Time and Money
- Create Your Loyal Customer Base
Out of the many benefits of using an EPOS system, here we have only mentioned the top 5 benefits that are really crucial to run a successful retail business. Now let's take an in-depth look at each of these points.
1. Ensure Your Customer Satisfaction
Waiting time is maybe one of the most annoying things for your customers. Every business wants satisfied customers, right? For this reason, EPOS systems run in order to make the buying process faster and to limit the queue in front of the cash registers.
With an EPOS system scanning products and taking payment transactions now only takes a few seconds. Hence, customer checkout speed has been verified and confirmed to be a key factor for customer satisfaction.
Again, whether you’re running a retail business or a restaurant, you need to be able to give your customers accurate information about product quality and availability. EPOS systems hold real-time inventories, so you can perform a quick stock search while you’re standing with the customer. You can also order items directly from your supplier, and then tell the customer when their purchase will be available for collection.
So, with EPOS systems, your business can focus on efficiency while at the same time making your customers happier and more satisfied.
2. Manage Your Inventory With Ease
Inventory management becomes easier than ever before. Every time a customer purchases a product, the inventory records on the system are updated immediately. Whether a sale is scanned or inputted manually, the system’s database updates stockholding records accordingly.
This way, by monitoring product turnover you will be able to track the number of products sold and when inventory needs to be restocked. In addition, according to the data that you collect through the system, it is possible to design a plan for the arrangements of goods within the store.
An open-source POS system provides an accurate picture of your stock levels at any given time. This helps you to get real-time data that ensures you’re not holding more stock than you need. Based on current and historic sales data, EPOS makes ordering suggestions to ensure you’re not losing money through unnecessarily bloated inventories or stock shortages.
3. Analyse Sales Report for Better Business

As mentioned earlier, EPOS systems record all the sales data. The related information is usually supplied in the form of reports, graphs, and charts. Tax rates and income levels are calculated automatically and saved in the system. Moreover, most of the EPOS systems usually work with cloud-based software, so all the information is stored and traceable on a daily, weekly, monthly, and yearly basis.
Modern EPOS system provides you with sales analysis by the hour, category, employee, or product. This might allow you to identify your business periods, or it could be used to track staff performance. Or you can use the reports to track the performance of new or promoted products as well.
All these data help you to make more data-driven decisions that would help you to launch better business strategies and ultimately make your business profitable.
4. Save Your Time and Money
Getting started with an EPOS system is super simple, you can literally get set up and running in a matter of minutes. Not only that, you will be able to sell quicker, you’ll need less staff to do the same job, allowing you to save on overheads.
All these mean significant cost-cutting capacities and granting the opportunity to invest the money saved in other areas of your business. It has become clear that implementing an EPOS system can support company growth and business performance improvement.
5. Create Your Loyal Customer Base
Creating a loyal customer base is not only important to increase the sales rate but it also helps to increase brand awareness. Positivity like word-of-mouth marketing can really help you to get more customers through your loyal customers. Moreover, your loyal customers will keep coming back to you if you can ensure quality.
“The probability of selling to an existing customer is up to 14 times higher than the probability of selling to a new customer.”
An EPOS system now has built-in loyalty and customer management schemes. These, in many cases, will be more sophisticated for tracking customers' data than the antiquated card schemes that many small retailers still use. Then you can utilize that data to find out their buying tendency.
Based on that data, you can launch discounts and promotions for every customer according to specific habits and tastes. This will make them believe that you are thinking about them and thus they feel special and will keep coming back to your store.
Related: 10 Ways to Increase Your Sales Using A Right eCommerce POS System
Best Open Source POS System for WooCommerce in 2021
Now, maybe you're thinking to use EPOS for your WooCommerce website. If so, let us guide you – which EPOS system you should use in 2021. Apparently, there are a number of EPOS systems available for WooCommerce, however, we have prepared this short list with only the best plugins that one could rely on without any hesitation. At first, take a look at our very short handpicked list:
- wePOS
- Oliver POS
- WooCommerce POS
Now, we will show you why we have chosen these plugins and what are their specialty. So, let's start with the first one from the list – wePOS.
1. wePOS
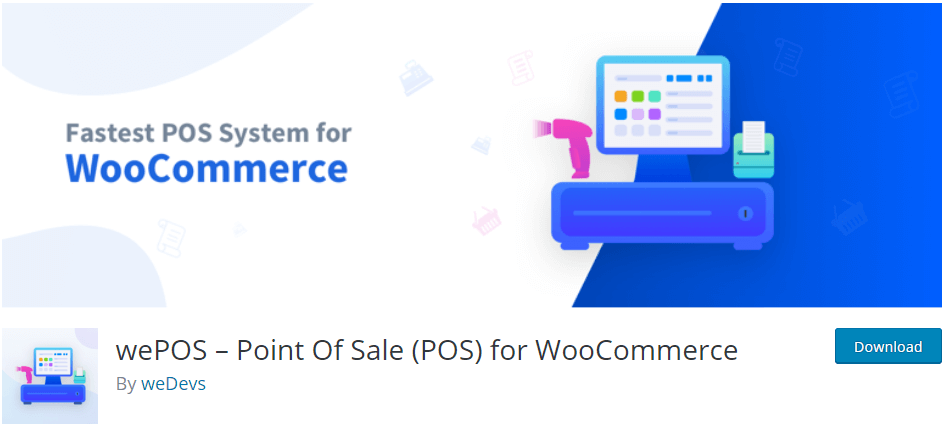
wePos is a dedicated WooCommerce Point of Sales plugin. It comes with an easy-to-use user interface and powerful features that let you take orders and track your inventory using your WooCommerce store.
This plugin is developed with WooCommerce REST API and some custom API that makes it super fast and responsive across devices like desktops and tablets. So, when you're dealing with a number of customers in your store, it could be handy by serving a fast checkout process.
wePOS does not gather any data by default. It starts gathering basic telemetry data when a user allows it via the admin notice. And then you can utilize that data for a better user experience.
Key Features of wePOS
- Lightweight, super fast, and easy to use
- Advanced UI design
- Custom barcode support
- Able to handle multiple orders at a time
- Easily integratable with your online and offline retail store
2. Oliver POS
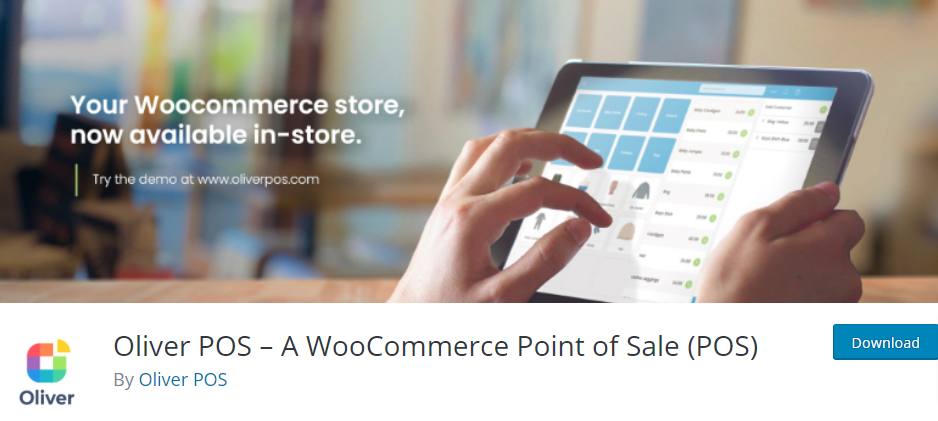
Oliver POS is one of the best free WooCommerce POS systems. It’s a web-based POS plugin designed specifically for WooCommerce and can be installed on WordPress. Oliver offers a free plan that includes unlimited transactions, customers, and products, with custom reports and a customizable register.
Though it was built especially for physical shops, Oliver POS allows for a consistent combination of eCommerce and physical brick and mortar stores. It also fully integrates your WooCommerce inventory into your POS register, so no manual syncing. Additionally, the support team is available around the clock, even for free users!
Key Features of Oliver POS
- Support for unlimited customers, transactions, and products
- Generate custom reports
- Customizable register
- Support around the clock
- Simple Interface
3. WooCommerce POS
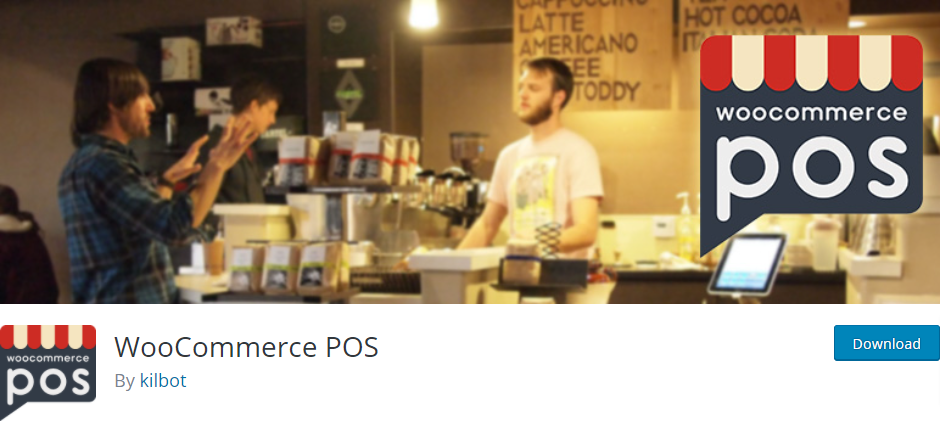
WooCommerce POS is another top-notch WordPress plugin for your WooCommerce store. It's a self-hosted system that uses the same database as your store. So, your inventory will always be in sync with all transactions.
This plugin offers barcode scanning, lets you control taxes, shipping rates, and enables you to edit your product titles and prices. Customers can also search for products, making their shopping experience quick and easy!
Key Features of WooCommerce POS
- Translatable into your native language
- Compatible with all browsers
- Quickly adjustable product inventory, titles, and price
- Add and choose a shipping method and set tax rate
- Create multiple stores with multiple tax rates and custom receipts
How to Get Started with an Open Source POS System

If you already have a WordPress-based WooCommerce website, it's only a few clicks away to get started with a POS system. To do so, you need to have the following things:
Step 01: Install and Activate wePOS
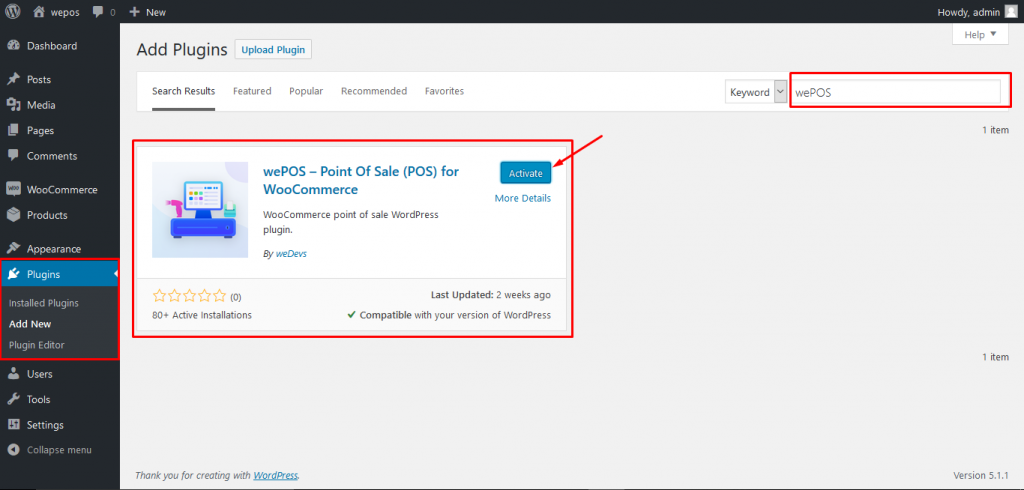
Follow the following steps to install and active wePOS-
- Login to the admin panel of WordPress.
- Navigate to Plugins > Add New
- Find wePOS by using the search box. Click Install. Once installed, click Activate.
Step 02: Configure wePOS
Before start using wePOS on your WooCommerce store, configure some crucial settings like tax, barcode, and order receipt. Let's start with the tax calculation.
Automatically Tax Calculation
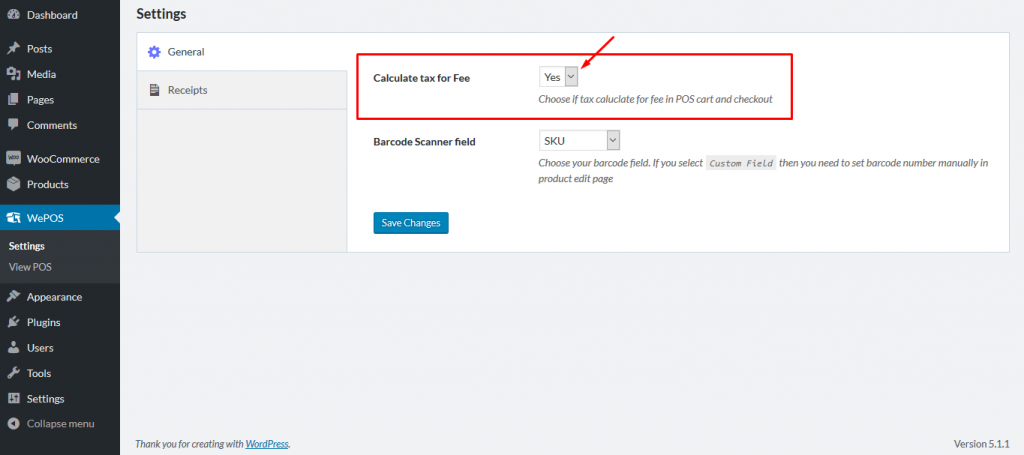
- Go to your dashboard > wePOS > Settings and choose ‘YES’, if you want to calculate Price with tax in the cart or checkout process.
- Choose ‘No’, if you want to calculate Price without tax in the cart or checkout process.
Barcode Scanner field
Choose your barcode scanner unit field to get correct product data when it will be scanned.
- Go to your WordPress dashborad > wePOS > Settings, then choose ID, SKU, or Custom Field.
- ID – If you use ID on products in the store.
- SKU – If you use SKU on Products in the store.
- Custom field – If you want to manually set barcode number for the products.
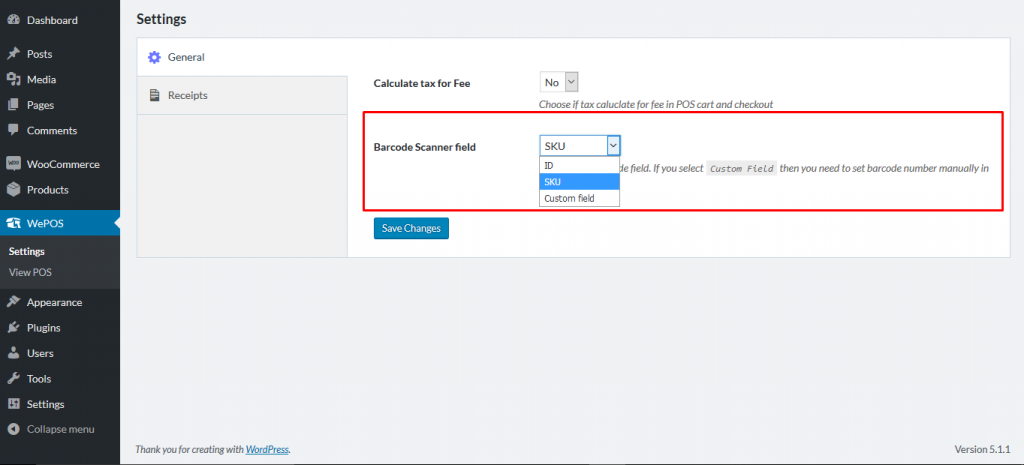
Click ‘Save Changes‘ after finish choosing.
How You Can Set Custom Field in WooCommerce for Barcode
To set a custom unit for any products for a barcode reader, at first, you need to choose ‘Custom Field’ from wePOS.
Follow the steps-
- Navigate to wePOS > Settings > Barcode Scanner field > Custom fields > Save Changes
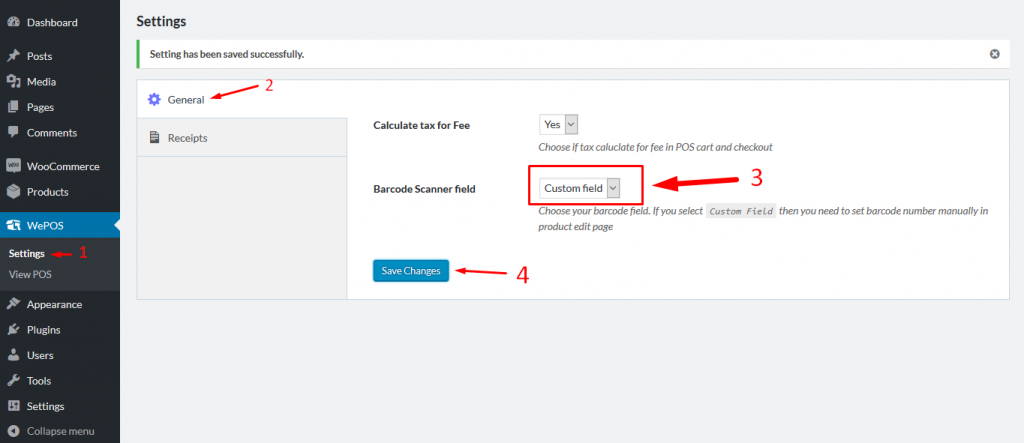
Now, you will select your products and set your barcode. You can also do that when adding new products.
- Navigate to Products > All Products > Select products
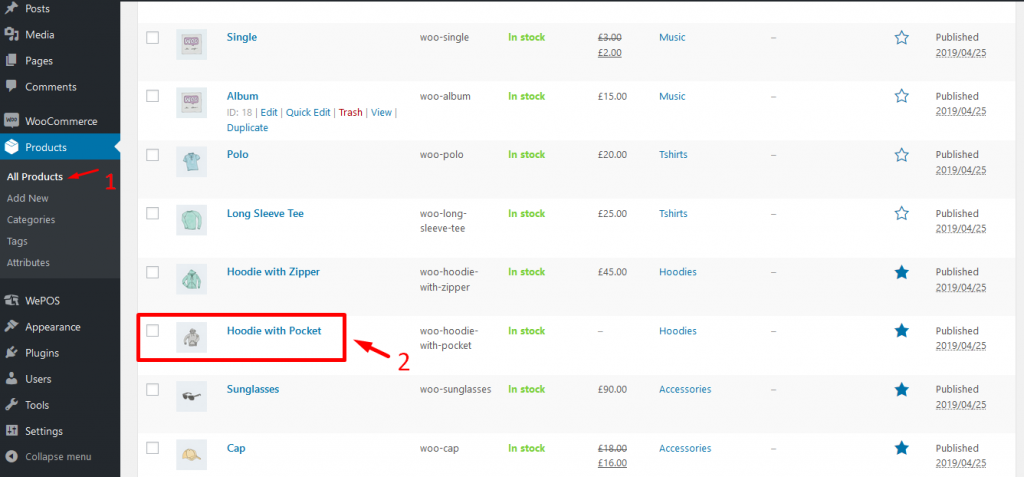
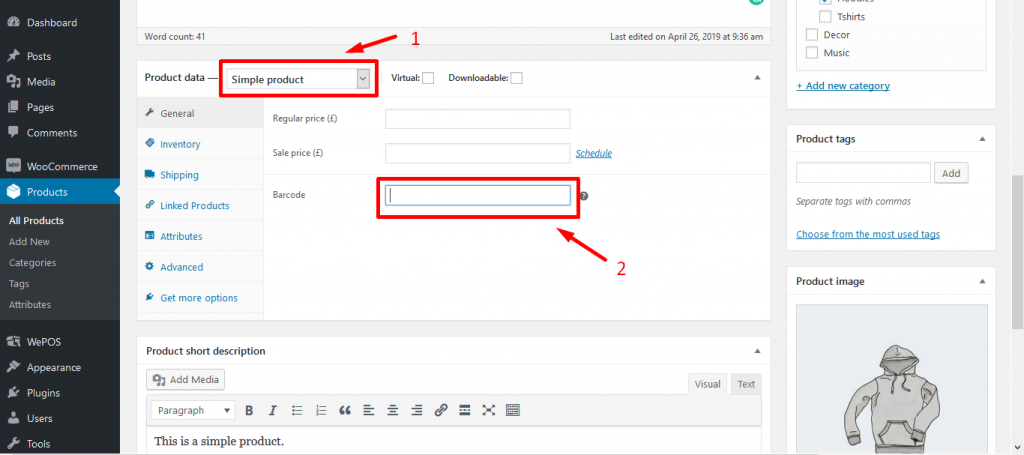
The Product Edit Page will appear now. Go to the Product data field to set your custom barcode unit for the products.
- Product data > Barcode > input unit for this product > Click update
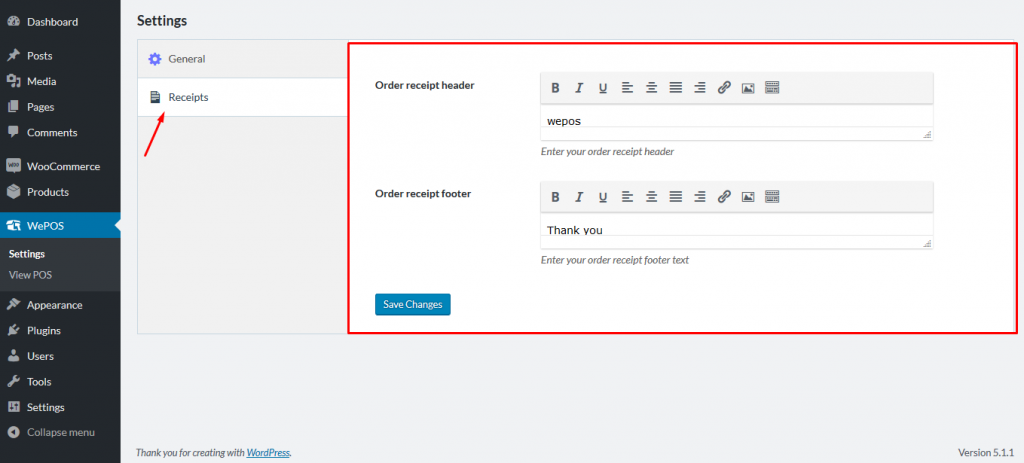
Order Receipt Settings
To write any information or note on receipt paper, use the following sections-
- Order Receipt Header: Write your store information or anything in this section of receipt paper. You can write your store name and physical address in this box. It will appear on the receipt.
- Order Receipt Footer: Write your store information or anything in this section for receipt paper. You can write any comments or information you want to say or share with your customer will visible on the footer of the receipt.
Step 03: Start Using wePOS
After configuring wePOS for your WooCommerce website, now it's time to start using the system.
To do so, you can follow our step-by-step documentation where we have shown how to use wePOS with ease.
Also, there is a blog on A Guide to Using a Point of Sale Software for Small Business. You can check this post as well to get the idea to start using wePOS on your WooCommerce website.
Use an Open Source POS System and Manage Your Business Professionally
If you want to manage your business professionally and give your customer a smooth checkout process, don't be hesitated to use an EPOS system for your business. Or, if you've already been using EPOS software for your business but not getting the expected outcome, it's time to change that software and choose the right one for you.
You can choose any of the above-mentioned EPOS software for you. All those are reliable and trusted by thousands of users. So, what are you waiting for?
If you have any further questions regarding an open-source POS system, you are highly encouraged to drop it in the comment box below. We would love to help you out. Good luck.

