How to Automatically Tweet When You Publish a New Post in WordPress
You create amazing content and publish it regularly on your WordPress site. But it's frustrating when your target audience is unaware of your posts.
To connect with your readers, you must share your content on social media, especially Twitter (rebranded as X).
With its massive user base, Twitter is an excellent platform for sharing your content and growing your audience.
As of now, Twitter (rebranded as X) has approximately 245 million daily active users worldwide.
Backlinko
However, manually tweeting each time you publish a new post can be time-consuming.
The good news is that you can automate this process.
In this blog post, we'll show you how to automatically tweet whenever you publish in WordPress. This will help you reach more people and save you time.
Why Automate Tweeting for Your WordPress Posts?
Before we dive into the “how”, let's talk about why automating your tweets for WordPress posts can be a game changer for you.
First off, when you post something new on your WordPress site, you want as many people as possible to see it, right?
That's where Twitter marketing comes in. It's a fast-paced platform where users are always looking for fresh content. By automatically tweeting about your new posts, you ensure that your audience gets notified right away.
Think about it: when you share a new article or blog post, it's like throwing a party. You want to invite everyone! But if you only send out invites once, many people might miss it. By tweeting your posts, you create multiple opportunities for people to see what you've shared.
Why Automate Tweeting?
Boost Engagement: Every new post is instantly shared with your followers.
Maintain Consistency: Automated tweets keep your presence steady on social media.
Save Time: You can focus on creating great content instead of manual promotion.
Plus, Twitter's algorithms work in your favor. The more you tweet, the more exposure you get!
Communication is key here. Engaging with your followers shows that you care about their interests. When you tweet your new content, you're not just promoting yourself. You're providing value to your audience. You're informing them there's something new and exciting to check out.
Automating your tweets saves you time, too. Instead of logging in every time you publish a post, you can set it up once and let it run. This way, you can focus on creating more great content while your automated tweets do the work of spreading the word.
In short, automating your tweets helps you reach more people, keeps your followers informed, and saves you time. It's a simple way to boost your online presence and connect with your audience.
How to Automatically Tweet WordPress Posts on Twitter

You can automatically tweet from WordPress using several methods. Below you'll find these methods to set up automatic tweeting for your WordPress posts:
- Use WordPress Plugins
- Use IFTTT (If This Then That)
Method 1: Use WordPress Plugins to Tweet WordPress Post
There are many dedicated plugins that help you automate tweeting when you publish new posts.
Here are some of our recommendations:
- Revive Social: This WordPress plugin allows you to automatically share both new and old content on social media platforms. You can use the plugin to schedule posts and share them on various channels like Facebook, Twitter (now X), and LinkedIn. It operates as an autopilot to maximize your content's visibility.
- XPoster: XPoster, previously known as WP to Twitter, is a powerful automation tool designed to seamlessly share your WordPress posts on Twitter and other social media platforms. With this plugin, you can schedule posts, customize your messages, and track engagement metrics.
- Social Media Auto Publish: This plugin simplifies the process of sharing blog content across multiple platforms without manual intervention. You can also customize your tweets & choose which post types to share.
For today's tutorial, we'll use the plugin “Revive Social”.
Let's explore how to use the Revive Social plugin to automatically tweet your WordPress posts on Twitter. Here are the steps you need to follow:
Step 1: Install the Plugin Revive Social
First, log in to your WordPress site. Go to your admin dashboard and click on “Plugins” from the left sidebar. Then, select “Add New”.
In the search bar, type “Revive Social”.
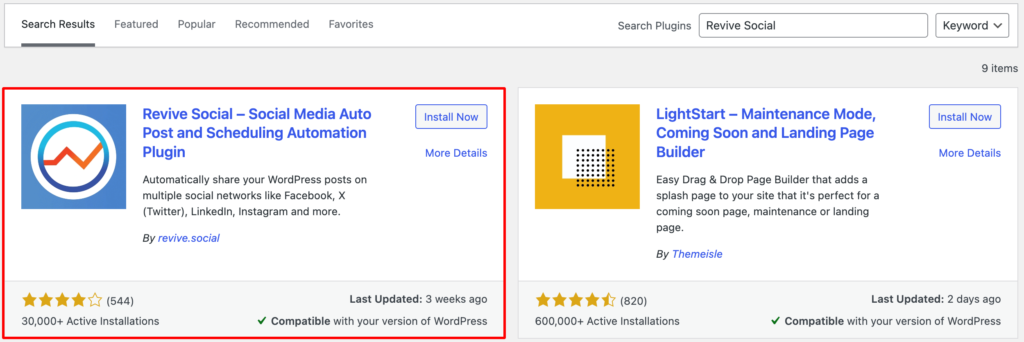
When you find it, click “Install Now”. After it installs, click “Activate”.
Step 2: Connect Your Twitter Account
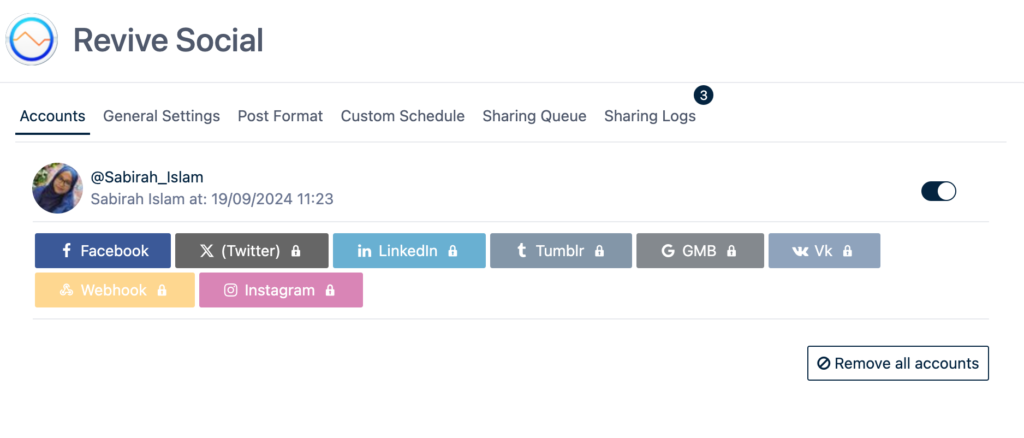
Next, look for the Revive Social option in your dashboard menu. Click on it to open the settings.
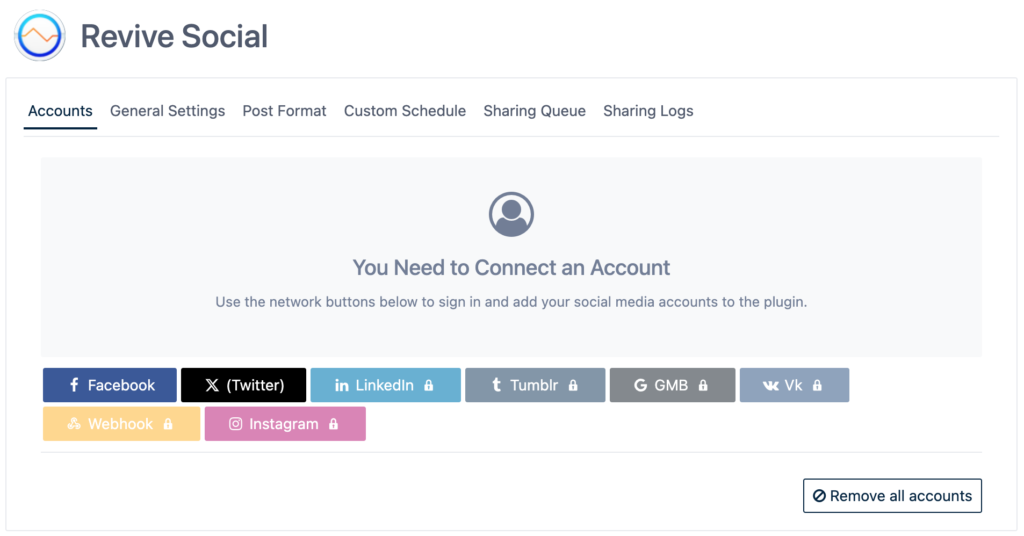
Here, you'll see an option to connect your Twitter account. Click the button to authorize access. Then, you need to follow the prompts to log in to your Twitter account and grant permission.
You have to enter API keys from your Twitter developer account.
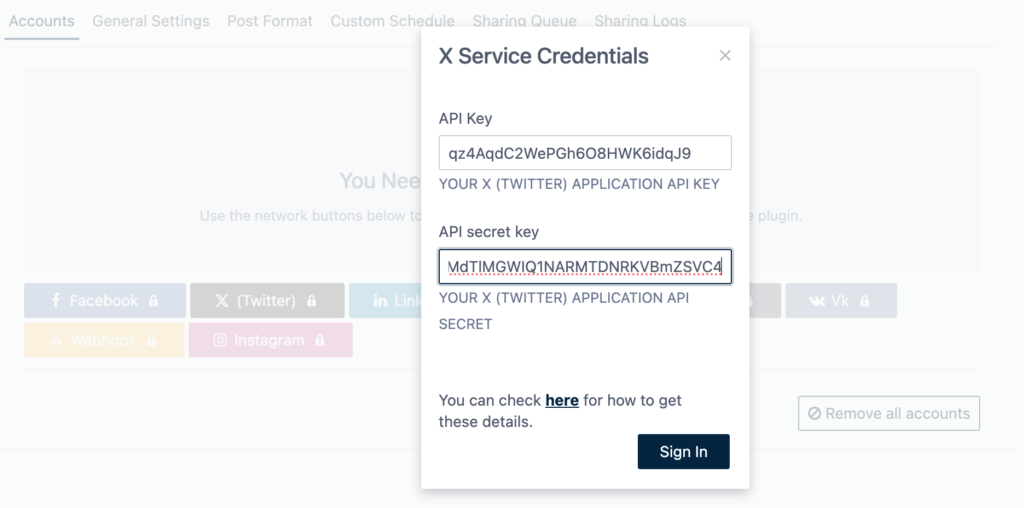
The plugin will guide you on how to do this. After authorization, your Twitter account will be connected to the plugin.
Step 3: Configure Your Plugin Settings
Now that your account is connected, it's time to customize your tweet settings.
Go to the General Settings tab and select what types of content you want to share (e.g., blog posts, pages, products).
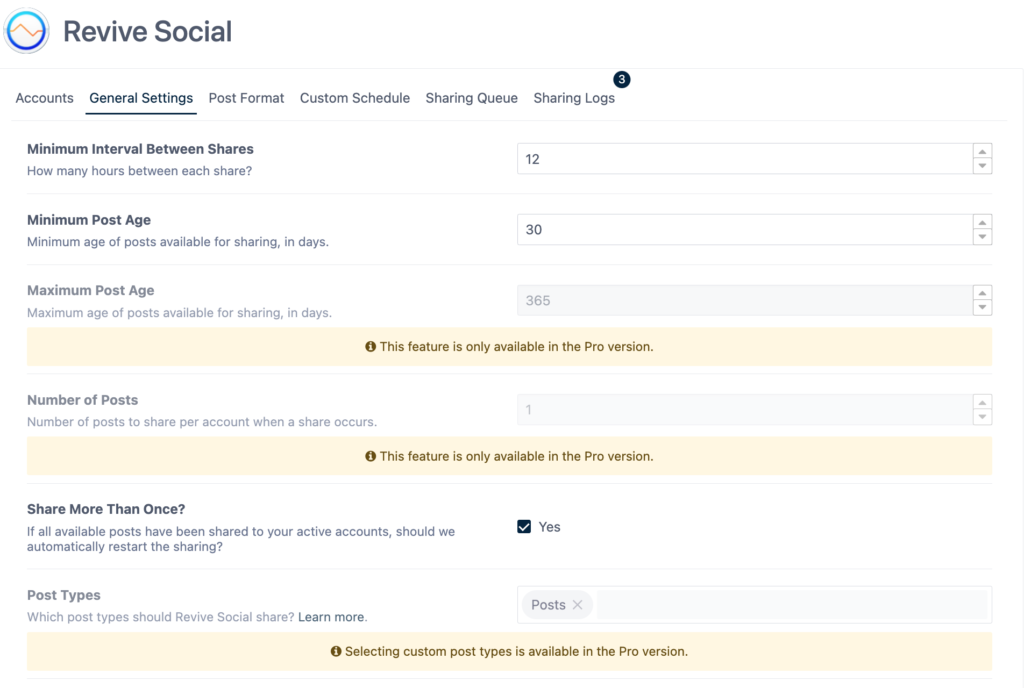
Here, you can choose the time interval between tweets. You can set how often you want Revive Social to share your content automatically. You can also choose to exclude specific categories or posts from being tweeted.
Note: As you can see, some options are reserved for pro users. To enjoy all the exclusive features, you need to buy Revive Social Pro.
Step 4: Customize Your Tweet Content
In the Post Format section, you can choose what your tweets will look like. You can include:
- Post Title
- URL (shortened automatically)
- Hashtags (either from categories/tags or custom ones)
- And others
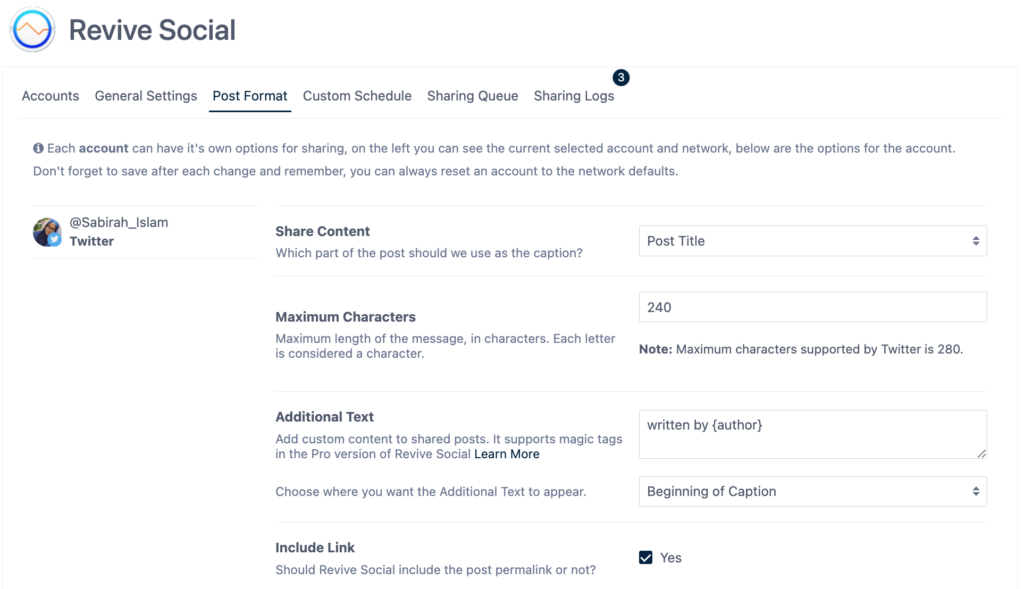
After configuring your settings, make sure to save your changes.
Step 5: Publish Your Post
Now, whenever you publish a new post on your WordPress site, Revive Social will automatically tweet it to your connected Twitter account based on the settings you've chosen.
Go to “Posts” and click “Add New” to write your latest article. Once you're satisfied, click the “Publish” button.
Don't forget to give the check mark under the section “Revive Social”
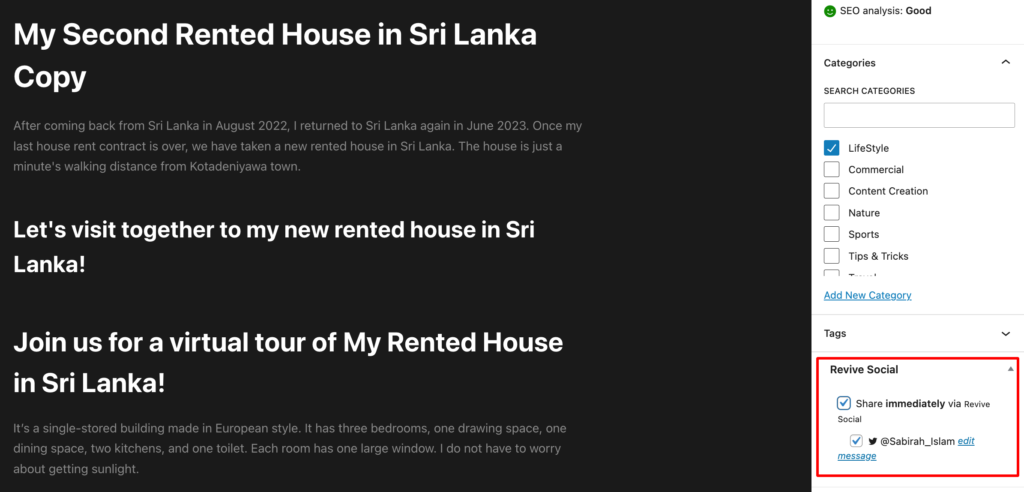
After a moment, check your Twitter account. Your new post should be tweeted automatically!

It's better to try different time intervals, tweet formats, and hashtags. Monitor the results through Twitter Analytics or Google Analytics to see which settings drive the most engagement.
Even though tweets are automated, remember to engage with your audience by responding to comments or retweets.
Method 2: Use IFTTT (If This Then That) to Automatically Tweet WordPress Post
You can use IFTTT (If This Then That) to automatically tweet every time you publish a new post on your WordPress blog.
IFTTT is a web-based service that allows users to create conditional statements or applets. These Applets enable users to automate tasks and actions across different platforms.
You need to create an Applet that triggers when you publish a post. It will automatically send a tweet containing the post title and URL.
Step 1: Sign Up for IFTTT
First, go to the IFTTT website (https://ifttt.com/) and create an account if you don't have one. You can sign up using your email or connect with an existing Google or Facebook account.
Note: It's a premium service. You need to buy a pro plan to use IFTTT.
Step 2: Create a New Applet
Once logged in, you can create and manage applets (automation recipes). Now, click on “Create” from the top-right corner of the homepage.
The applet follows an “If This, Then That” logic. This means you have to set two components:
“If This” (Trigger) – This will be the WordPress post.
“Then That” (Action) – This will be the Tweet action.
Step 3: Set Up the “If This” Condition (WordPress Trigger)
Now, click on the “If This” button. It allows you to choose your trigger service. Here, you'll find a list of services to choose from. Search for “WordPress”.
It's time to connect your WordPress site. You need to authorize IFTTT to access your WordPress account by providing your WordPress website URL, username, and password.
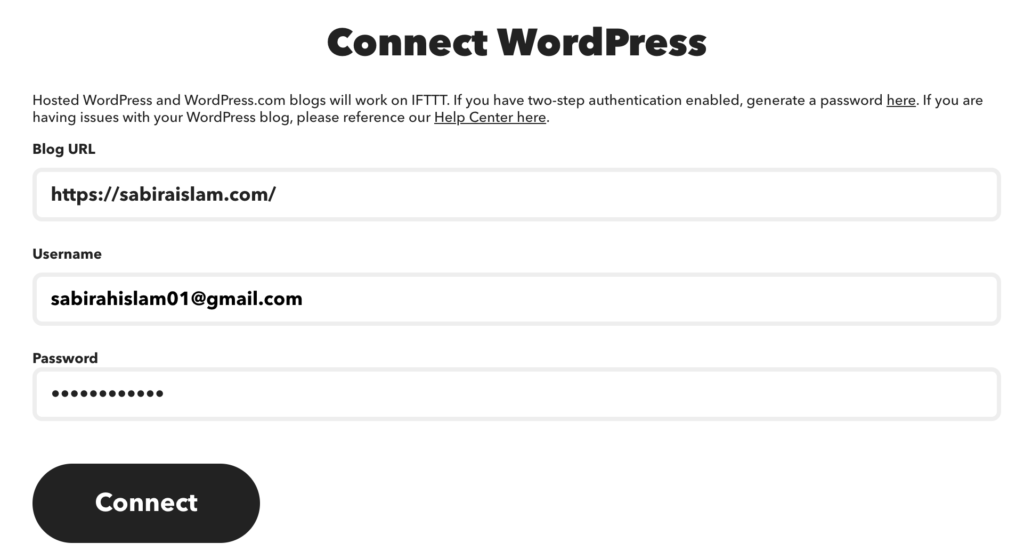
Once it connected, choose a trigger from WordPress.
“Any new post”: This will trigger the Applet whenever you publish a new post on your site.
“New post with tag or category”: If you only want specific posts (based on tags or categories) to be tweeted, select this option.
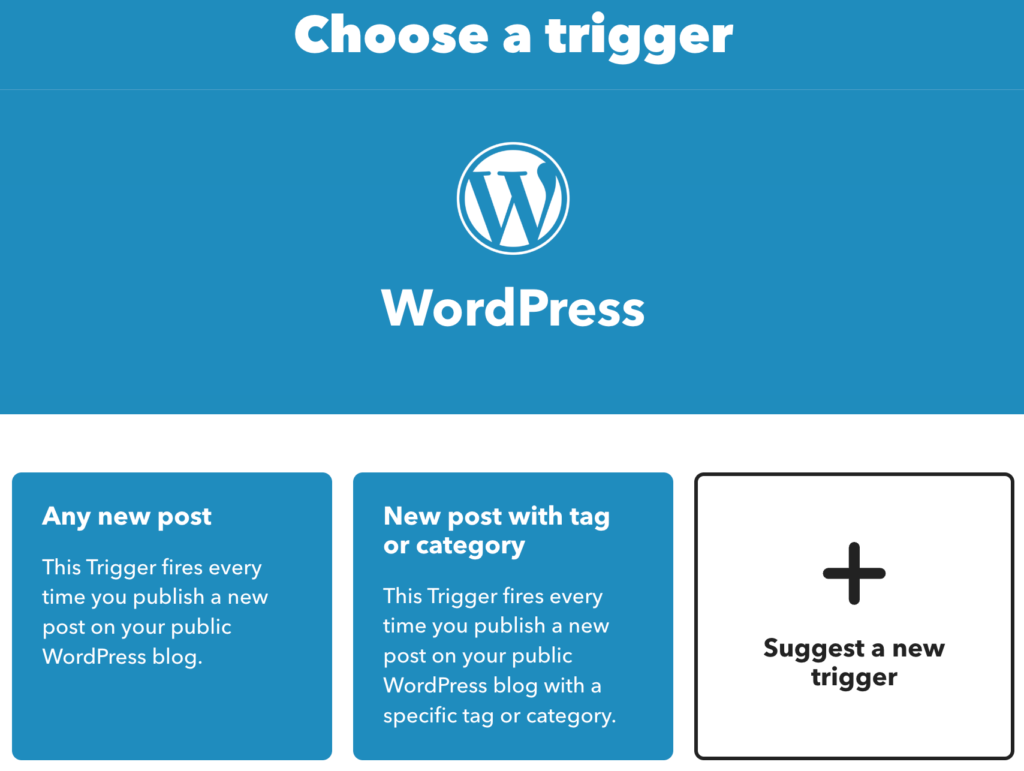
Here, we will choose “Any new post”. You can also suggest a new trigger as per your unique requirement by clicking on the + button.
Step 4: Set Up the “Then That” Condition (Twitter Action)
After selecting the condition for WordPress, it's time to move forward.
Click the “Then That” button to choose the action that should happen when a new post is published.
Search for “Twitter” and select the Twitter service from the list.
Now, connect your Twitter account. You must authorize IFTTT to access your Twitter account if you haven't done so already.
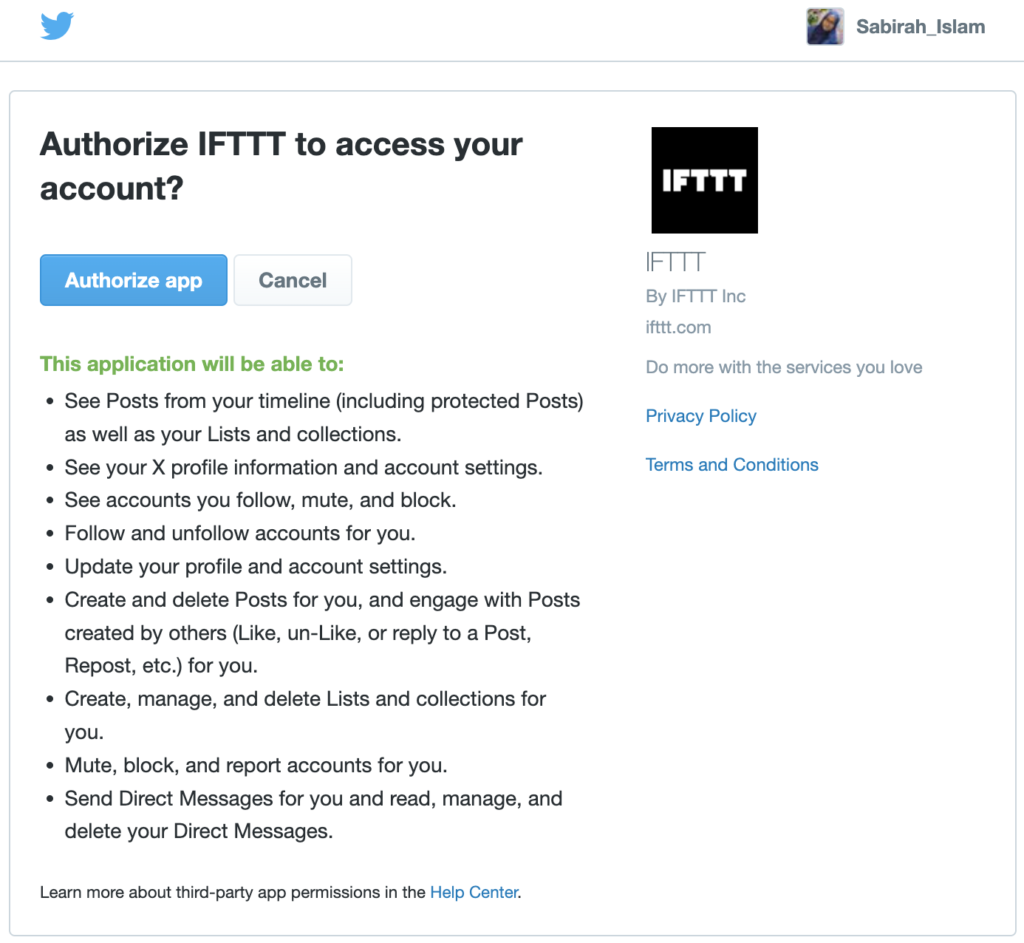
Then, choose an action that would be performed when you publish a new post on your WordPress.
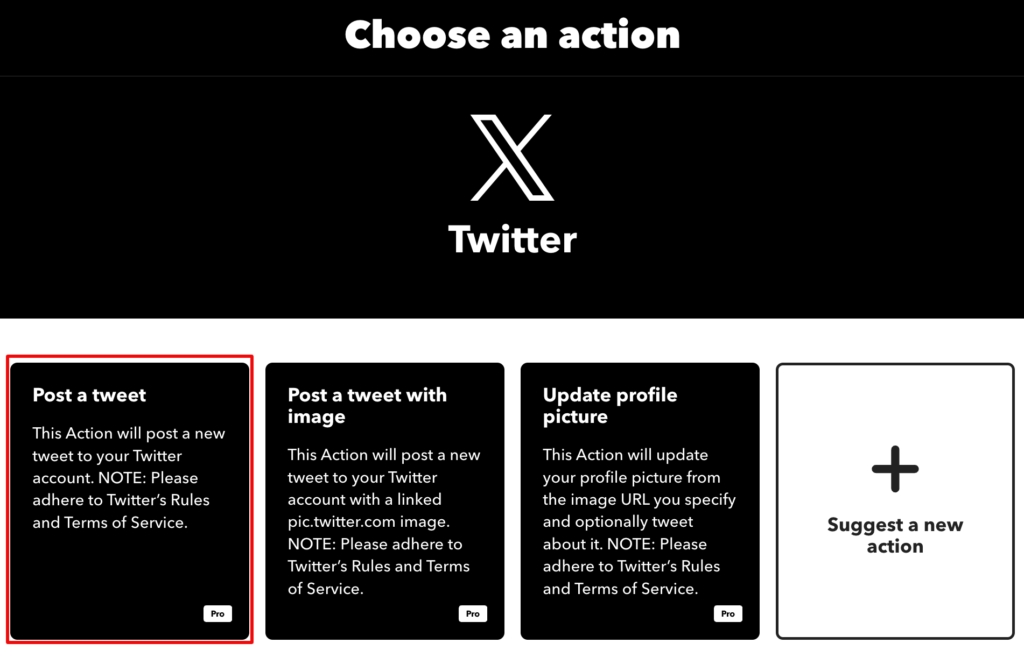
We've selected “Post a tweet”.
Step 5: Customize the Tweet
Once you've chosen the “Post a tweet” action, you'll be able to customize the tweet:
You can include dynamic content like:
{{PostTitle}}: The title of your WordPress post.{{PostUrl}}: The link to the post.
You can add some elements to it, like “New post: {{PostTitle}} – Read more at {{PostUrl}}”.
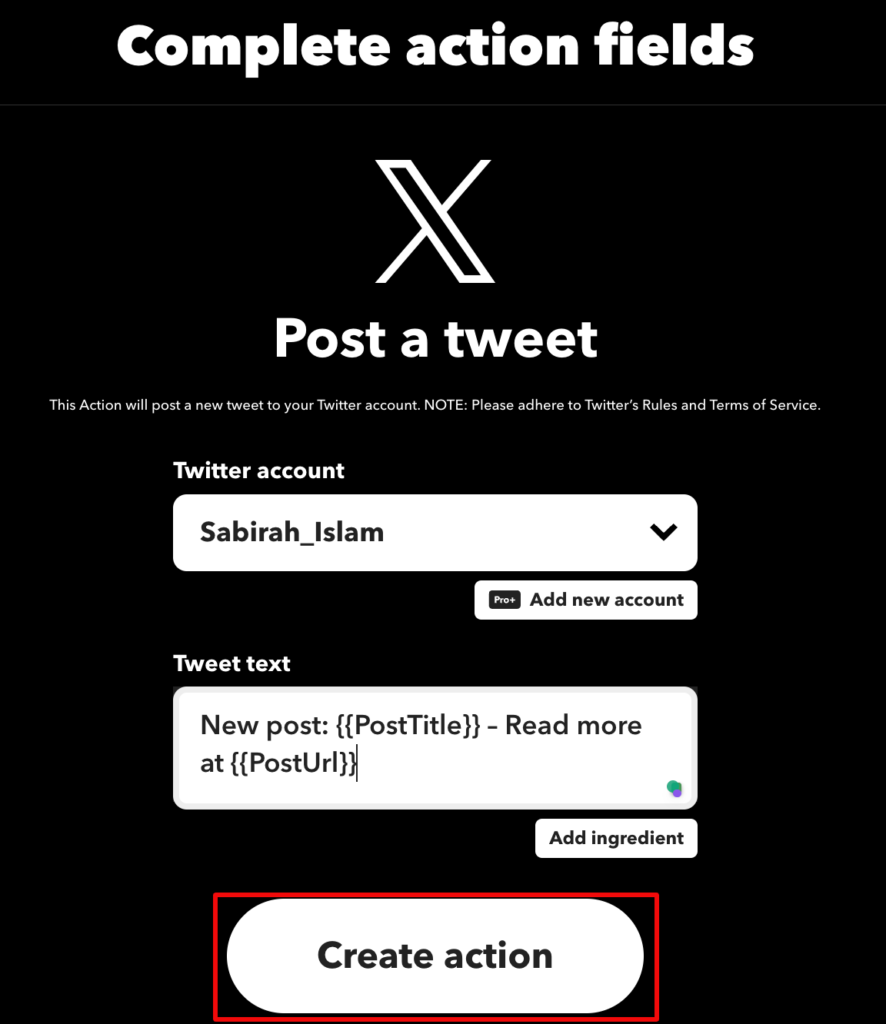
Finally, click on the button “Create action”.
It'll take you to the next page, where you can see the conditions you've set in previous steps.
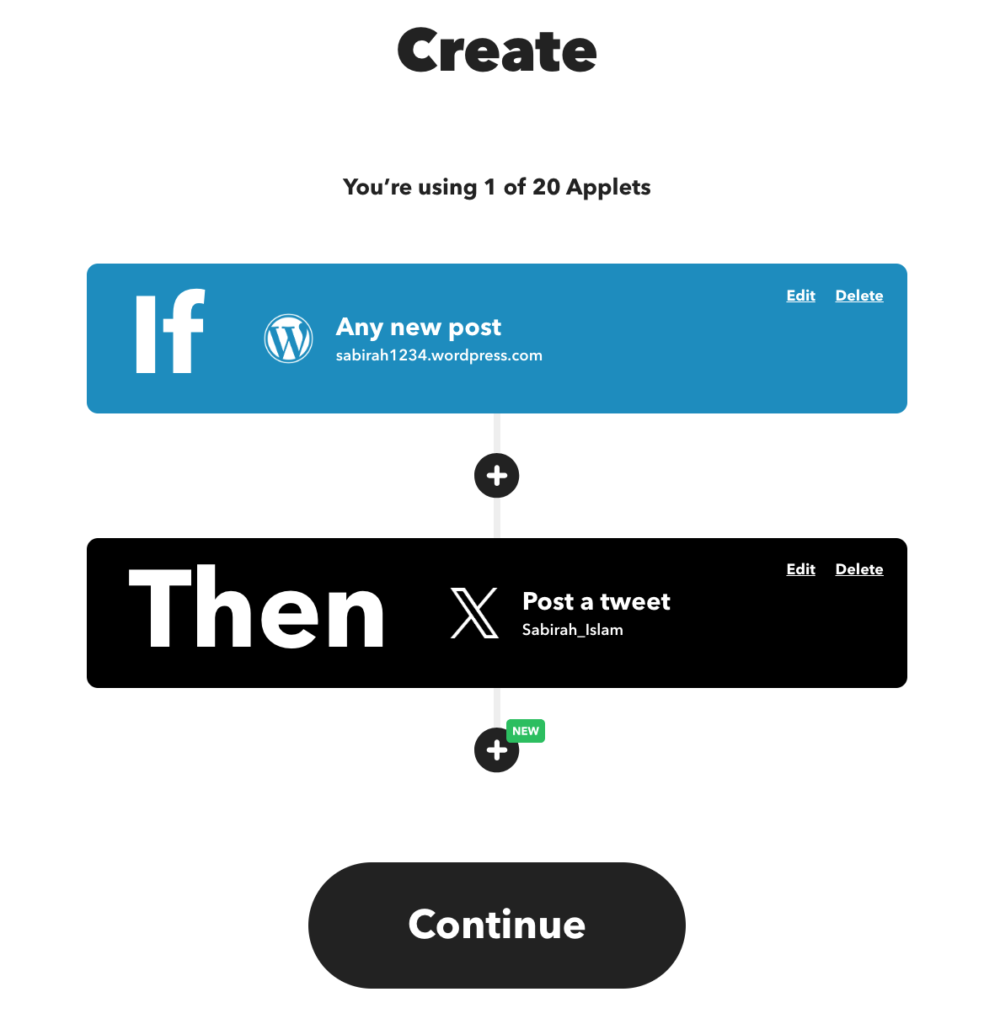
This configuration will automatically tweet the title and URL of every new WordPress post you publish.
Hit the button “Continue”.
Step 6: Finish and Activate the Applet
After configuring the applet, click the “Finish” button to save and activate the automation.
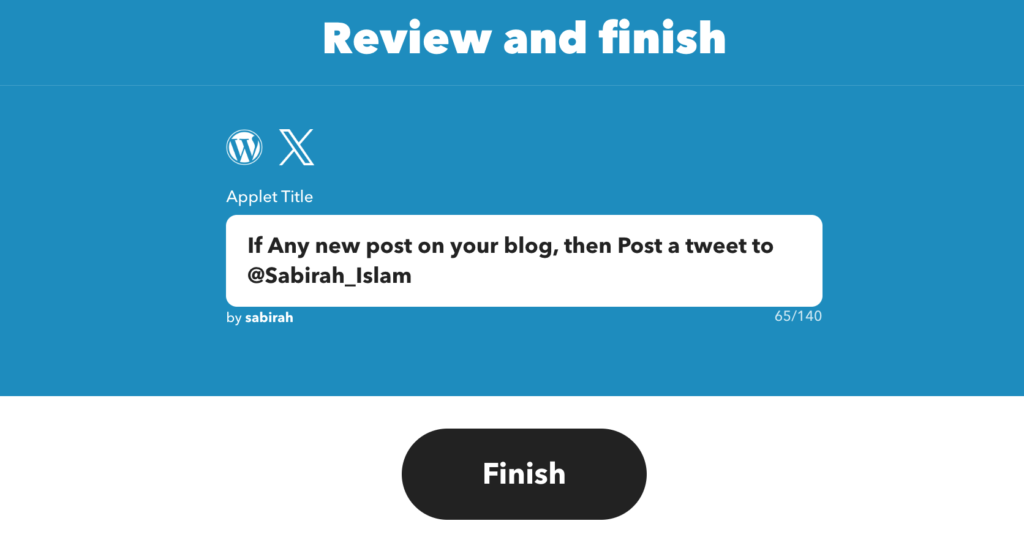
You can monitor the activity of the applet under the “My Applets” section.
To ensure everything is working, create a new post on your WordPress site. Once you publish it, check your Twitter account. You should see your new post tweeted automatically!
Besides sharing newly published posts, it's also important to share your old WordPress posts on social media. This allows you to reach new audiences who may have missed your content the first time.
Key Features to Look for When Choosing an Automation Tool
As there are several methods and different tools, choosing the right tool to automate your tweets can be a challenge.
You should focus on features that suit your needs. Look for a user-friendly interface, scheduling options, and analytics to track your performance. Integration with other platforms can also be a big plus.
Here are some key things you should consider:
- Ease of Use: Look for a tool that's simple to set up and use. You don't want to spend hours figuring out how it works. A user-friendly interface makes everything smoother.
- Integration with WordPress: Make sure the tool easily connects to your WordPress site. This way, it can automatically detect when you publish a new post and tweet it for you.
- Customizable Messages: Find a tool that lets you customize your tweets. You might want to add hashtags or a catchy line to grab attention. Personalizing your messages helps them stand out.
- Scheduling Options: Some tools allow you to schedule tweets at the best times for your audience. This can boost engagement since more people will see your posts.
- Analytics and Tracking: Look for features that let you track how your tweets are performing. This helps you see what works and adjust your strategy over time.
- Customer Support: Good customer support is important. If you run into issues, you want a team that can help you quickly.
- Affordability: Finally, consider your budget. There are plenty of tools out there, so find one that fits your needs without breaking the bank.
By keeping these features in mind, you'll be able to choose an automation tool that helps you get the most out of your tweeting.
You can uplift your social media marketing strategy with an optimized social media workflow. Check out this blog now.
Bonus: Best Practices for Auto-Tweeting Your WordPress Post
Now that you've set up automatic tweeting for your WordPress posts, it's time to make those tweets shine.
To make the most of your automatic tweets without annoying your followers, keep these tips in mind:
- Mind Your Frequency: Don't overwhelm your followers. If you publish multiple posts a day, consider spacing out your tweets rather than posting them all at once.
- Mix Up Your Content: Use your automation tool to share a variety of content. This could include:
- New blog posts
- Product updates
- Upcoming events
- User-generated content
- Use Hashtags Wisely: Include relevant hashtags, but don't go overboard. Two or three per tweet is usually enough.
- Engage Manually Too: Automation is great, but don't forget to interact with your followers personally. Respond to comments and retweet interesting content from others.
- Monitor Performance: Keep an eye on which tweets perform best. Many automation tools offer analytics features to help you track engagement.
- Stay Up-to-Date: Twitter's policies can change. Make sure your automated tweets always comply with the latest guidelines.
- Consider Timing: Some tools let you schedule tweets for optimal times. Experiment with different posting times to see when your audience is most active.
- Recycle Evergreen Content: Some tools allow you to reshare your best-performing tweets at set intervals. Utilize this feature to maximize the reach.
- Use Content Variations: Create multiple versions of tweets for the same post. This extends the lifetime of your content and keeps your feed fresh.
- Include Call-to-Actions: Encourage engagement by asking questions or prompting your followers to take action, like “Read more” or “Share your thoughts”.
By following these tips, you'll create tweets that not only promote your content but also engage your audience effectively. Remember, the goal is to provide value to your followers while maintaining an active presence on Twitter.
FAQs on How to Automatically Tweet WordPress Posts
Here are some common concerns users might have:
Yes! Many automation tools allow you to personalize your tweets. You can add hashtags, mentions, or a custom message to make your tweets more engaging.
Most tools offer an easy way to pause or stop automation. You can usually do this from the dashboard with just one click.
Not necessarily. You can choose to have different formats or messages for each post, especially if you're sharing the same content multiple times.
Yes! Some tools let you schedule tweets for older posts. This can help bring attention to content that may have been missed.
Most tools handle this by queuing the tweets. You can set the order in which they go out, ensuring that each post gets its time in the spotlight.
While automation saves time, be cautious. Avoid over-tweeting or posting too frequently, as it can annoy your followers. Balance automation with personal engagement.
Many automation tools offer multi-platform support. You can often set up automation for Twitter and other networks like Facebook or LinkedIn, all from one place.
Final Words: How to Automatically Tweet WordPress Posts
After publishing a new post, it's important to share your content across social media platforms to maximize reach and engagement.
If you're using WordPress to manage your blog, you can automate the process of tweeting whenever you publish a new post. Simply follow the methods we've shown above. It won't take much time or effort.
You can automatically tweet your WordPress posts:
- Use WordPress Plugins
- Use IFTTT (If This Then That)
So why not give it a try? Your next post deserves to be seen!
Are you using TikTok for your business? Check out our latest tips to effectively sell products with your TikTok Business account!
If you have any further queries or face any problem during the process, we are here to help. Just drop a comment below!