


How to Create Invoices & Collect Payments Automatically with WP Project Manager (Invoice Module Review)
Having a reliable project management system can boost your projects' performance. It also helps you to keep the goals of the project to closely align with the main goals of your business. WP Project Manager comes with the aim to serve the same purposes.
Although for your startup team, the core WP Project Manager is enough to significantly handle all the tasks, track them and get you every detail within a project. But for your growing team, it's better to activate some premium modules that make your projects more productive and convenient. However, it solely depends on your business type and team member's accountability.
Greatly WP Project Manager Pro supports 9 premium modules to speed up your production workflow. Today we are going to introduce you to one of these promising modules- Invoice and elaborate its functionality.
Invoice Module: Create Invoices & Collect Payments within Your Projects

This pro module of WP Project Manager gives you access to all advanced invoicing facility. It may include billing features, partial payment, PDF download, and much more for your small to medium businesses.
Avail following benefits by activating Invoice module for your projects:
- Provide frontend view for your clients to see the issued invoices
- Design your invoice structure in an effective yet easy way
- Allow partial payments or automatic billing for hourly jobs
- Create & share your terms & conditions right from your invoice page
- Receive clients payment through an automatic billing process
In short, generate your invoice in just a few clicks including all the essential information. And make the billing process direct and simple.
How Does the Project Invoice Module Work
WP Project Manager Pro facilitates you to create a project invoice including all the advanced fields. In order to activate this module, you must subscribe to either the professional or business plan. Let's go through the complete system step by step:
Activation of Invoice Module
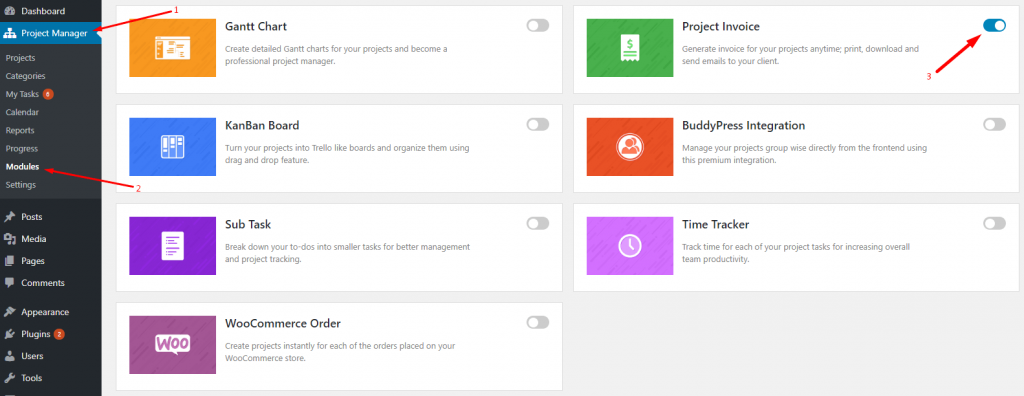
At first, navigate to WP Admin Dashboard → Project Manager → Modules. Then, activate the “Project Invoice” module by clicking on the toggle button as indicated below on the picture:
Configure Invoice Settings
After activating Project Invoice module, it's time to configure some settings related to your Project Invoice. Go to Project Manager → Settings → Invoice.
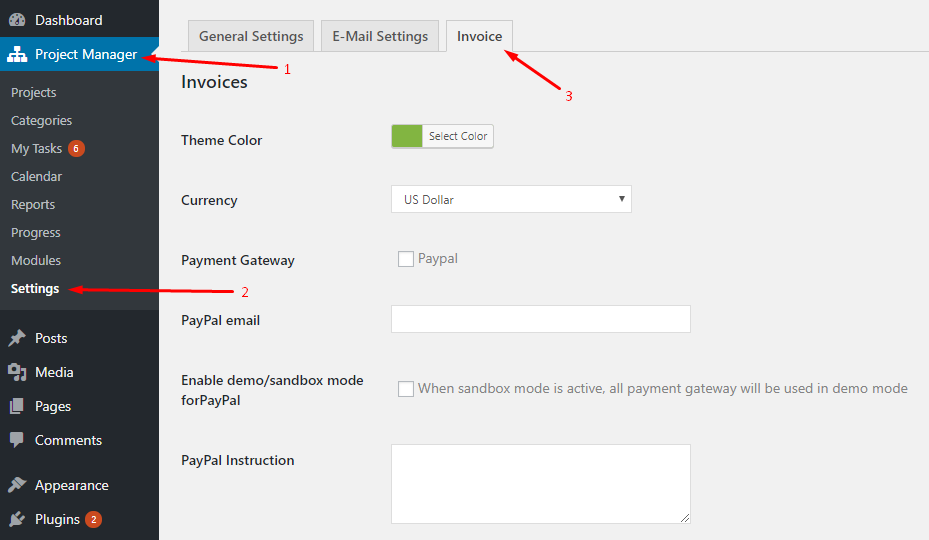
An Overview of Settings
Here you will get several options to customize your project invoice according to your choice. Let's see how these options actually work:
Theme Color: Change the color from the “Theme Color” option to customize your theme color.
Currency: Set the currency you prefer to charge your users in from the drop-down menu.
Payment Gateway: You can choose the payment gateway to PayPal by giving a checkmark to the box. Also, you have the flexibility to add Stripe as a payment gateway by getting the Stripe add-on.
PayPal Email: Insert your PayPal email address to receive payment.
Enable Demo/Sandbox Mode for PayPal: This PayPal sandbox mode is for programmers. So that they can test payment software before performing real transactions. You can also test it out by marking the checkbox here.

PayPal Instruction: You can include some important instructions here that will show up to your clients along with the PayPal pay button.
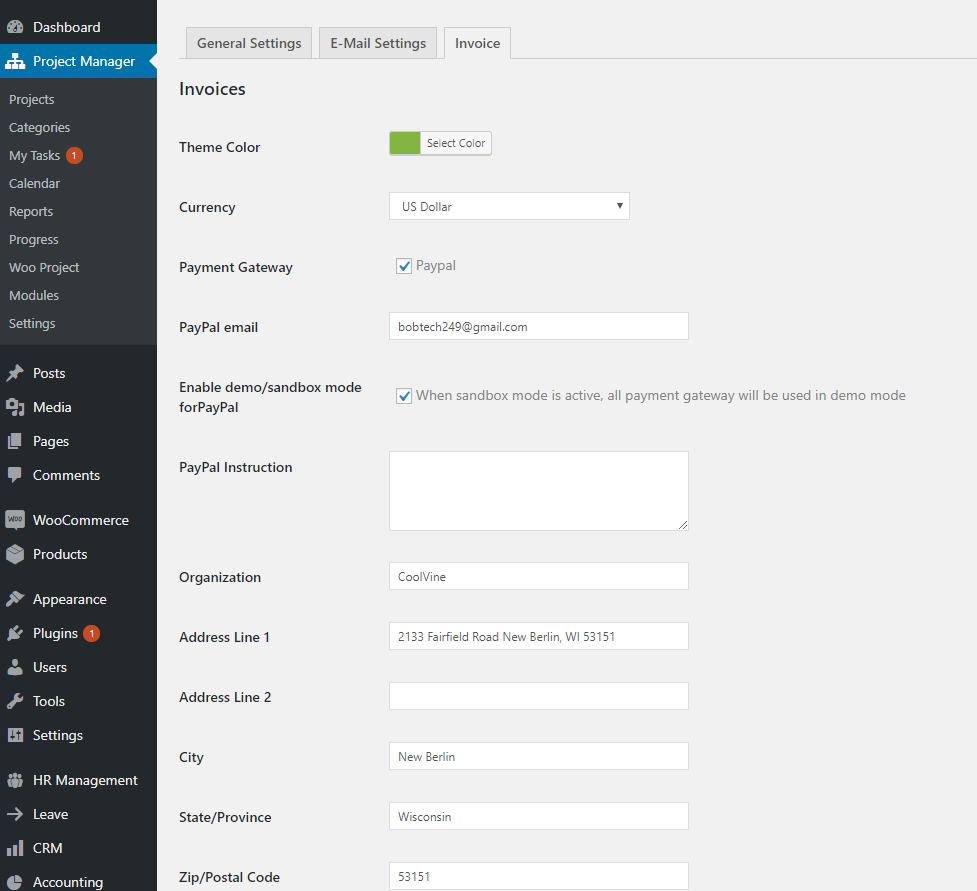
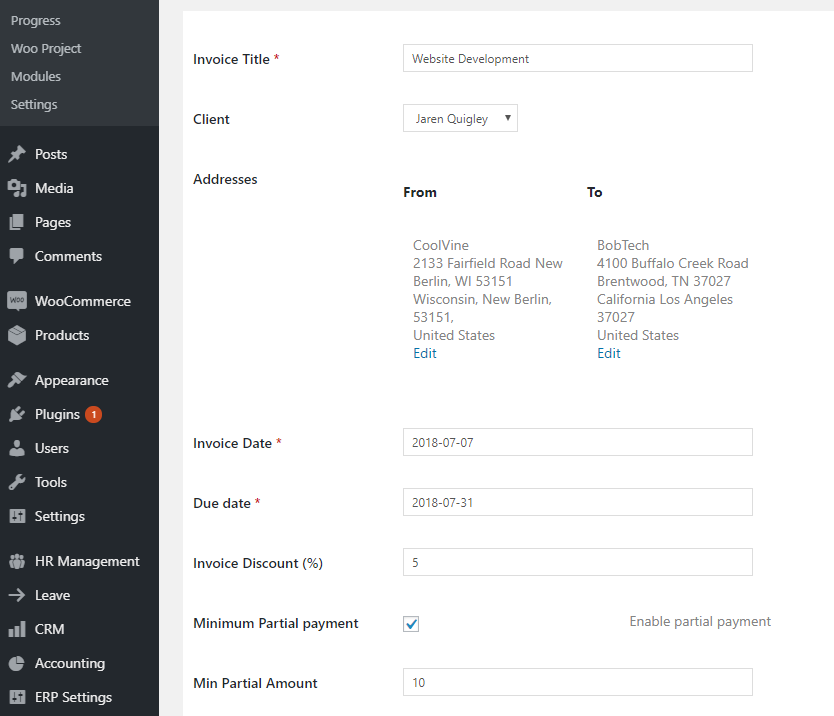
Organization and Address: The following fields will allow you to enter your company details. After adding your company name and address it will be automatically added to all invoices you create. However, you can add or edit your company address manually while creating an invoice. But adding the company address here will make your tasks easier and faster.
Once you are done click on the “Save Changes” button and save all your settings.
How to Create an Invoice
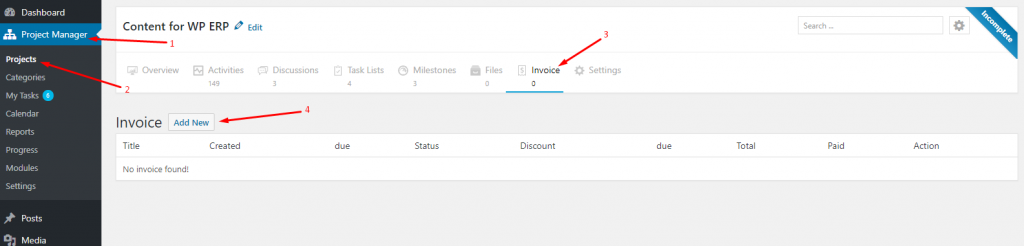
Let's get the idea of how to create an invoice for your users. Here are the steps you need to follow:
- Go to the project under which you want to generate your invoice
- Select a project you want to create an invoice for
- Click the Invoices tab
- Click the Add New button to create an Invoice.
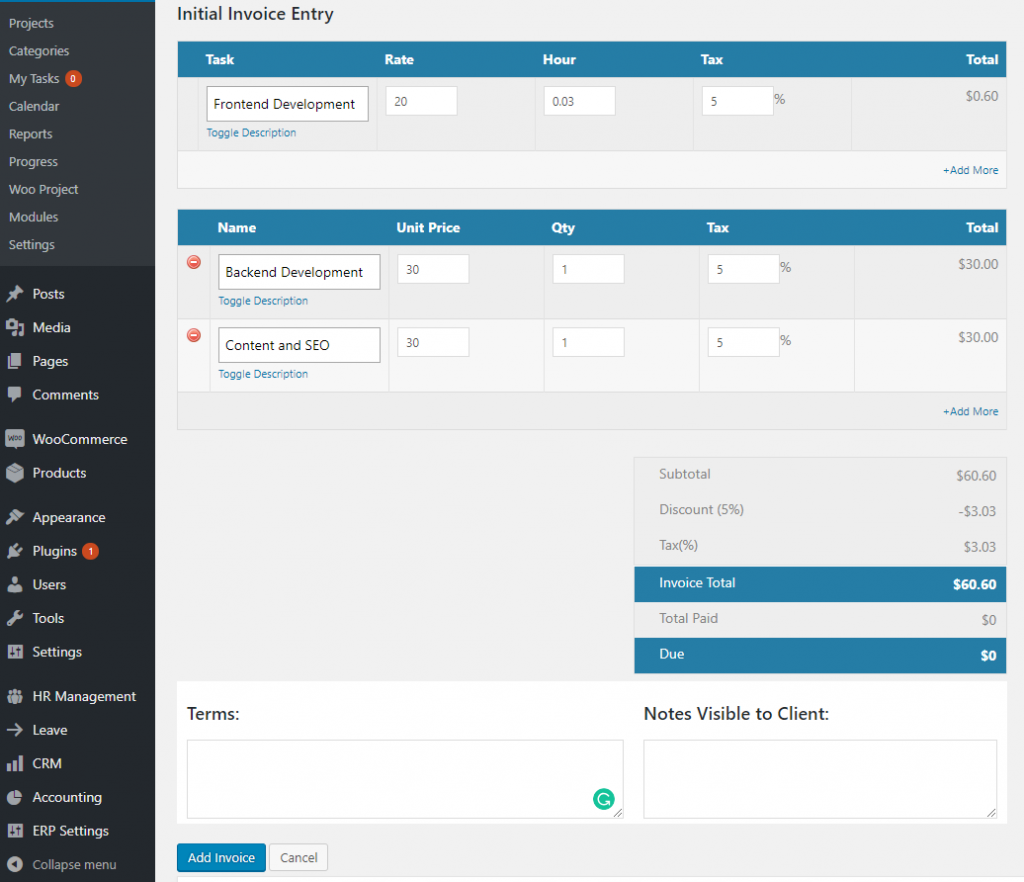
After clicking on the “Add New” button you will get an invoice creation form like below:
In the second part of this form, you get the chance to include the information for which you will be charging your clients. Also, it lets you add terms and conditions or any special instruction you want to tell your clients.
After customizing all. the options click on the Add Invoice button to save the invoice. When a client logged in, s/he can see the invoices issued to them from the front-end. See how to show invoices on the site to your clients.
Show Invoices on Front-End
With WP Project Manager Invoice module you can extend your clients' experience in many ways. They can see the invoices issued to them on the front-end of your site. To configure this setting you need to do as follow:
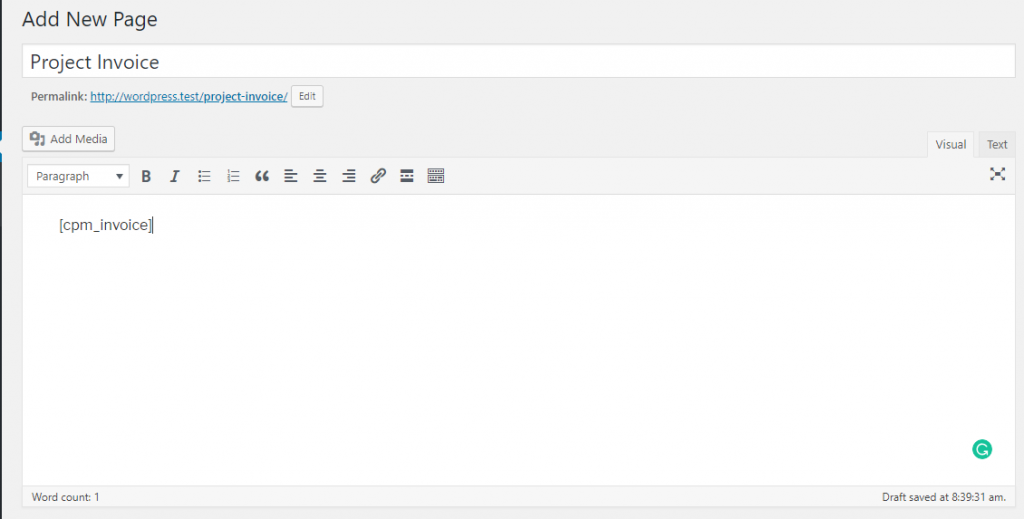
- Create a new page and name it Invoices
- In this new page, just type the shortcode [pm_invoice]
- Publish the page.
Now when your clients are logged in, you can directly send them to the Invoices page. There they will get all the invoices you have issued to them. Here is a sample invoice that your client will see:
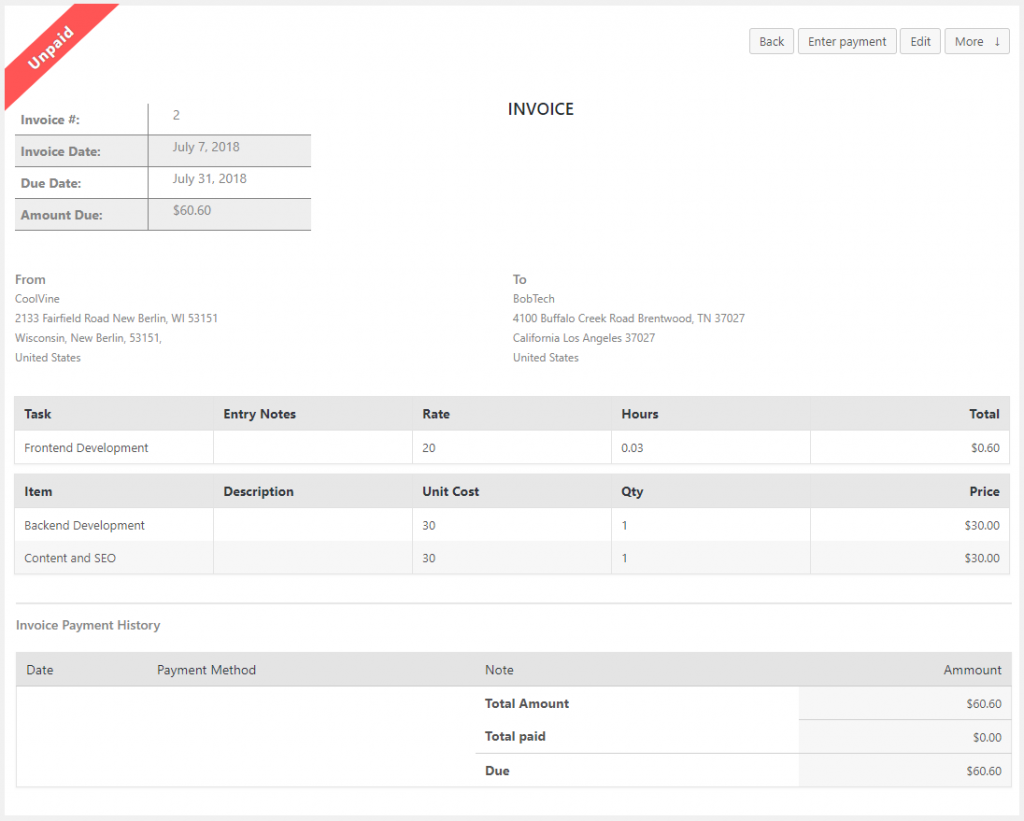
Important Note: Select a client when creating a new invoice. Otherwise, they'll not see it there.
Mark an Invoice as Paid
Well, when a client pays the bill against an invoice through PayPal, that invoice automatically gets marked as paid. But if they use an alternate way for paying in that case you have to mark as invoice manually. Let's explain how to do it:
- Go to Projects and choose the project for which you want to mark the invoice as paid
- Then navigate to the Invoices tab
- Pick the right invoice from the list that you want to mark as paid
You will see the full invoice in-front of you. Now click “Enter Payment” button.
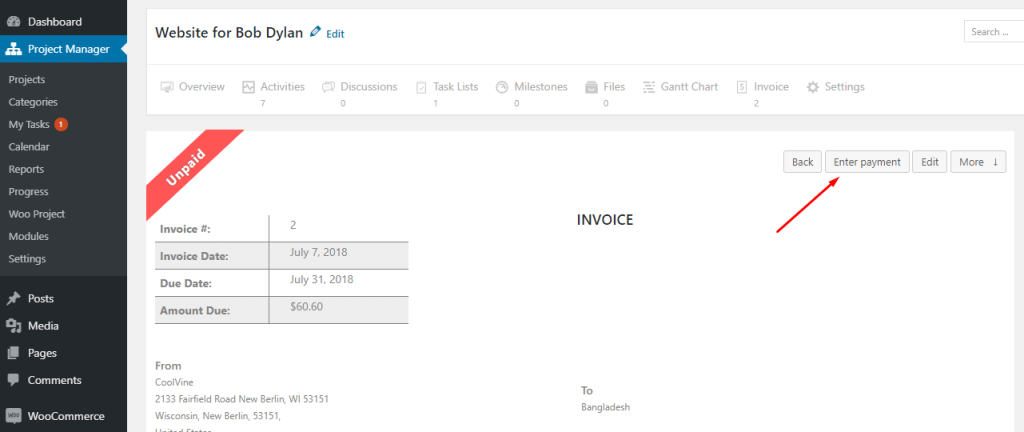
Entering the Payment
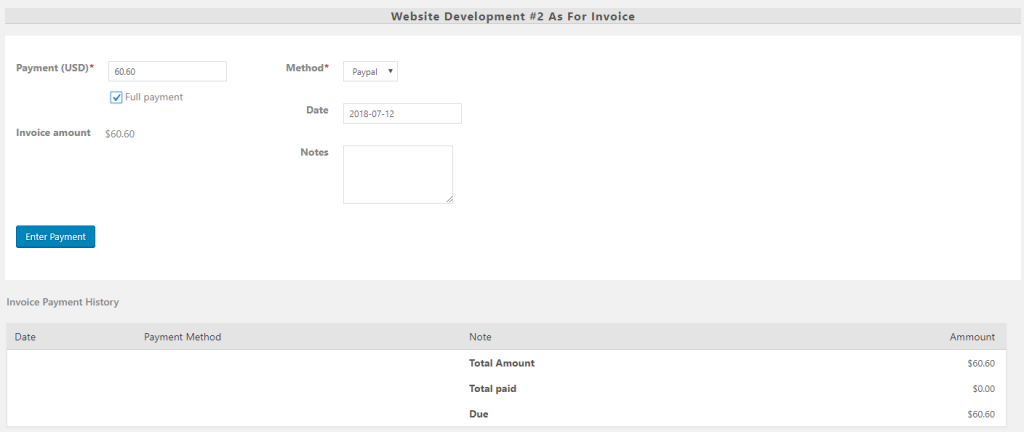
In this form, you can enter the payment amount. Alternatively, you can click the Full Payment checkbox to include the full invoice amount. Moreover, it allows you to add a payment method, date, and important notes.
Once you have done, finally press the “Enter Payment” button. Therefore, the invoice will be marked as paid.
Check the detailed documentation to explore more about the Invoice module review.
Get a quick overview of WP Project Manager Pro modules:
Conclusion
WP Project Manager comes with an aim to effectively manage employee workload and simplify a project manager's job. Even in this global pandemic Project Manager has been supporting thousands of businesses working safely from home. Furthermore, you can boost your management efficiency by unlocking the premium modules as well. In turn, it may increase your project success rate dramatically.
Needless to say, every business needs an invoicing system to keep records of all cash in and out. The invoice module lets you create and provide invoices easily to your clients for a project. Also, allow you to collect the payment and update the invoice right from your WordPress dashboard.
Use the comment section below if you have any further queries about the invoice module. Or if you are using WP Project Manager don't forget to share your experience with us!