
Introducing WooComerce POS: A Point of Sale Plugin for WordPress
No matter what type of brick and mortar store you are running, it is a must to go with the latest technology so that you can stay ahead of the curve.
To this end, nothing can beat the idea of adopting a POS or Point of Sale system for your business outlets. It lets you take orders and bill your customers the fastest way possible and which ultimately paves you the way to reduce nonbillable hours and enhance billable hours for your business.
Today, I will be reviewing the WooCommerce POS system which will enable you to bill your customers not just with desktop computer systems but with any mobile devices including tablets, smartphones, or any pump tops that support a POS machine.
So, stick around, and let's move right on to the main point without any further adieu!
What is a POS System?
To put it simply, a POS or Point of System is nothing but the place where your customers are making purchases or paying for the products you sell.
In other words, wherever or whenever you are selling anything to your customers you are basically completing a Point of a Sale transaction.
With a POS system, you will be able to simplify the order-taking process and lessen the hassle for the staff behind-the-counter. Consequently, you can boost your sales volume.
What are the Benefits of Using a POS Software?
As modern business technology has evolved at its best, the march for using the POS system presses ever onward.
Most of all, there are a myriad of benefits you are going to enjoy if you are using a Point of Sale for your business outlet. But unfortunately, a host of store owners are not using any POS system for their business.
According to the Softwareadvice,
As evident as the benefits of a POS system are, we found that 56 percent of single-store retailers are still not using one. Instead, we found, many are still using a combination of manual methods, cash registers, QuickBooks, and Excel for bookkeeping.
Softwareadvice
Here are a few benefits you can enjoy from a POS system:
- Maintaining your business entity separately for accounting and financial purposes.
- Keeping up the utmost transparency and trust towards your customers.
- Managing multiple outlets online.
- Harnessing the valuable business outlet space as Desktops or laptops take over valuable business spaces.
Introducing WooCommerce POS – A Free POS System
If you have a WordPress website, you can easily use the WooCommerce POS. It is completely free and intuitive to use POS solutions from the same developers of WooCommerce. So rest assured of its quality.
The order-taking bliss you will get from the WooCommerce POS is topnotch and too away from the ideal. The main reason you should go for this POS system is that you will have a unified order system. That's because, if you sell your business both online or offline you will have to maintain separate order systems.
Besides the WooCommerce POS system is so user friendly that even a third or fourth grader will feel comfortable using this system.
Unlike an on-premise POS software, the WooCommerce POS solution will let you take and store your orders on the cloud or on the internet server. This is really helpful to avoid the loss of valuable sales data.
What You’ll Need to Get Started with the WooCommerce POS Plugin
- Domain and hosting
- WordPress (Free)
- WooCommerce (Free)
- WooCommerce POS (Free)
Step 1: Choose Suitable Domain and Hosting
First of all, you will need to buy a domain and hosting for your site. You can consider popular domain and hosting vendors like Namecheap, Godaddy, Bluehost, Kinsta, Cloudways, etc. as they offer great bandwidth yet charge with reasonable pricing.
Step 2: Create a WordPress Site
Once you have a domain and hosting service up and running, you will need to install WordPress on your C Panel. Sometimes, your hosting provider will install WordPress on their own. If do not know how to install WordPress on the C panel, then go through the following video to learn it:
Step 3: Install WooCommerce
Not to mention, WooCommerce is the most popular eCommerce plugin to date. Assuming that you have a website built on WordPress, you will need to get to the WP Admin Dashboard > Plugins > Add New > Search for ‘WooCommerce' > Install > Activate.
If you are not sure how to install WooCommerce then see the following video:
After installing WooCommerce, you can insert the free Storefront theme for your site. You can use other themes also but this one is specially optimized especially for WooCommerce and is free to use. So, why not give it a go?
Step 4: Add & Publish a Few Products
Now, you you should be adding your products on by one. While adding products you will have to insert the name, product description, product data, short description, categories, tags, proper product image and so on.
When you are done with adding products you will need to publish them.
Step 5: Installing WooCommerce POS
- Download the extension from your WooCommerce dashboard.
- Go to Plugins > Add New > Upload and select the ZIP file you just downloaded.
- Click Install Now, and then Activate.
More information at Install and Activate Plugins/Extensions.
Setup & Configuration
After you activate the POS system, you will see a notice that will prompt you to either:
- continue with setup
- or go to registers
- or go to outlets
Once you install the plugin a default outlet and a default register will be created which you can not delete afterwards.
The address of the default outlet will be based on the online address you will find from WooCommerce > Settings > General.
Setting up the outlet
If you wanted to add additional outlets:
- Go to Point of Sale > Outlets > Add New.
- Enter the name of the outlet you want to create.
- Go to the Outlet data panel, and select the appropriate section to enter the applicable information.
Address section
The address section is where you enter the location of the outlet. This is used to calculate tax for orders placed from registers assigned to this outlet.
Contact section
The contact section allows you to enter contact details that are printed on generated store receipts.
WiFi section
The WiFi section is for shop managers who want to share their wireless internet to paid customers. The wireless details are printed on generated store receipts.
Social section
The social section is where you can enter social details and handles for this particular outlet.
Setting up the register
If you want to set up additional registers:
- Go to Point of Sale > Registers > Add New.
- Enter the name of the register you want to create.
- Go to the Register data panel, and select the appropriate section to enter the applicable information.
General section
- Outlet – the assigned outlet of this register. Users that are assigned to the configured outlet will only be able to access the register.
- Product Grid – the grid which is loaded in the register. By default, the Categories Layout grid will display the products in category format.
- Receipt Template – the receipt template which is used when placing orders through the register.
- Prefix & Suffix – enter a prefix or suffix to the order numbers that are generated when placing orders through the register.
- Customer – assign a default customer that is loaded when opening this register.
- Cash Management – enable this to prompt for a starting cash float when opening the register.
- Dining Option – set the default dining option for this register.
End of Sale section
- Print Receipt – this will toggle the print receipt function by default.
- Gift Receipt – this will allow cashiers to print gift receipt as well as normal receipt.
- Email Receipt
- No – the email receipt toggle will be off by default.
- Yes, for all customers – this will toggle email receipt for all customers including guest customers by default.
- Yes, for non-guest customers only – this will toggle email receipt for registered customers only by default.
- Note Request
- None – this will not prompt for a note.
- On save – this will only prompt for a note when saving / holding orders.
- On all sales – this will prompt for a note on all orders, including saving / holding orders.
- Change Cashier – this will log the cashier out of the register and redirect them to the login screen after each sale. There is a 5 second delay from when the order is fulfilled and the cashier is redirected to the login screen.
Assigning users to the outlet
To open or enter a register, the logged-in user must be assigned to the outlet which the register belongs to. To assign your user to an outlet:
- Go to your User Profile or if you are assigning another user, go to their User Profile.
- Scroll down to the Point of Sale section and select the outlet from the Assigned Outlets field.
- Click Save Changes and the user will now have access to registers that are in this outlet.
As well as assigning users to outlets, you can also restrict what cashiers can do when using the register, this includes:
- Discounting – this will disable discounting functions such as discounts, fees and coupons from the register.
- Tendering – this will disable the ability to place an order. Cashiers can only place orders on hold.
Creating a product grid
You can choose to display your own product grid with pre-defined tiles. To create a grid:
- Go to Point of Sale > Grids and click Add New.
- Enter the name of the grid and click on Add Tile.
- Choose what type of tile you want to add; either Product or Product Category.
- Click on Publish to create the grid.
After creating the grid, you will need to assign this grid to a register:
- Go to the register you want to assign the grid to and click on Edit.
- Under the General tab, click on Product Grid and assign the grid you have just created.
- Click Update under the register actions.
- The grid is now assigned to this register.
You can also add products to a grid directly from the products page.
- Go to the product you want to add and click on Edit Product.
- Scroll down to the right, near the meta box labelled Product Grids.
- You can check the grid that you want to add this product to or click Add product grid to add a grid.
Configuring receipt templates
You can create multiple receipt templates to assign to different registers. There are a variety of settings available to configure the layout of the receipt and options to include what to print. To edit the default receipt template:
- Go to Point of Sale > Receipts and under Default Receipt click on Edit.
- The familiar WordPress customizer will appear with a live preview of how store receipts appear to customers.
- Within the customizer, you can adjust the receipt settings from the sections on the left.
Printing product barcodes
You can print product barcodes using the built-in tool that is available under Point of Sale > Barcodes page. To print the barcode of a product:
- Click on Add Product, search for the product you want to print for and click Add.
- Enter the Number of Labels under Print Settings and set the Label Type.
- Depending on the type of label you are printing on, the number of the label should reflect this. For example, a label sheet with 7 rows and 3 columns, you would enter 21 in the number of labels.
- Choose what Product Fields you want to include in the label.
- Click on Print to print your labels.
Check that you have your printer margins in your browser settings set to minimum or none to ensure accurate printing of labels.
Global settings
General Options
- Filters – controls the register and outlet filters shown on the back-end WooCommerce > Orders page.
- Front End Access – allows assigned outlet cashiers to open their register from their My Account > Point of Sale page.
- Auto Logout – set a period of time after which the register will logout automatically.
- Tax Number – set the tax number to be printed on receipts.
- Transition & Effects – disables visual transitions on the registers.
- Dining – enables the option to set the dining option for each order.
Status Options
- Fulfilled Orders – set the status of successful orders when placed through the POS.
- Parked Orders – set the status of orders that are put on hold through the POS.
- Fetch Orders – set the status of orders that are loaded within the Orders panel in the POS.
- Website Orders – choose to include website orders within the Orders panel in the POS.
Register Options
- Keypad Presets – preset the percentage of keys found on the discount panel.
- Keyboard Shortcuts – enable keyboard shortcuts when using the register.
- U – Search customers
- L – Search products
- P – Browse products
- S – Enter shipping information
- D – Apply discount
- C – Apply coupon
- F – Apply fee
- O – Fetch orders
- T – Accept payment
- H – Hold order
- V – Clear cart
- N – Add a note
- Scanning Fields – choose the product field that is used when scanning product barcodes through the register. Default is WooCommerce SKU.
- Search Includes – choose the fields that are included in the product search query that is displayed in the register. Default is Product Title and Product SKU.
- Required Product Fields – choose the fields that are required when adding a custom product through the register.
- Force Logout – enable users to take over an already opened register.
- Additional Payment Methods – increase the number of static payment methods accepted through the Point of Sale.
Cash Management
- Order Status Criteria – set the status of orders that are included in the cash management report.
- Currency Rounding – enable currency rounding for countries with limited currency denomination.
- Denomination Options – add currency denominations for quick cash calculation.
Tile Options
- Default Sorting – set the default sorting for tiles on the register.
- Product Previews – showcase your products when using the register. A small button will appear on the product tile.
- Out of Stock – include out of stock products in the product grid.
- Product Visibility – control the visibility of products from the online store and POS.
- Unit of Measurement – choose to prompt the seller for a specific quantity value when the product tile is clicked. See Unit of measurement on how to configure this for products.
- Add to Cart Behaviour – control what happens to the grid when a product is added to the basket.
- Publish Product – choose whether to publish the product immediately when adding through the register.
Customer Options
- Default Country – set the default country for customers when they are added through the register.
- Guest Checkout – enable or disable guest checkout when using the register.
- Customer Cards – enables scanning of customer cards from the register.
- Required Fields – set what fields are required when adding a customer through the register.
- Optional Fields – hide optional fields from the customers panel in the register.
- Save Customer – when adding a customer through the register, this will toggle the Save Customer option by default.
End of Sale Actions
- Signature Capture – enables capturing of signature for authorisation at the end of the sale process.
- Signature Required – this will make capturing of signature a requirement.
- Signature Commands – choose whether to require signature capture when fulfilling or parking orders.
Tax Options
- Tax Calculation – enable or disable tax calculation for the POS.
- Calculate Tax Based On – choose what address to calculate the tax from.
Report Options
- Closing Reports – display an end of day report when closing the register.
- Report Orders – set what order statuses are included at the end of day report.
- End of Sale Email – the end of email notification can be customised by going to WooCommerce > Settings > Emails > End of Sale template.
Setting up units of measurement
For store owners who sell product stock in a specific unit of measurement or in decimals, you can choose to prompt the cashier for a specific quantity value when the product tile is clicked. To enable this feature globally:
- Go to Point of Sale > Settings > Tiles.
- Under the page Units of Measurement, check the box labelled Unit of Measurement.
- Click Save Changes.
To change the unit of measurement of a product, you would need to go to the product page:
- Go to the Product Data Panel > Point of Sale.
- Check the box for Unit of Measurement and select the Unit for the product.
From here you, you can also define how suggested values are generated. Simply enter the starting suggested value, calculation and factor.
Setting up embedded barcodes
For store owners who want to sell products with price or weight embedded barcodes, you will need to enable this configuration from the Point of Sale > Settings > Tiles > Units of Measurement page.
For the UPC-A barcode, the value represents the price and the multiplier is 100.
For products with units of measurements, you can choose to override the quantity in the POS when scanning price embedded barcodes:
- Go to the product with Units of Measurement enabled.
- Scroll down to the Product Data panel and click on Point of Sale.
- Check the box Override Quantity.
Setting up customer store cards
For store owners who want to scan and load customer details when processing orders, you can use customer card numbers to manage customers. To enable this feature globally:
- Go to Point of Sale > Settings > Customer.
- Check the box labelled Enable customer cards.
- Click Save Changes.
To set a customer card number for a user:
- Go to User Profile > Point of Sale heading.
- Enter the card number in the Customer Card field. If there is already a customer card number set, you would need to click on Change Card Number.
User roles
There are two user roles that are installed when activating this extension. These roles relate to register access, back-end access and settings limited to the store manager.
Register clerk
- Can only access from register URL or if enabled, My Account page.
Outlet manager
- Same capabilities as a Shop manager role
- Ability to assign outlets to users
- Ability to process order refunds
- Can access register from the WordPress back-end admin page
- Force logging users out of registers
Product visibility
You can choose to display products in POS only, web store only or both. This setting is a global setting which can be configured from here. Once this setting is enabled:
- Go to the product you want to control the visibility for.
- Under the Publish > POS visibility, click on Edit.
- Choose out of the following options POS & Online, POS Only or Online only.
Usage
Opening and closing registers
To open a register, click on Point of Sale > Registers and choose the register you want to open.
If the register has already been opened, the button will display Enter. If the register is closed, it will display Open.
The login panel is the first thing you will see when you open the register. This will display the cashiers that are assigned to the outlet. Click on the profile you want to log in and enter the password to enter the register.
From the login panel, there are several indicators to view key register information at a glance:
- Wireless icon – this displays internet connectivity in case of loss of internet connection.
- Cloud icon – this displays the total number of fetched products in the cache.
- Solid circle icon – this displays the register status which is either Open (Green) or Closed (Closed).
To close a register, click on the WooCommerce icon on the top left of the register and click on Sales at the bottom. This will display the closing register window. From here, you can click on Close Register to close the session.
Adding products
There are four ways to add products to the cart from the registers page:
- Browse and navigate products using the product grid.
- Search for the product from the search box.
- Add a custom product for bespoke orders.
- Scanning the product barcode.
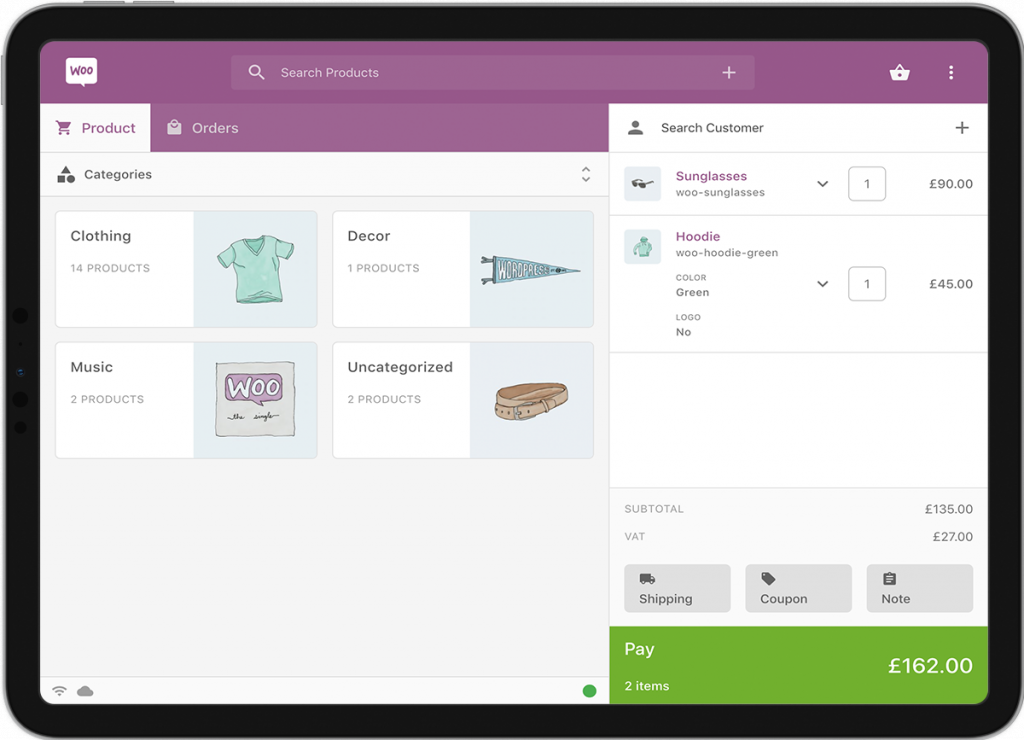
Using the product grid
The product grid displays products as square tiles and categories as rectangular tiles. You can configure the product grid to display particular products or dynamically load a particular category. See Creating a product grid for more information on creating your own product grid.
As you navigate through product categories, the breadcrumb will display the current category or product. Clicking on the first item in the breadcrumb will navigate back to the start of the product grid. Child categories will be displayed first and products will be displayed below.
For variable products, the options will be displayed as tiles and as you go through your selections, the selected choices will be displayed above. Cashiers can go back through the selection using the breadcrumb.
To sort product tiles, click on the arrow icon on the top right corner of the grid. This will allow you to sort by name, date added, popularity and featured items.
To view product stock or read the products description, click on the small three dots icon in the product tile. This will load more information on a particular product in a full-screen panel. This feature can be enabled or disabled from Point of Sale > Settings > Tiles.
Adding a custom product
For bespoke products, you can add a custom product by clicking the + icon in the search box. Enter the product name, price and quantity and click on Add Product.
To add product attributes such as size, colour, etc click the Add Attribute button.
For store owners or cashiers with publishing privileges, you can have the product published to the products catalogue by clicking on the Publish Product toggle on the bottom left of the dialog box.
Searching for a product
If your product catalogue is too large to navigate using the product grid, you can use the search box in the top bar to query a product. The results will show you the product photo, SKU, price and stock count.
Scanning product barcodes
To scan products to the cart:
- Click on the search icon in the search box to enable barcode scanning.
- After you click this icon, it will display a barcode icon prompting you to start scanning.
- At this point, you can point your barcode reader on the product barcode and press the trigger.
- This will query the product SKU barcode with the store’s product SKU and if successful, add items to the cart. If the product SKU cannot be found, an error will appear.
Loading customers
Adding an existing customer
You can add an existing customer to the order by searching through the users on the top right. If the search finds no queries, the register will suggest you add this customer based on the query you have entered.
Adding a new customer
If you want to add a new customer to the order, click on the + button on the right of the customer search bar.
You can choose whether to save the customers details or keep them as guests by clicking on the Save Customer toggle on the bottom left of the dialog box.
To configure the required fields when adding a new customer, go to Point of Sale > Settings > Customer > Required Fields.
Scanning a customer barcode
To scan and load a customer to the register, click on the customer icon in the customer search bar. This will display a prompt where you can scan the customer card or enter the customer’s card number.
To enable store cards, you will have to check the box located under the Point of Sale > Settings > Customers > Customer Cards tab.
Editing cart items
After adding a product to the cart, you can click on the cart row item to display more options.
Item Fields
- Quantity – this will display the quantity selected along with the unit of measurement that the product stock is handled in. You can also swipe the item row from left to right to increase product quantity by 1.
- Discount – enter a percentage value you want to discount the item price by, the price field will lock to display the original price and the price on the order will be discounted.
- Price – enter a custom price or return to the original price by entering ‘0’ in the discount field.
- Note – add a note to this product. This will be added as a product meta attribute in the order.
Item Actions
- Edit – allows you to modify the product name, tax class and add, delete or modify any product attributes if there are any.
- View – opens in a new tab the online link to this product.
- Delete – deletes the item from the cart. You can also swipe left on the cart row to remove the product from the cart.
Applying cart actions
Below the cart total, there is a cart action panel. This presents the actions that you want your cashiers to use while fulfilling orders through the POS. Cashiers can swipe left on this panel to see further actions including reset, clear and print.
Applying a coupon
To apply a coupon, click on the Coupon action button. This will open the coupon tab where you can enter the coupon code or if you have a barcode scanner, you can scan the coupon barcode.
Attaching a note
To attach a note to the order, click on the Note action. This will open the notes tab where you can choose whether to add a customer note or order note. Customer notes are sent to the customer and order notes are for internal purposes.
Discounting the order
To apply a discount, click on the Discount action button. This will open the discount tab where you can set the discount reason, type of discount (fixed or percentage) and the discount value.
To set the percentages presets, go to the Point of Sale > Settings > Register page and choose the discount values in Keypad Presets.
Maintenance actions
You can reload the register by clicking on Reset action or if you just want to start the order from scratch, you can clear it using the Clear action.
Holding an order
To hold or save the order, swipe left on the cart total and click on Hold. The default status of orders that are put on hold through the POS is on-hold. This can be configured from Point of Sale > Settings > General > Status Options.
Order fulfilment
Choosing a payment option
After clicking the Pay button, you will be shown options to choose what method of payment you want to use to tender the order. Payment methods are enabled and disabled from the WooCommerce > Settings > Payments page.
The extension comes with two payment methods: Cash for cash payments and Chip & PIN for EMV payments. This is for store owners who already have an EMV terminal, enable this and the register will generate an order number which you can use to reference when using your terminal.
End of Sale
After selecting a payment method, you will be shown what actions to run when fulfilling the order:
- Printing – this will print the receipt can be controlled. If this is set to yes in the register settings, this will appear as an option.
- Email – this will email the receipt. If this is set to yes in the register settings, this will be toggled by default with a prefilled email address and will be required.
- Signature capture – click on the + button to capture a signature. This is useful for orders that require approval or verification. This must be enabled from Point of Sale > Settings > Customer > End of Sale > Signature Capture.
- Notes – attach a customer note to the order or if a note is already attached, review with the customer before finalising the order.
Refunds
There are two ways you can refund an order; you can use the Orders tab and locate the order or you can search using the Refunds action tab:
- Swipe left on the cart totals panel or click on the More action.
- Click on the Refund action button.
- This will open the refund tab where you can search for the order you want to refund.
- After you locate the order, click on the order itself. This will load contents to cart.
- Click on Refund button at the bottom left.
- Choose to Recover Stock or leave a Refund Reason.
- Click on Continue to finish the refund process.
Stock keeping
This extension includes a stock-keeping controller for store owners to quickly adjust stock levels:
- Go to Point of Sale > Stock.
- Scan or enter the product SKU barcode.
- If the product is found, a table will be displayed with product image, name, SKU, stock status, stock level, price and the option to update the stock level.
- Depending on the value you enter, you can:
- Increase the stock level by the entered amount by clicking Increase.
- Decrease the stock level by the entered amount by clicking Decrease.
- Replace the stock level value by the entered amount by clicking Replace.
Payment Gateways
Point of Sale for WooCommerce comes with two payment methods; one for accepting cash and one for using chip & PIN. To enable payment methods for the Point of Sale for WooCommerce:
- Go to WooCommerce > Settings > Payments.
- For Cash and Chip & PIN, this will have a dedicated gateway.
- To enable the payment method, select the toggle.
- To manage other settings, click on Manage.
If your gateway is not listed below, please click here to open a ticket with our support team to discuss integration. It is important that the gateway you are requesting integration for offers in-store payment solutions. Point of Sale for WooCommerce will not display web-based gateways as this is not best practice.
Setting up Stripe Terminal
For store owners based in the United States and have an account with Stripe, they can accept in-store payments using Stripe’s Terminal service. More details can be found here. Please note that this is only compatible with the Verifone P400. You can order readers from the Stripe Dashboard and get them shipped to a location of your choice.
Once you have registered, you will need to activate the Stripe plugin, enter your secret key and connect POS to Stripe:
- Go to WooCommerce > Settings > Payments.
- Select Stripe Terminal and click on Setup or Manage if this is already enabled.
- To enable the payment method, check the Enable/Disable box.
- Click on Save Changes.
Compatible Hardware
Till
Point of Sale for WooCommerce is a web-based application, therefore, all hardware must be able to interact with HTML pages. We recommend devices with browsers that are capable of delivering a modern browsing experience such as Google Chrome or Safari.
Receipt printers
We recommend receipt printers that are capable of printing HTML pages.
Reported compatible printers:
- Star TSP650 II (USB + CloudPRNT)
- Star TSP100 (USB)
Cash drawers
Cash drawers are connected to the receipt printer and are automatically triggered open when a print is sent to the printer.
Barcode scanners
We recommend any USB or Bluetooth barcode scanner that outputs the barcode SKU as it is scanned.
Card readers
Card readers can be used in an isolated manner using the built-in Chip & PIN payment method, or alternatively, you can connect to a cloud-based EMV service. The following integrations are available:
- Stripe Terminal (for the U.S.)
Compatible Extensions
Point of Sale for WooCommerce is compatible with the following extensions:
These extensions have known incompatibilities and cannot be used with Point of Sale for WooCommerce at this moment of time:
Is There any Free Alternative of WooCommerce POS?
Definitely! To get the most of the premium services of WooCommerce POS in a free POS software with a great design then you can use the wePOS system which is one of the best POS systems for WooCommerce and WordPress.
The best part here is that you are getting a professional POS system for WooCommerce for free of cost. It has also a set of premium versions which gives you the freedom to choose the plan that suits you best:
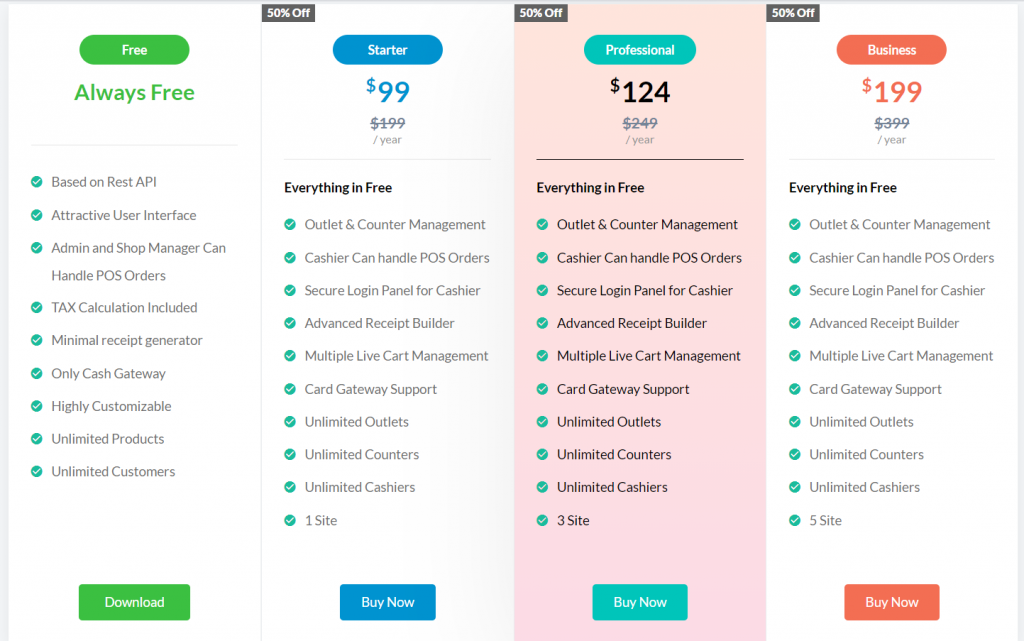
The free version includes:
- Based on Rest API
- Attractive User Interface
- Admin and Shop Manager Can Handle POS Orders
- TAX Calculation Included
- Minimal receipt generator
- Only Cash Gateway
- Highly Customizable
- Unlimited Products
- Unlimited Customers
- Outlet & Counter Management
- Cashier Can handle POS Orders
- Secure Login Panel for Cashier
- Advanced Receipt Builder
- Multiple Live Cart Management
- Card Gateway Support
- Unlimited Outlets
- Unlimited Counters
- Unlimited Cashiers
Conclusion
And if you are using any on-premise POS system then it's high time you move on to a cloud-based or online-based POS tool.
If you are not using a POS system yet, the WooCommerce POS can be the perfect one to give it a go for any business person who has a WordPress website.
Again, remember that an online-based POS plugin is not only useful to boost sales but also effective to maintain a flawless accounting and financial data stored on the cloud or internet.
Finally, if you think that we missed anything to mention here, please let us know below in the comment section.