


How to Create a Child Theme in WordPress (Manually+Plugin)
You have found a beautiful theme but want to change a few things to make it truly your own? Maybe the colors don't quite match your brand, or the font feels a bit off.
This is where child themes come in! It allows you to safely customize your website's appearance and functionality without messing with the original theme. It's like creating a special edition of your favorite theme, just for you.
If you are wondering how to create a child theme in WordPress, no worries. In this blog, we are going to break down everything you need to know about creating a child theme. Mainly, there are two ways to create a child theme in WordPress and we are going to show you both the ways.
So, let's get started!
What is a Child Theme in WordPress?
In WordPress, a child theme is like a customized version of a main theme, which is also called the parent theme.
Let's say you have a parent theme called “Simple Theme” installed on your WordPress website. You like how it looks, but you want to make some changes, like changing the colors or adding a new feature.
Instead of directly editing the files of the “Simple Theme,” which can be risky because your changes might get lost when the theme updates, you can create a child theme.
This child theme acts as a safe playground where you can make all your customizations without altering the original parent theme. It inherits everything from the parent theme, like its layout and basic features.
So, in simple terms, a child theme is a way to customize your WordPress website without messing with the main design and features of the original theme. It helps you keep your changes organized and protected, while still letting you make your site look and work just the way you want.
Why & When You Should Create a WordPress Child Theme

Now you know what is a WordPress child theme. It's time to describe when you should create a child theme in WordPress.
Let's find some occasions to create a WordPress child theme:
- Customizations: When you want to customize the appearance or functionality of your WordPress website beyond what's offered by the parent theme. For example, changing colors, fonts, layout, or adding custom features.
- Theme Updates: If you anticipate that the parent theme will receive updates in the future, creating a child theme ensures that your customizations remain intact. This prevents your modifications from being overwritten when you update the parent theme.
- Future-Proofing: Even if you don't plan to make immediate changes to the theme, creating a child theme provides a foundation for future modifications. It's a proactive approach to ensure that your site can evolve with your needs over time.
- Experimentation: If you're unsure about certain design or functionality changes, a child theme allows you to experiment without affecting your live site. You can test out different modifications in the child theme's environment before implementing them on your main site.
- Code Cleanliness: Using a child theme promotes clean coding practices by separating your customizations from the original theme files. This makes your codebase more organized, easier to manage, and simplifies troubleshooting if issues arise.
If you want more details, then read our guide on why you should create a child theme.
Does any of the above-mentioned points match your reason? If so, then let's jump into the tutorial to create a child theme for your WordPress website.
Prerequisites to Create a Child Theme in WordPress
Before diving into creating a WordPress child theme, it's crucial to take some preparatory steps to ensure the safety of your website. Here are two essential prerequisites:
- Website Backup: Creating a backup of your entire website is the first and most important step. This provides a safety net in case anything goes wrong during the child theme creation process. There are several ways to achieve this:
- Backup Plugins: Popular options like BlogVault or UpdraftPlus offer user-friendly interfaces for creating and managing website backups.
- Hosting Platform Backup: Many hosting providers offer built-in backup functionalities. Check your hosting control panel for options.
- Consider a Staging Environment (Optional): While not essential, creating a staging environment is highly recommended. This essentially creates a temporary copy of your live website where you can make changes (like creating and testing the child theme) without affecting your visitors. Once you're happy with the results, you can then push the changes from the staging environment to your live site.
How to Create a Child Theme in WordPress – 2 Ways

There are mainly two ways to create a child theme in WordPress. If you are a technical person, you can do it manually through coding. And if you aren't a technical person, you can simply do it using a WordPress plugin.
However, we will show you both ways. So, let's get started!
Method 01: Create a Child Theme in WordPress Manually
To create a child theme manually, you'll require the control panel access. If you don't have access or forgot the credentials, you should ask your hosting provider to provide you with the login credentials. Then follow the below steps to get your job done!
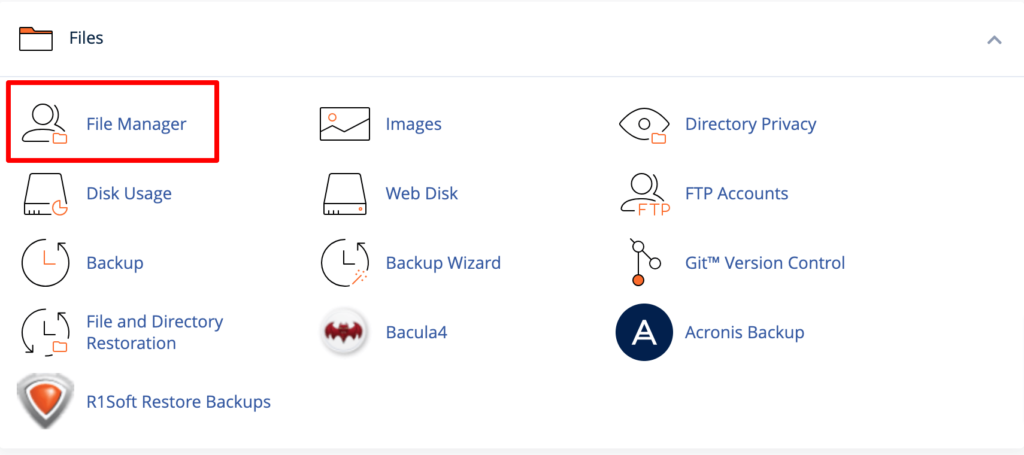
Step 01: Log in to Your Control Panel
Log in to your control panel (cPanel), then navigate to Files -> File Manager. Click on the File Manager option. it will take you to a new interface.
Step 02: Create a New Folder
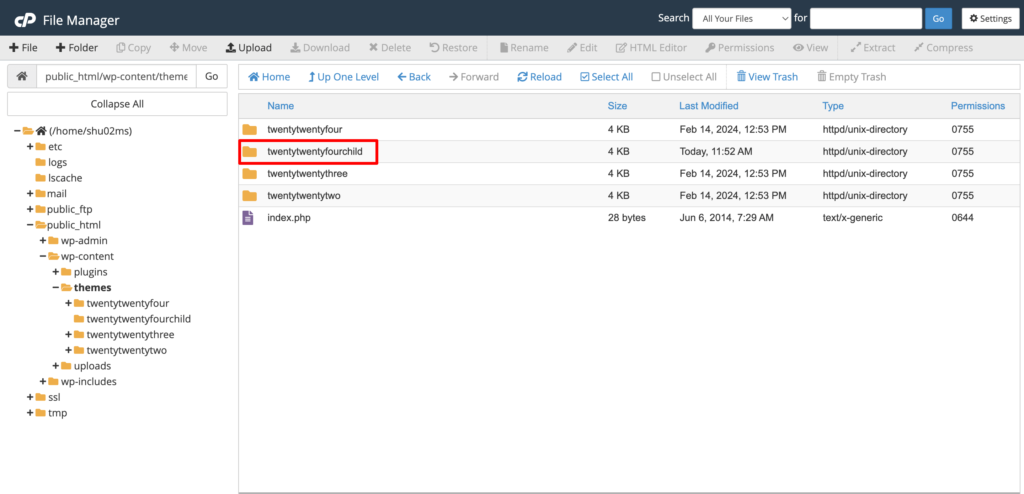
In the File Manager, go to public_html -> wp-content -> themes. This is your themes directory. Here you'll find all the themes that you have installed on your site.
Now you need to create a new folder. Name it something similar to indicate that it’s a child of your parent theme. For this tutorial, we have named it “twentytwentyfourchild” as a child theme of the “twentytwentyfour” parent theme.
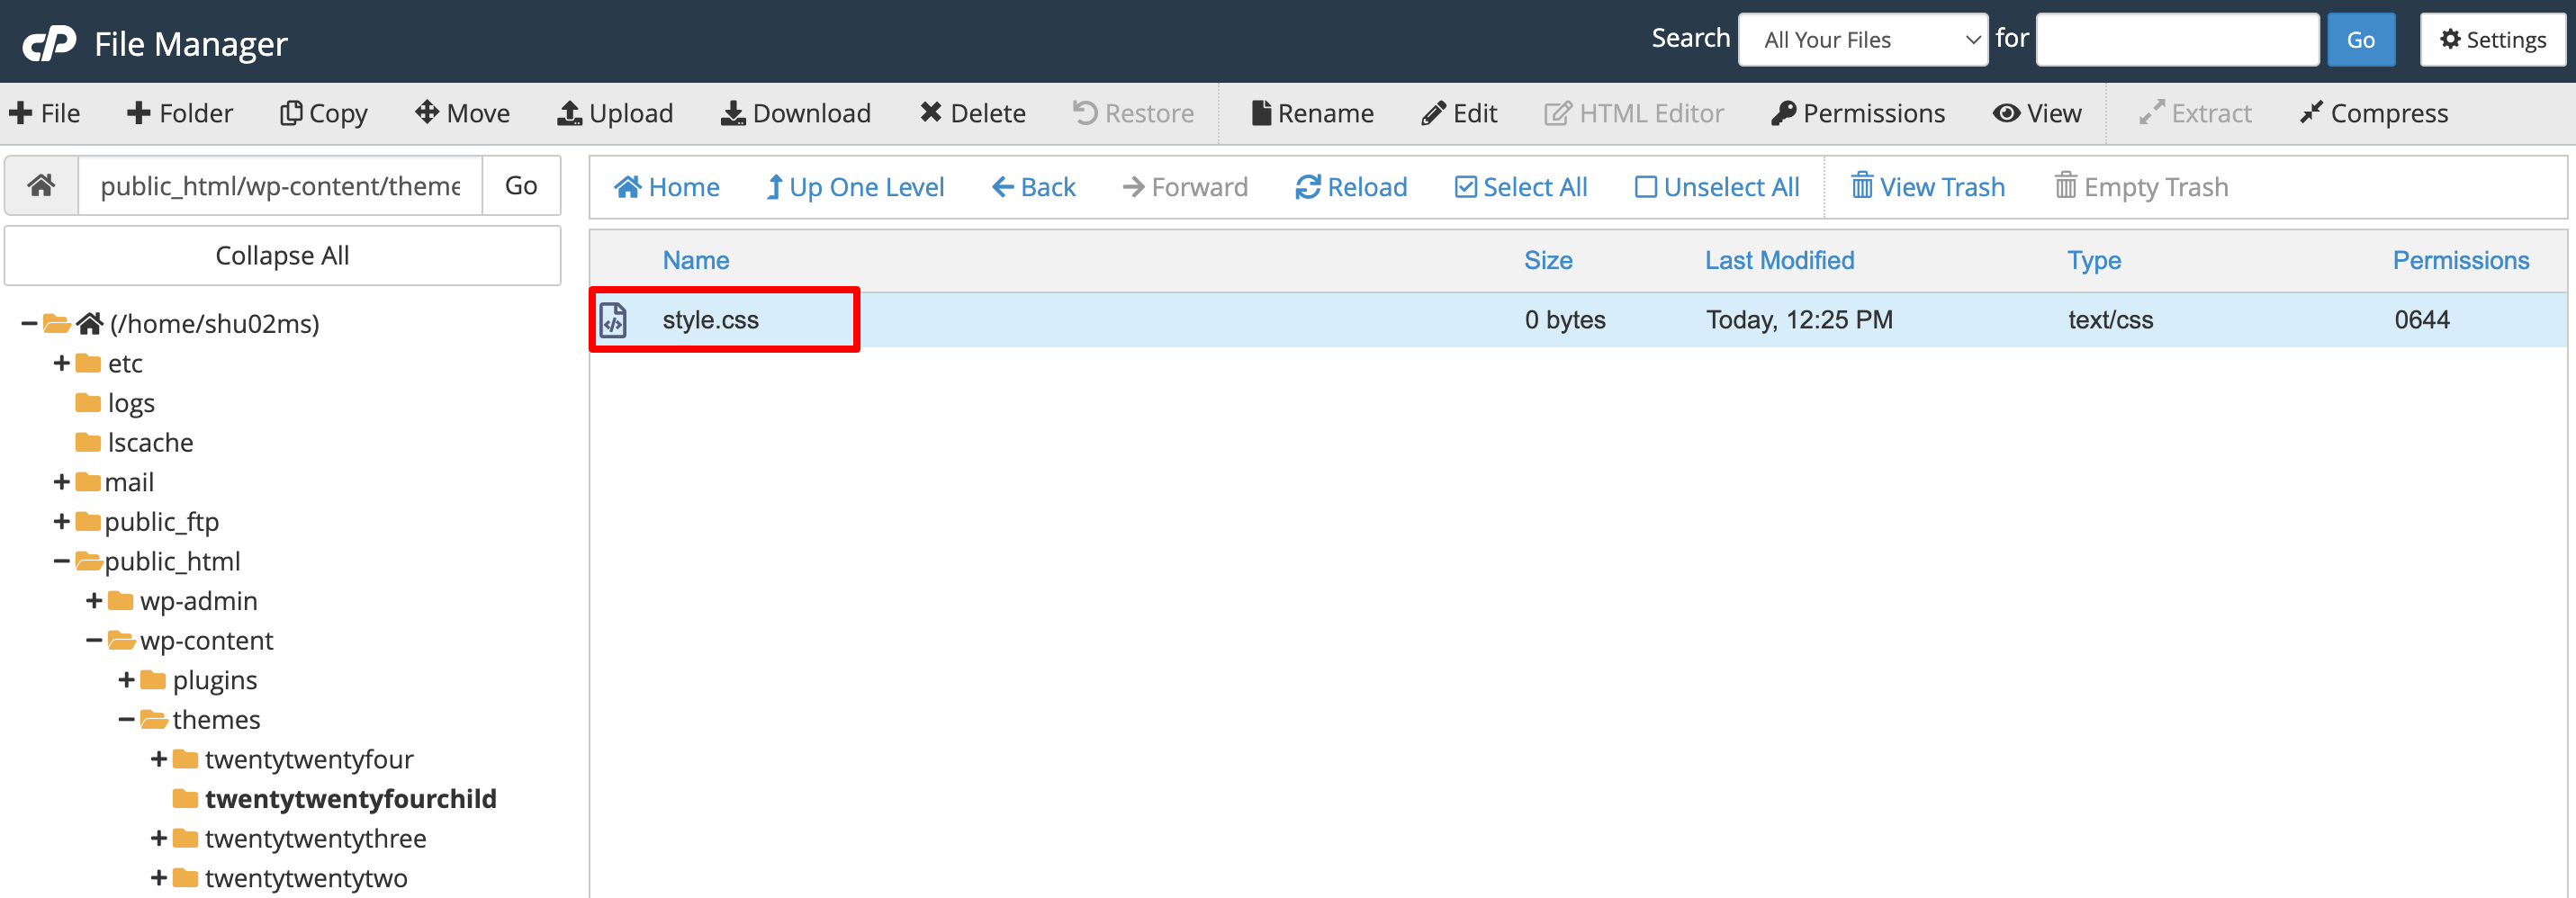
Step 03: Create a New style.css File
In the twentytwentyfourchild directory, create a new CSS file named style.css.
Edit this file and add the following code. Finally, save the file to complete this step.
/*
Theme Name: Twenty Twenty-Four Child
Theme URI: https://yoursite.com/twenty-twenty-four-child/
Description: Twenty Twenty-Four Child Theme
Author: Shams Sumon
Author URI: https://yoursite.com/
Template: twentytwentyfour
Version: 1.0.0
*/
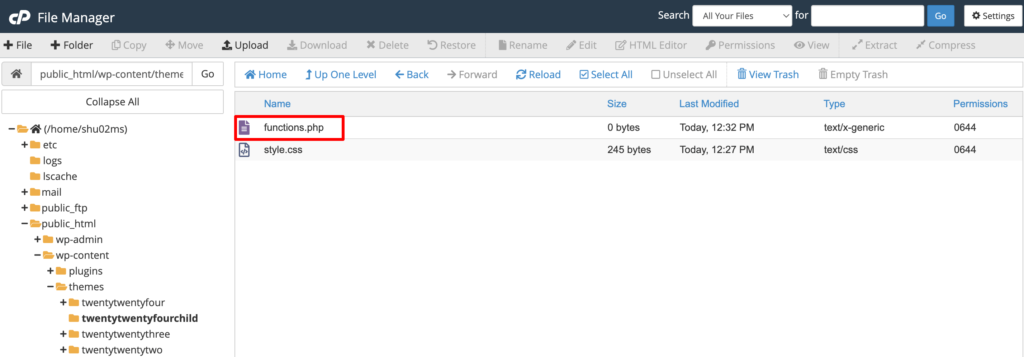
Step 04: Create a New functions.php File
Within the child theme’s directory, create another new file named functions.php.
Then copy this code and paste it to the file. Don't forget to save the file.
<?php
// Your code to enqueue parent theme styles
function enqueue_parent_styles() {
   wp_enqueue_style( 'parent-style', get_template_directory_uri() . '/style.css' );
}

add_action( 'wp_enqueue_scripts', 'enqueue_parent_styles' );
?>
Step 05: Install and Activate Your Child Theme
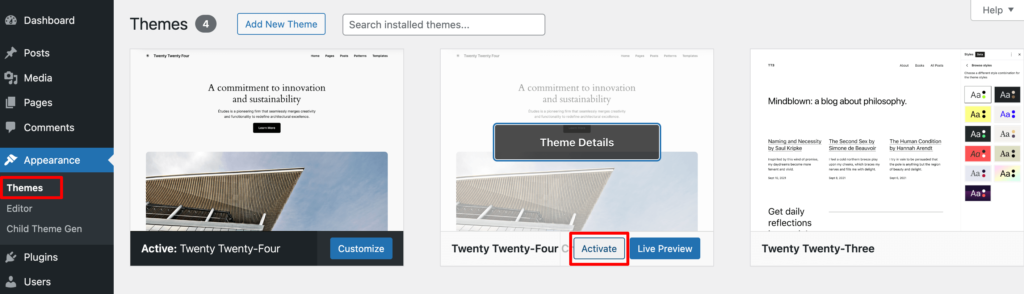
Congratulations! You have successfully created the child theme. If you visit your WordPress dashboard and then go to Appearance -> Themes, you will find the child theme there.
Now click on the Activate button to activate the theme on your site.
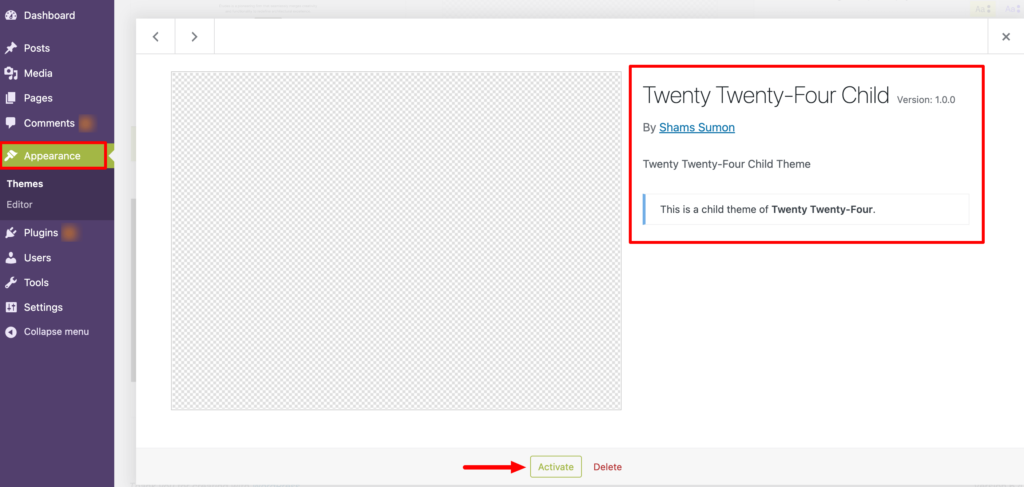
That's how you can create a child theme in WordPress manually.
Method 2: Create a Child Theme Using a WordPress Plugin
There is another way to create a child theme in WordPress which is using a plugin. It's more easier method to create a child theme than doing it manually.
Because when you are creating it manually you have to edit a few crucial files of your site like style.css and functions.php. If you mistakenly make any mistake here, things can go south and your site can be broken.
However, when you are using a plugin to create a child theme, you don't have to access all those crucial files of your site. You can easily do it within minutes even if you are a newbie.
Let's find out how to create a child theme in WordPress using a plugin:
Several WordPress plugins can help you in this regard. However, we are going to use the WP Child Theme Generator plugin. It's a free and easy-to-use plugin to get this job done within a few clicks.
Step 01: Install the WP Child Theme Generator Plugin
Log in to your WordPress backend and go to Plugins -> Add New Plugin. There you'll find a search box to search the plugin. Type the plugin name – WP Child Theme Generator and install the plugin from the search result.
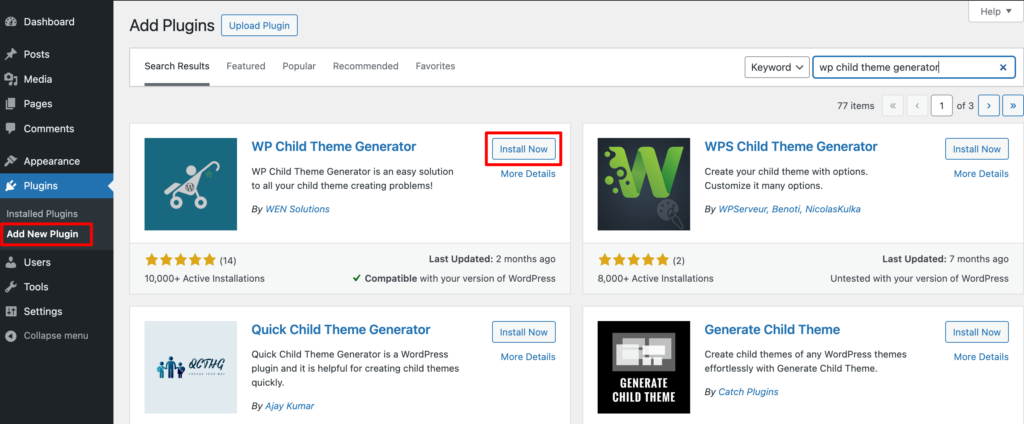
Finally, activate the plugin to use it on your site.
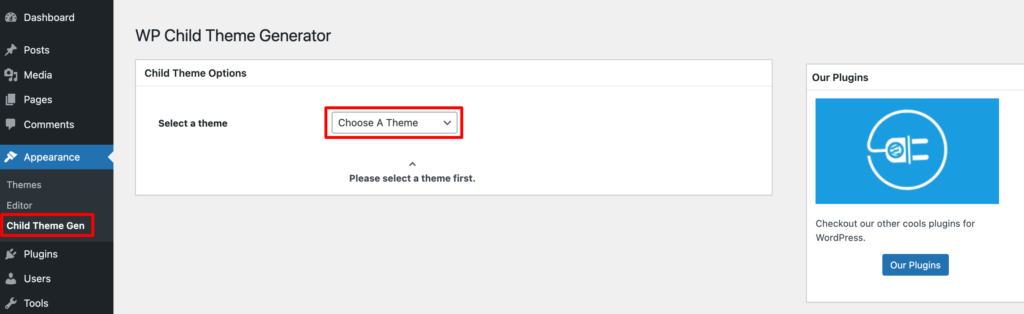
Step 02: Create a Child Theme
After activating the plugin, if you hover on the “Appearance” button, you will find the “Child Theme Gen” option. Click on that option. It will take you to a new interface.
Now choose a parent theme from the drop-down list. Here we are selecting Twenty Twenty-Four as a parent theme which means we are creating a child theme for the Twenty Twenty-Four theme. Then insert a few basic information like the author name, child theme name, etc.
If you tick the Create & Activate option, the child theme will be automatically activated. However, if you don't check the option, you'll be required to activate the child theme separately. We'll show you how to activate the child theme in the next step.
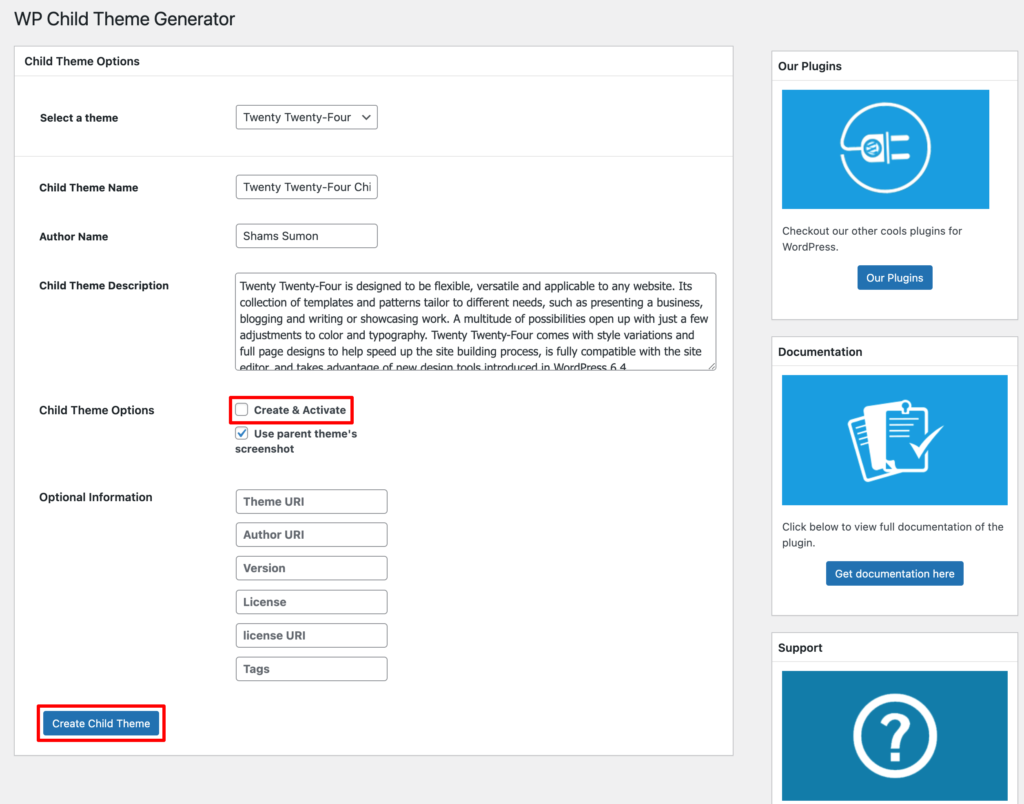
Finally, click on the “Create Child Theme” option to create your child theme.
Step 03: Activate the Theme
Congratulations! You have successfully created a child theme in WordPress using a plugin. If you navigate to Appearance -> Themes, you'll find your newly created child theme.
Now click on the Activate option to activate the theme on your site.
That's all!

How to Create a Child Theme – Ending Note
Creating a child theme in WordPress offers a safe and efficient way to customize your website's design and functionality keeping your parent theme safe. However, before creating a child theme, it's essential to back up your site to safeguard against any unwanted situation.
We have shown two ways to create a child theme in WordPress in this blog. You can follow either of the ways to get your job done- manually or using a plugin.
With your child theme successfully created, you now have the freedom to personalize your website to your heart's content, knowing that your changes are secure and easily manageable. So go ahead and redesign your site as you want.
That being said if you have any further queries related to this tutorial, feel free to share them with us using the comment box below. We are all ears!