


How to Build an Alumni Website with WordPress
The alumni network is the best way to keep in touch with your seniors and peers after graduating from college or school. Especially through an alumni website.
Everyone is connected through the internet. That is why creating an alumni website is a great way to stay connected and get all the info about your classmates and seniors. Moreover, you can charge a small fee to register as an alumnus and use that fee to conduct meetups and get-togethers.
In this guide, we’ll walk you step by step through building an alumni website with WordPress, highlighting tools and plugins that make the process smooth and efficient. If you're looking to strengthen your alumni network, this tutorial has you covered.
Why an Institution and Its Graduates Need an Alumni Website
Creating an alumni website offers a host of benefits for both the institution and its graduates. Here’s why investing in one is worth it:
- Stronger Community Connections: An alumni website keeps former students connected with each other and with the institution, fostering networking, friendships, and mentorship opportunities.
- Centralized Information Hub: Share updates, news, events, and achievements in one place. Alumni can quickly find what’s happening, register for reunions, or access resources without confusion.
- Professional Networking Opportunities: Graduates can showcase their skills, connect with peers in similar fields, and even discover career opportunities through the platform.
- Fundraising and Support: Alumni websites can include donation or sponsorship options, making it easy for former students to contribute to scholarships, projects, or institutional growth.
- Engagement Analytics: Track which events, posts, or programs resonate most with your alumni. Insights help you tailor content and initiatives that keep your community active.
- Promotes Institutional Pride: Highlight success stories, awards, and milestones to strengthen the bond alumni feel toward their alma mater.
Advantages of Creating a Paid Alumni Membership Site

We have already said you can use the subscription fee to organize meetups, etc. But other than that, there are quite a few advantages, like-
- Turn your visitors into paid customers
- Charge your visitors on a monthly or yearly basis
- Let your visitors post their articles on your website
- Let a group of people connect with each other
- Allow members to post content on the website
- Let the Members get exclusive online access
- Build a strong network among your users, which is necessary for their careers.
- Allow your users to reunite with each other easily and more
But the biggest advantage of creating an alumni website is bringing back the good old college days to a group of college friends.
Why You Should Choose WordPress to Build an Alumni Site?
The reason is simple! WordPress is the most popular CMS that lets you build an alumni website easily with the power of its plugins. You don't even need to use a single line of code, which will save you effort and precious time.
Other than that, there are quite a few advantages of creating an alumni website with WordPress-
- Ease of Use
- Flexible Content Management
- Membership Plugins
- Community Building with BuddyPress
- Plugin Ecosystem
- Responsive Design
- SEO-Friendly
- Customization Options
- Scalability
- Cost-Effectiveness
- Support and Resources
- Data Ownership.
These factors will help you greatly to manage your alumni website with ease.
Read: Best CMS Platforms in 2026[WordPress vs Joomla vs Drupal vs Squarespace vs Wix vs Medium]
How to Create an Alumni Website Using WordPress

It's easier than easy! You can not only build an alumni site, but you can also create subscription fees for every member of the site.
We are going to choose the WP User Frontend plugin to create the alumni website. It is one of the best front-end management plugins in the WordPress ecosystem. The plugin has more than 20000+ active installations and 339 five-star reviews.
Want to know more about this amazing plugin? Then you can read our guide on why WP User Frontend is the best-selling WordPress frontend plugin.
Now you need to follow these simple steps, and you are good to go!
Step 1: Download and Install WP User Frontend
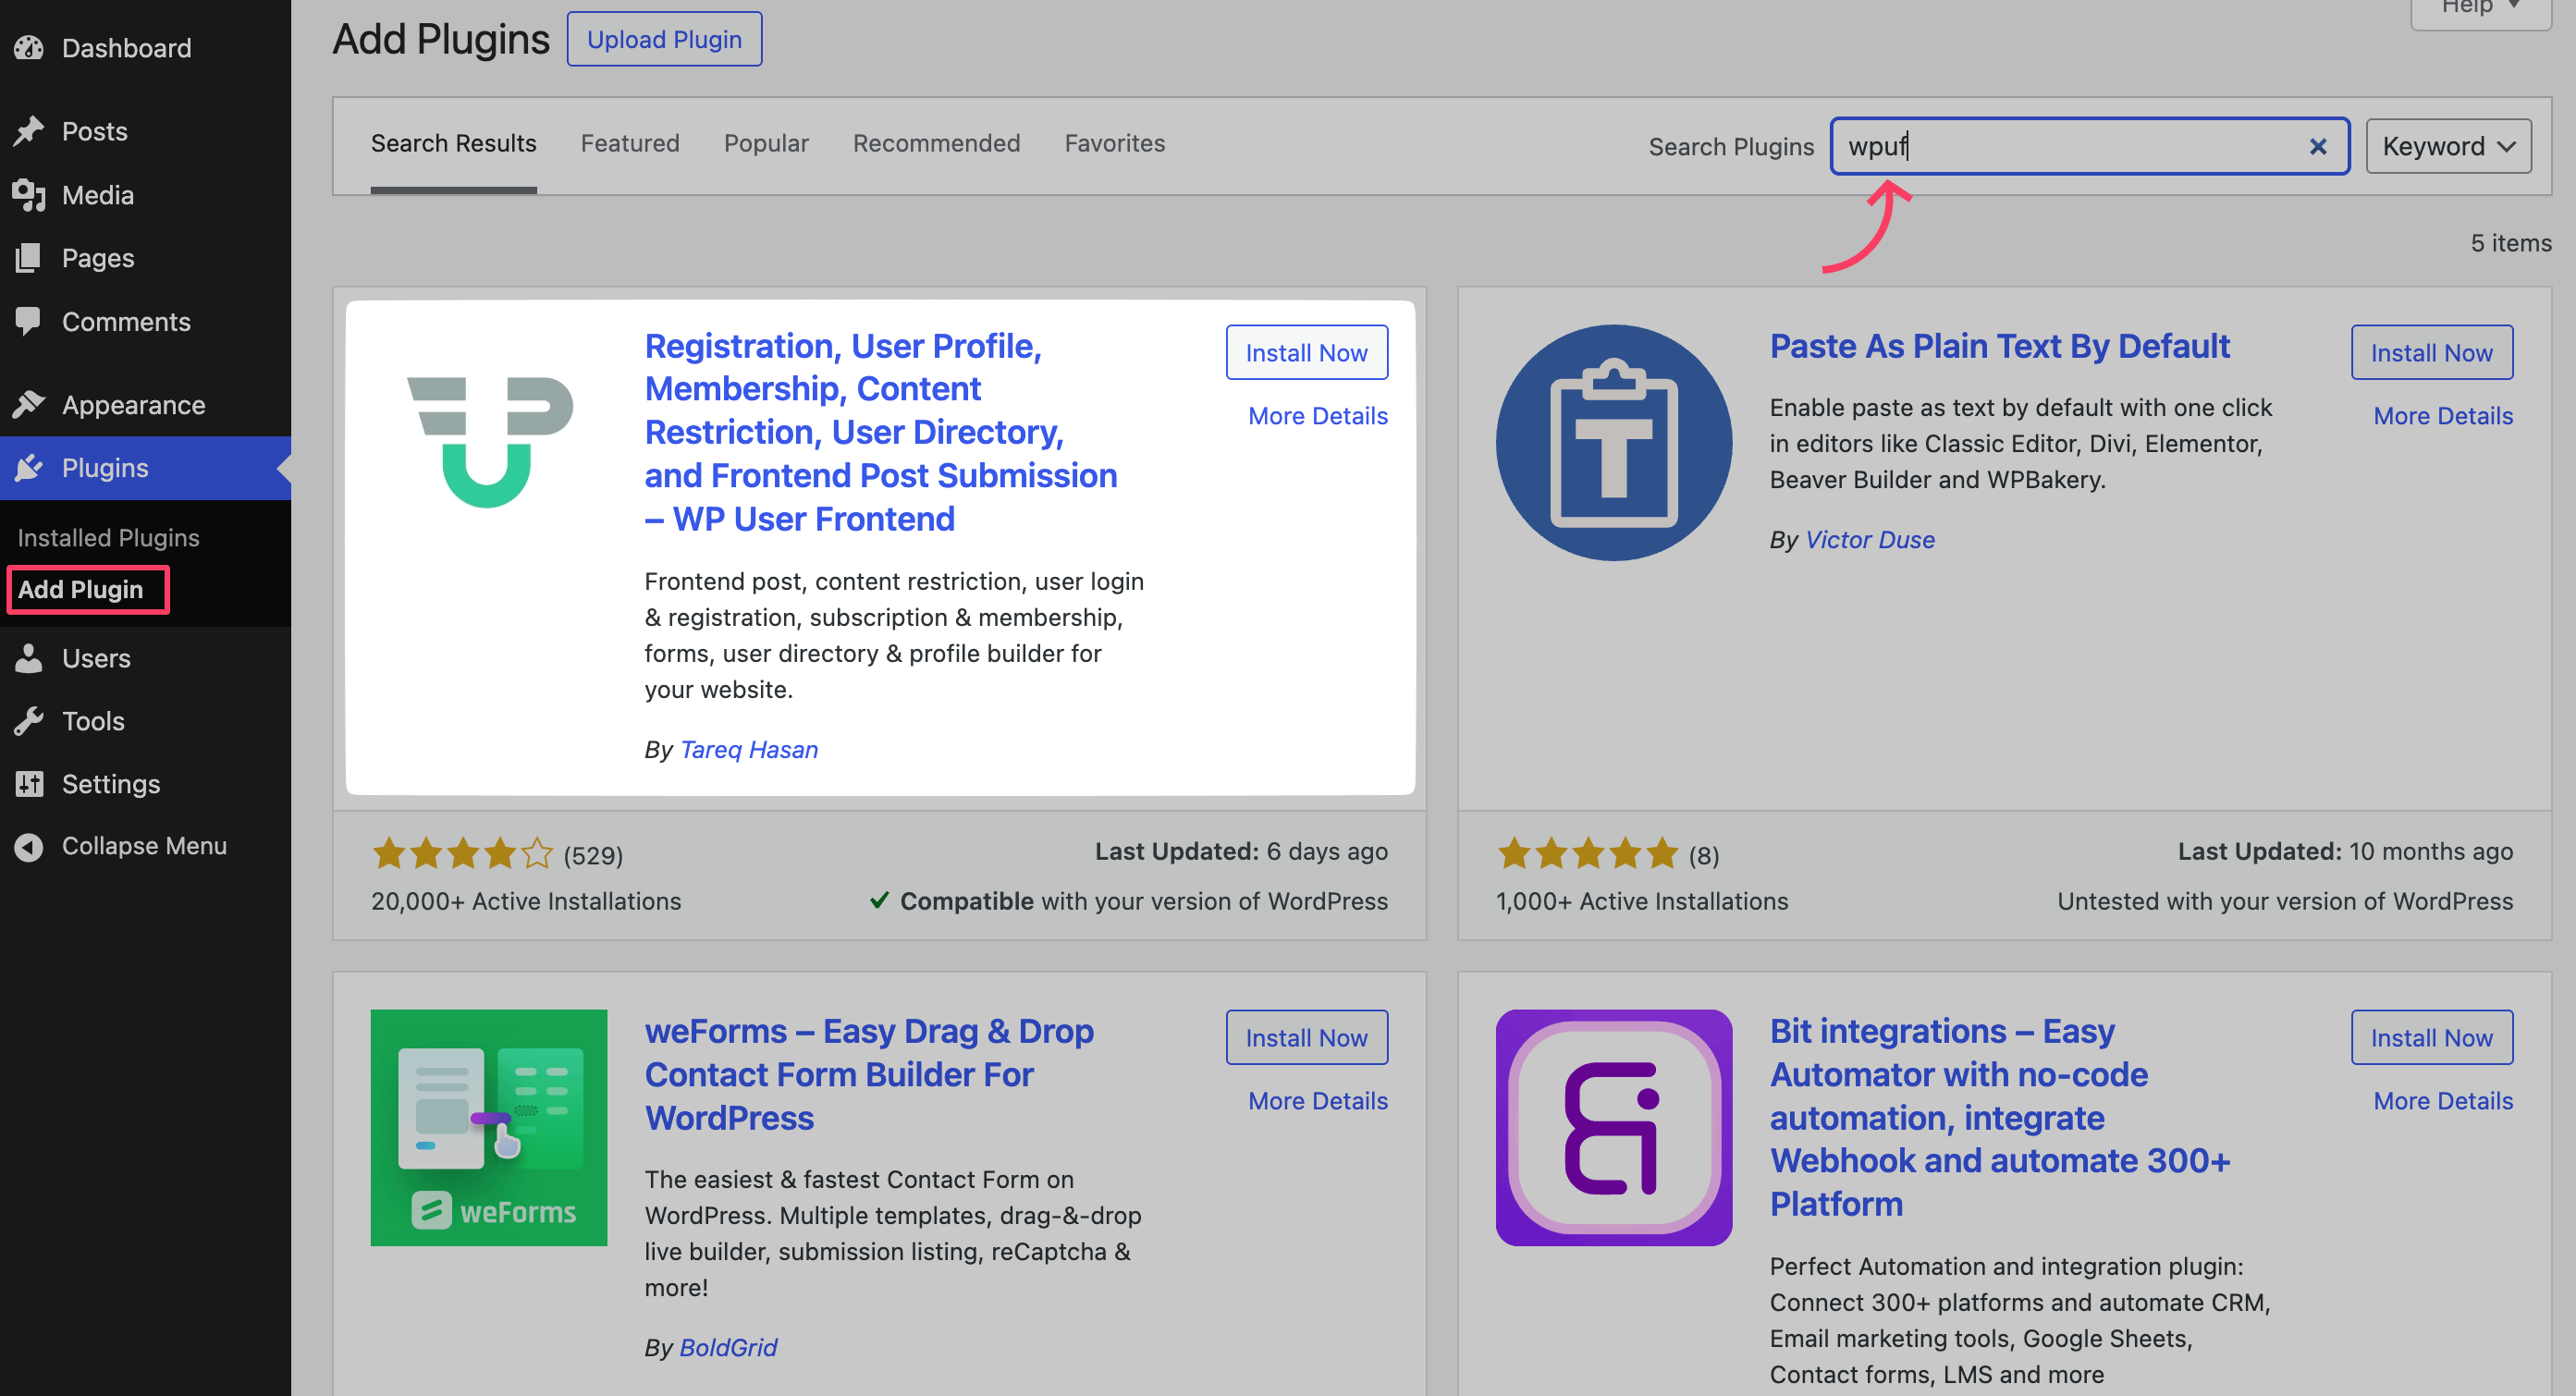
Assuming that you have your WordPress site up and running, go to the WP Admin Dashboard → Plugins → Add Plugin.
Now search for WP User Frontend and install and activate the plugin.
Step 2: Get the WP User Frontend Pro version
An alumni website is actually a user directory website. And as the user directory feature is not free in WordPress, you will need to buy and download the WP User Frontend Pro plugin before creating an alumni site.
Step 3: Activate the Stripe Payment and the User Directory Module
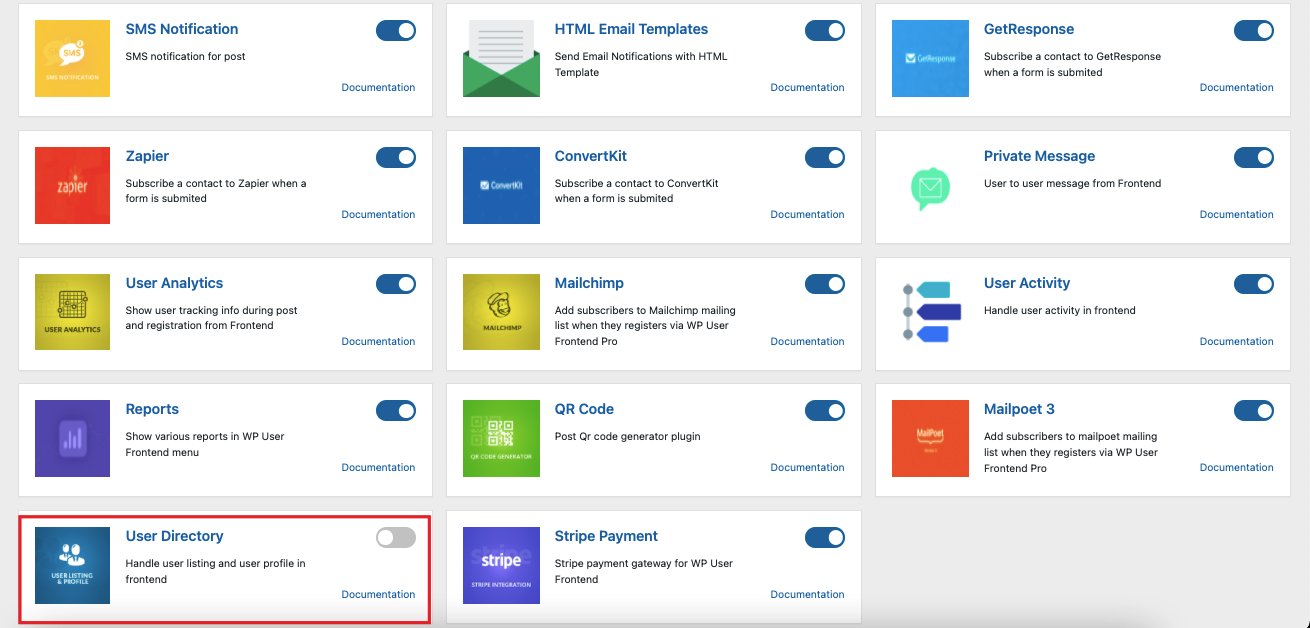
Now go to the WP Admin Dashboard > WP User Frontend > Modules.
Now, activate the User Directory module by turning on the toggle bar.
Step 4: Create & Publish a Registration Form
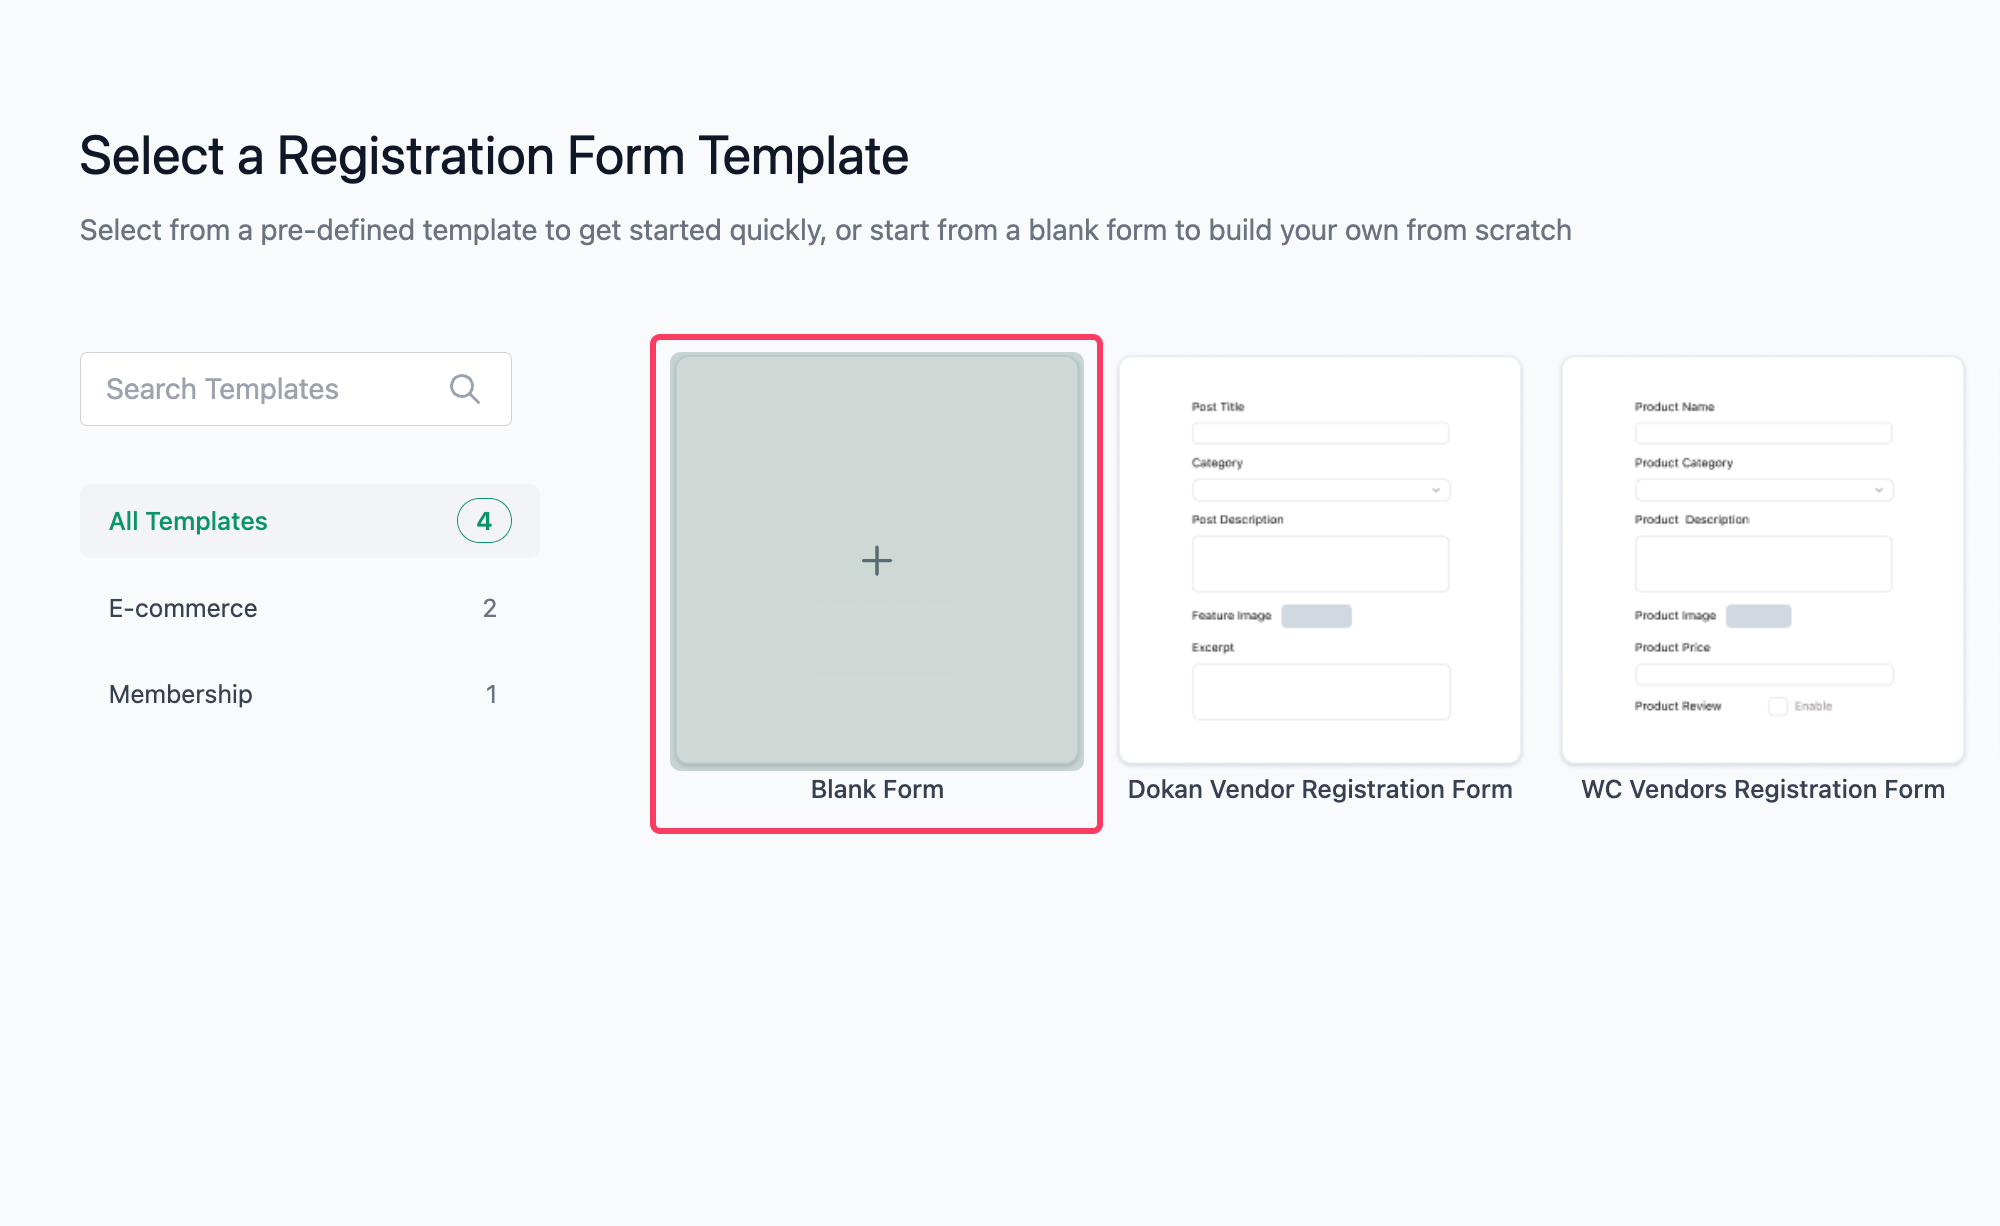
Now, you need to create a registration form in the WP User Frontend Pro. Go to User Frontend → Registration Forms → +Add New
You need to choose a form template from this step. We've chosen the Blank Form since it is the ideal one for our purpose.
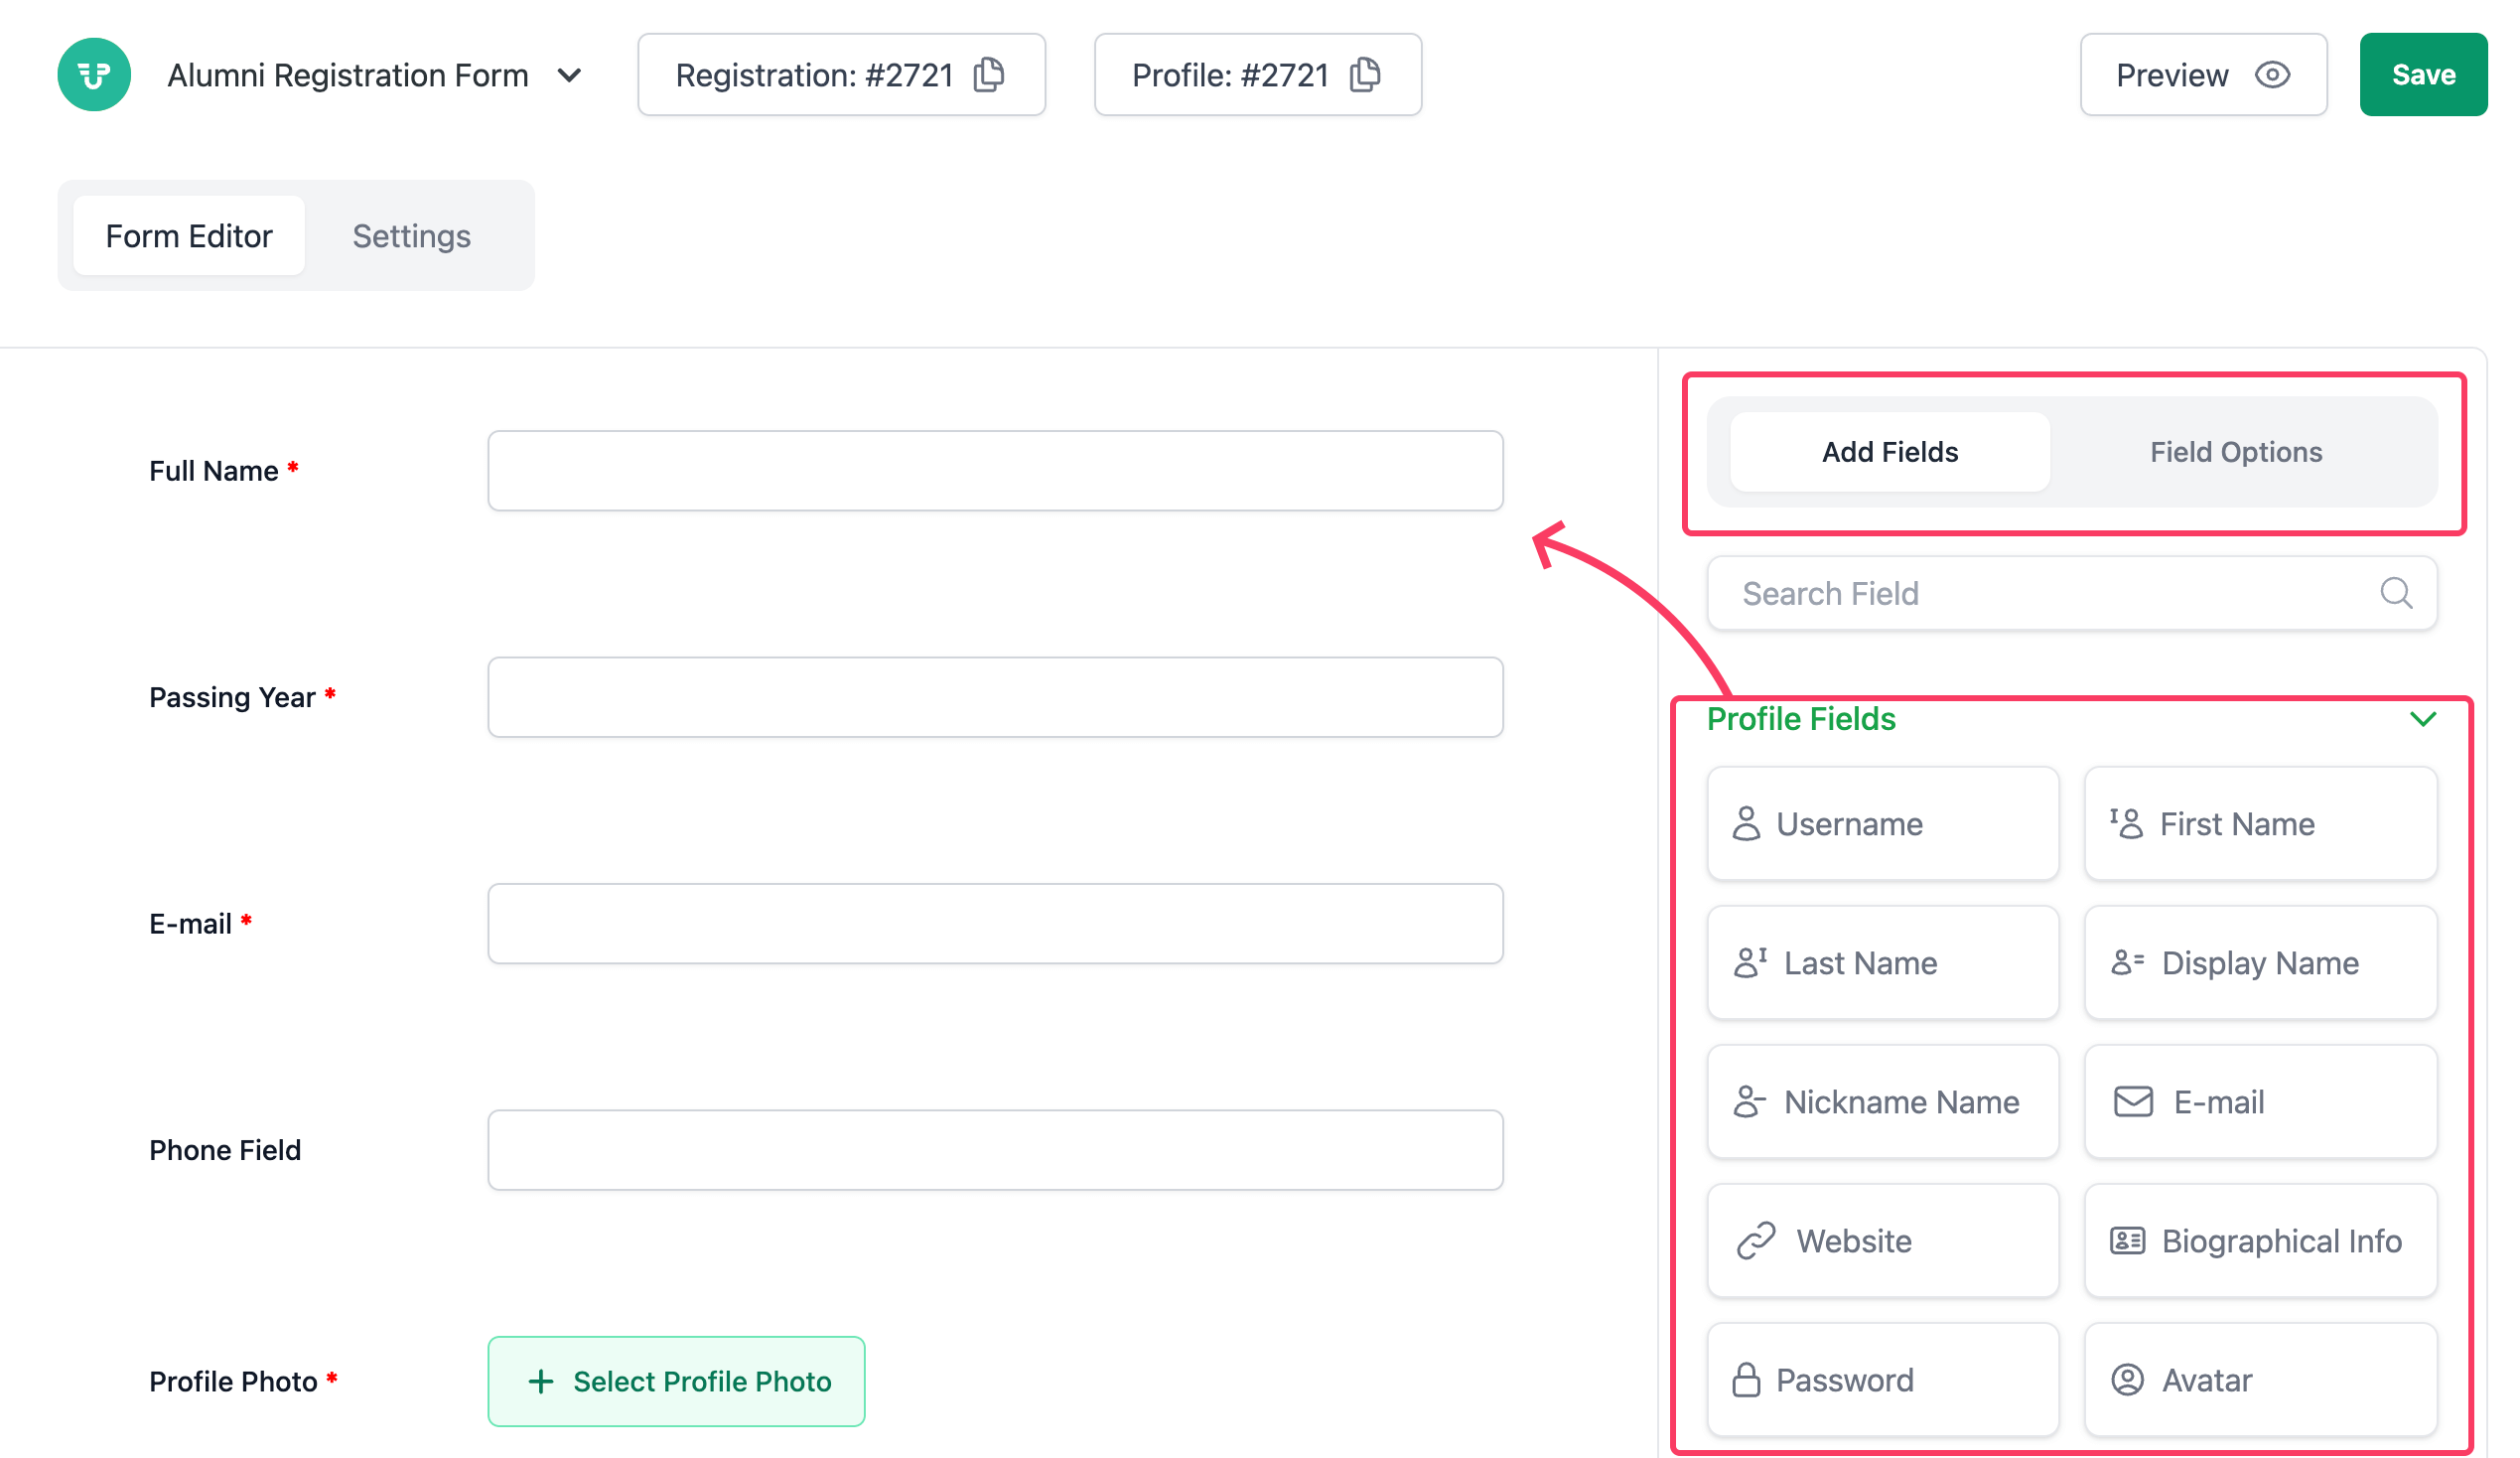
Now, create a registration form for alumni users, including all required fields such as contact details, passing year, department, and more.
The WPUF editor makes this simple: you can drag and drop form elements directly from the panel on the right. For each field, you can use the Field Options tab to:
- Set conditional logic
- Assign custom meta keys
- Add help text
- And configure other advanced settings
This gives you full control to create a detailed, user-friendly registration form tailored to your alumni users. Once all fields are added, hit the Save button.
Now, copy the shortcode and publish it on your site's Membership form page. Finally, hit the publish button.
Now, you have to set this registration page from the User Frontend → Settings → Log in/Registration Page → Registration Page (Dropdown).
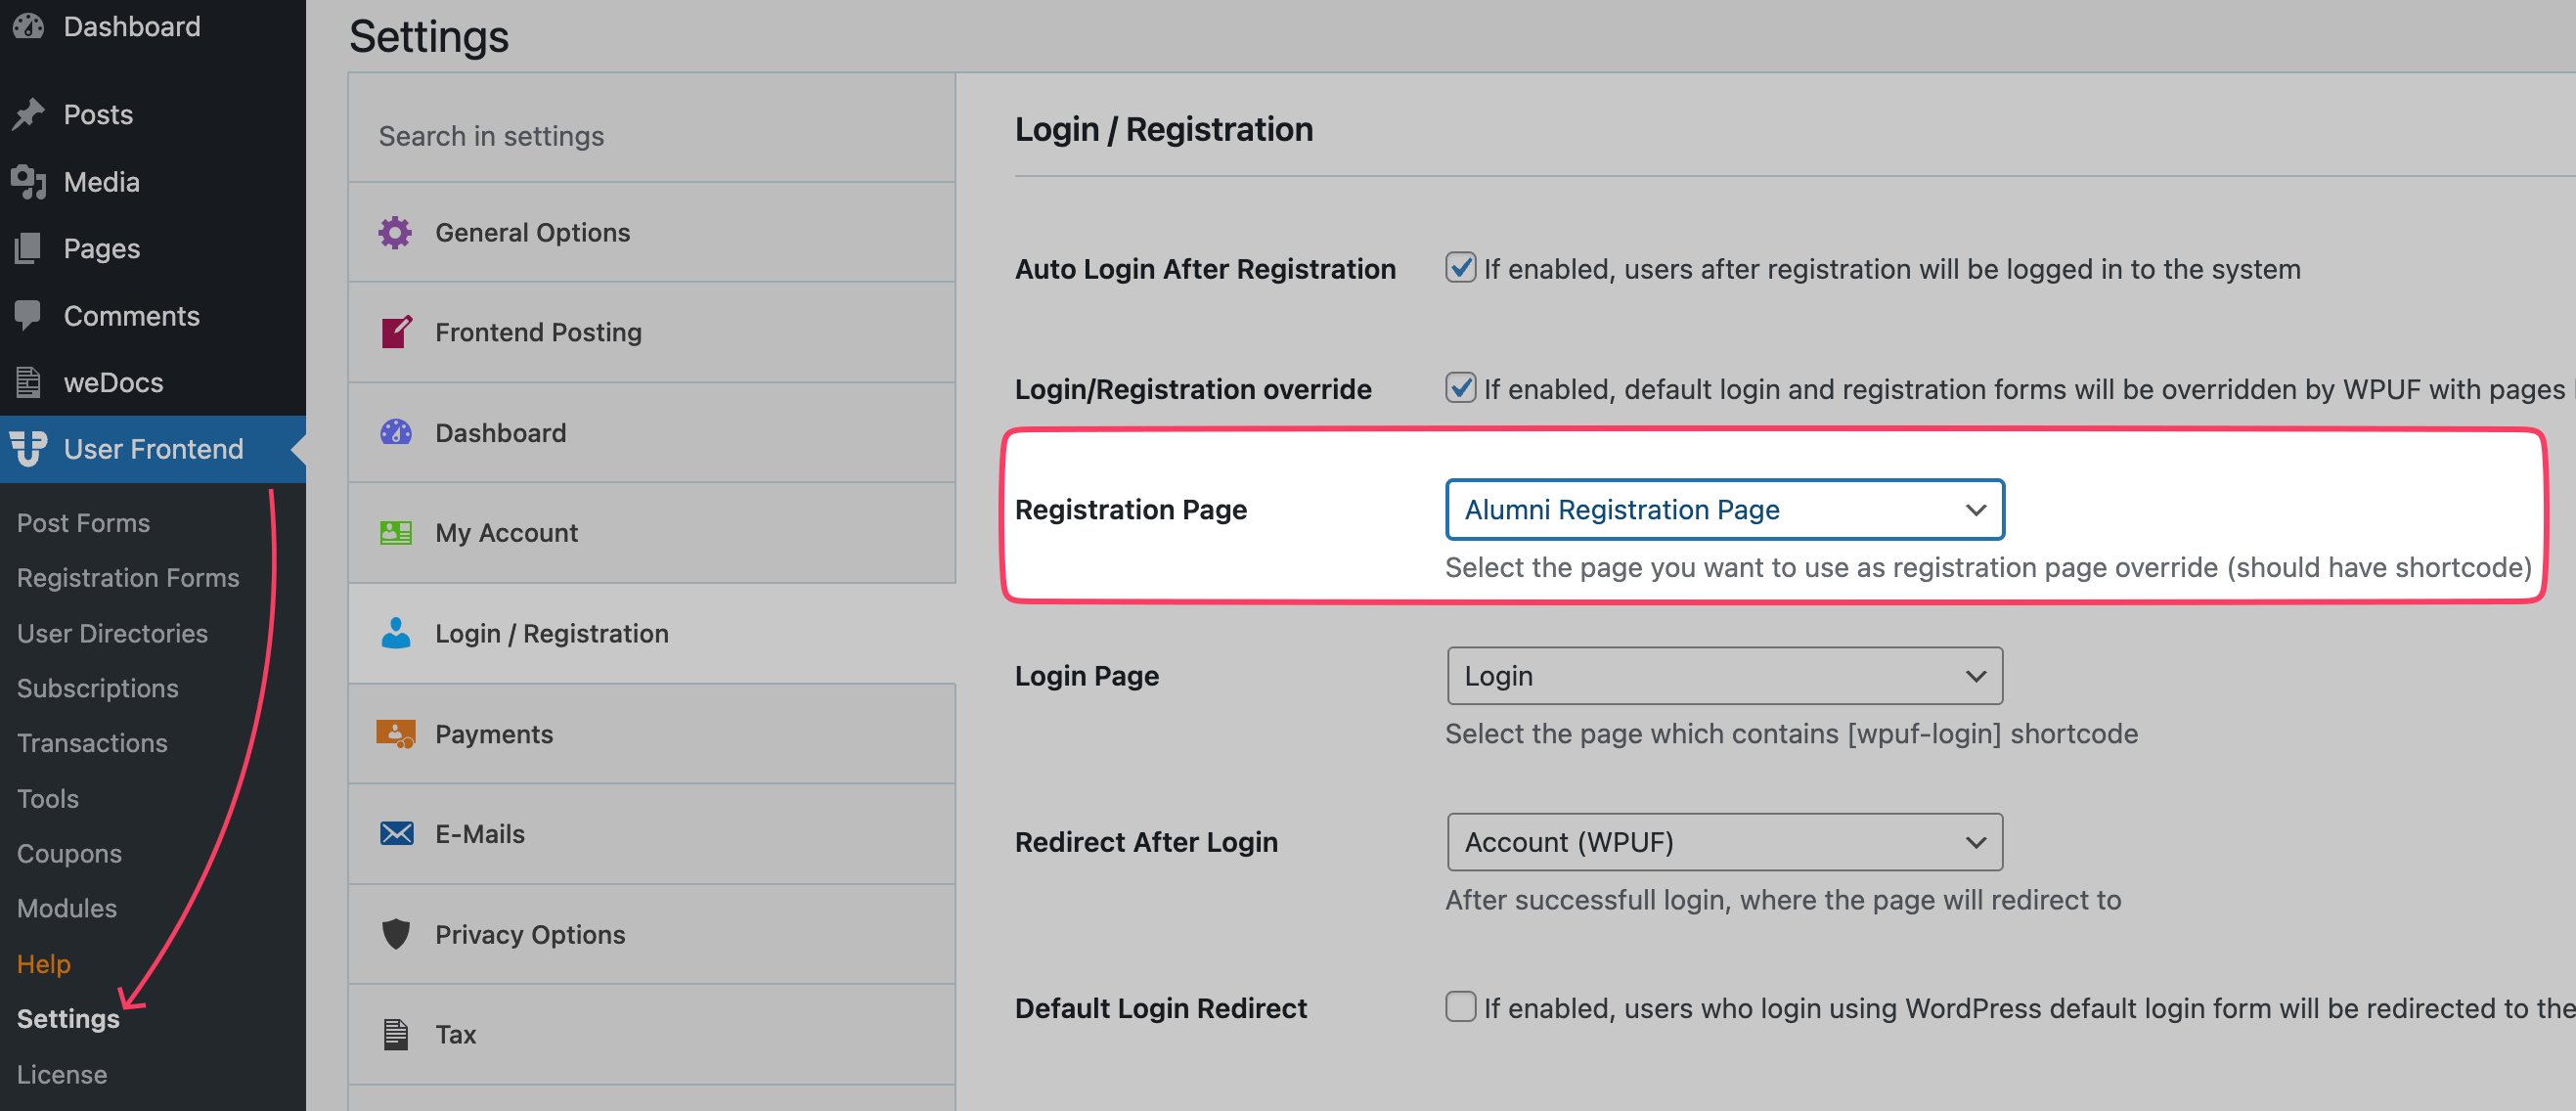
Save the changes.
Step 5: Turn on ‘Anyone Can Register' So that Users Can Register
Navigate to the WP Admin Dashboard → Settings → General. Check the box from the Anyone can register option:
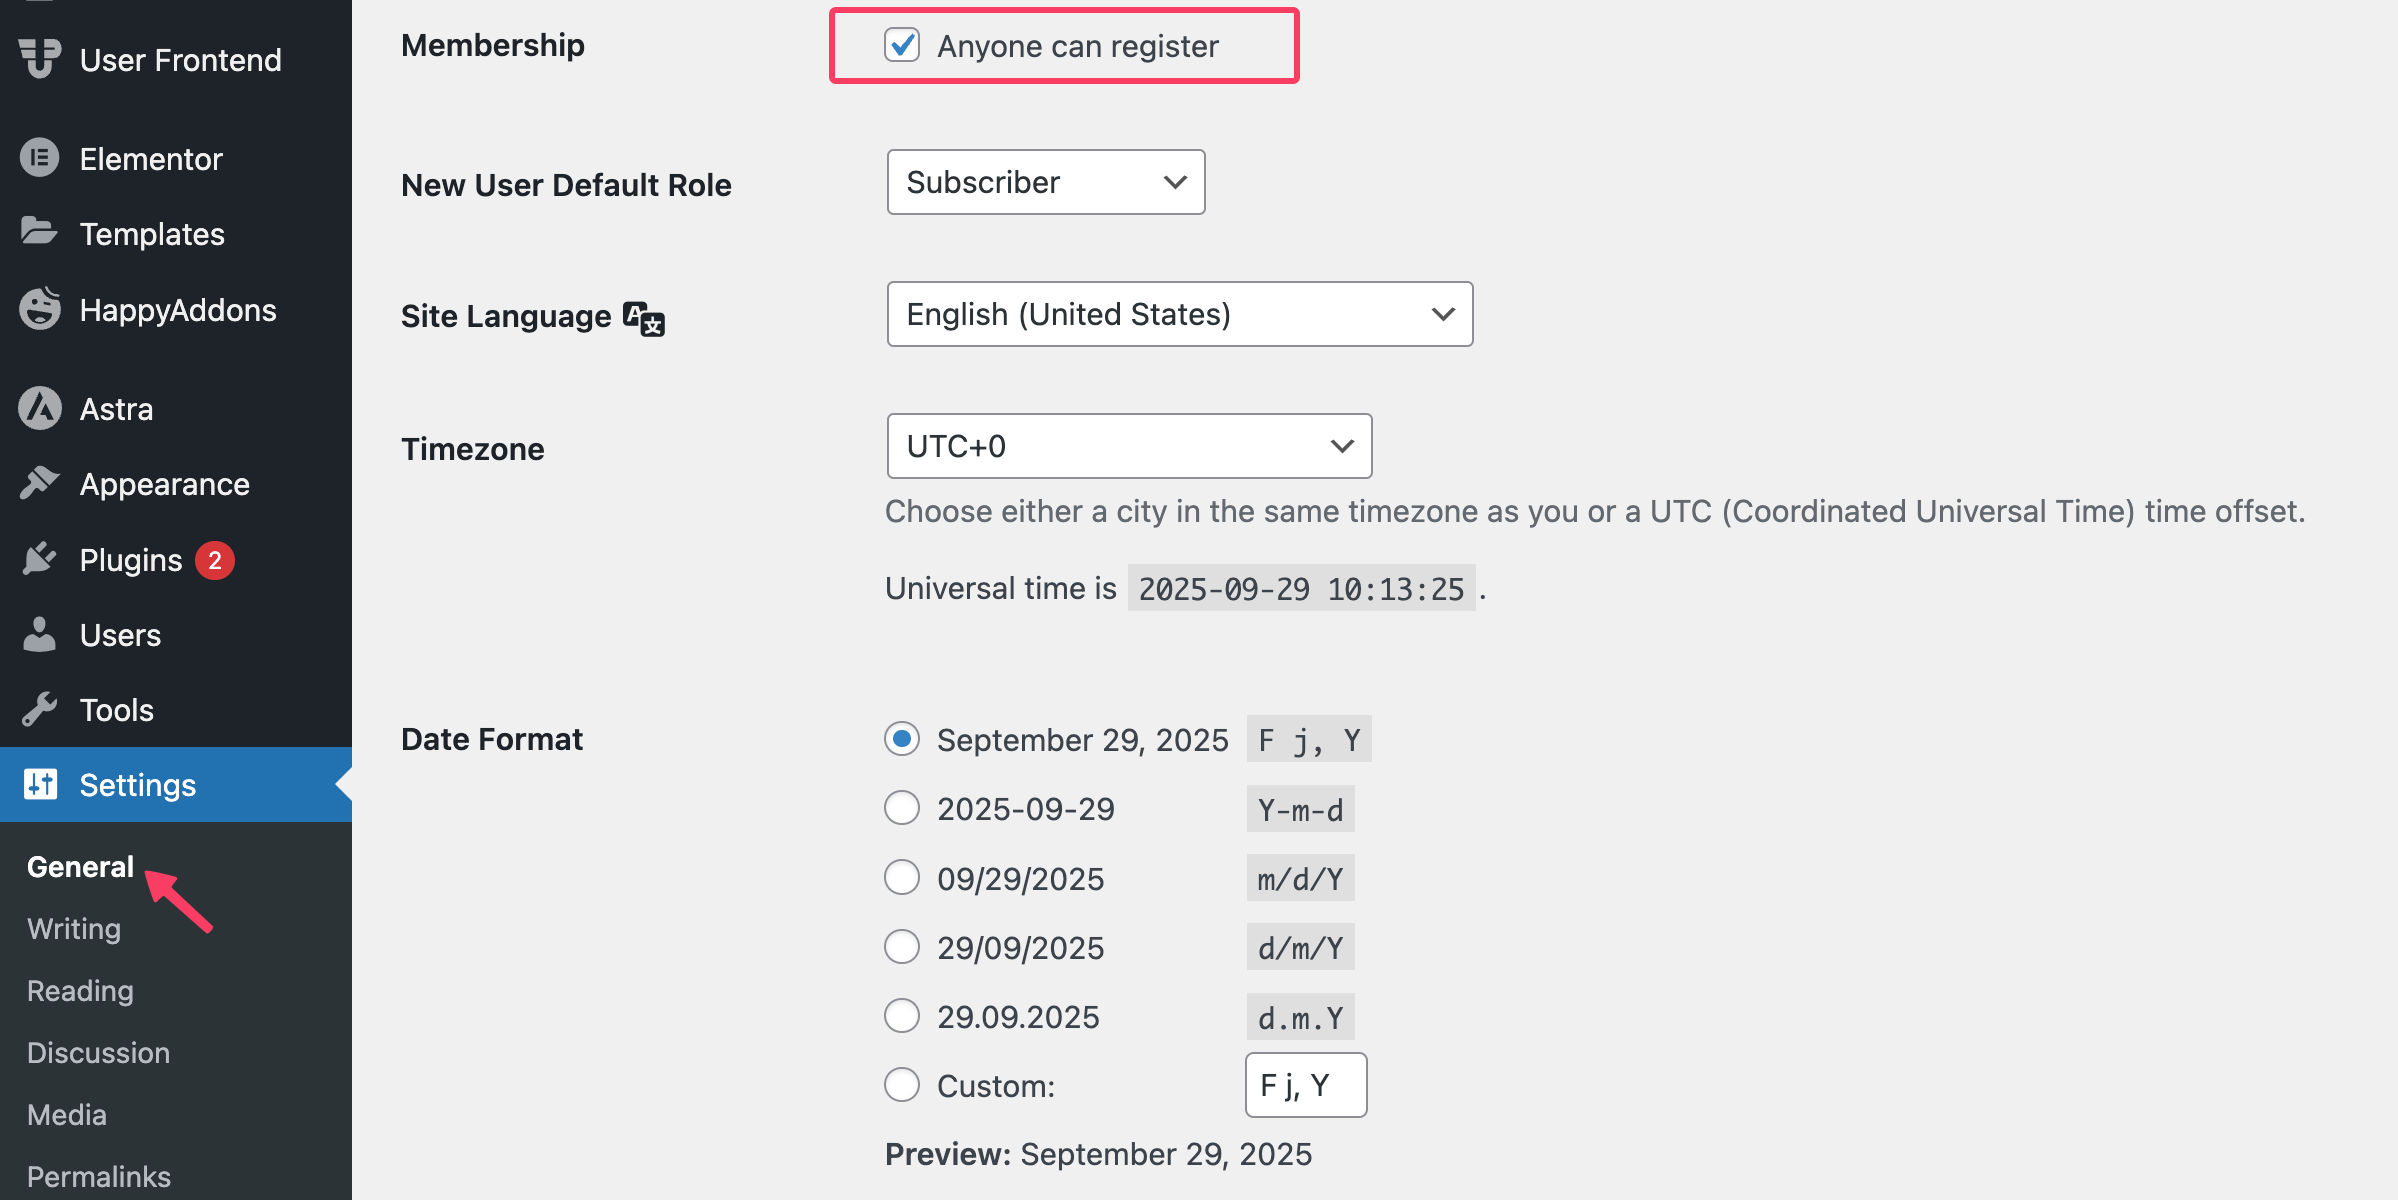
Save the settings.
Step 6: Add a New Directory and Configure User Listing Page
In this step, you will need to go to the User Frontend → User Directories. Here, you can set the Profile Image Size, Avatar Size, Profile Header Template, and user listing template.
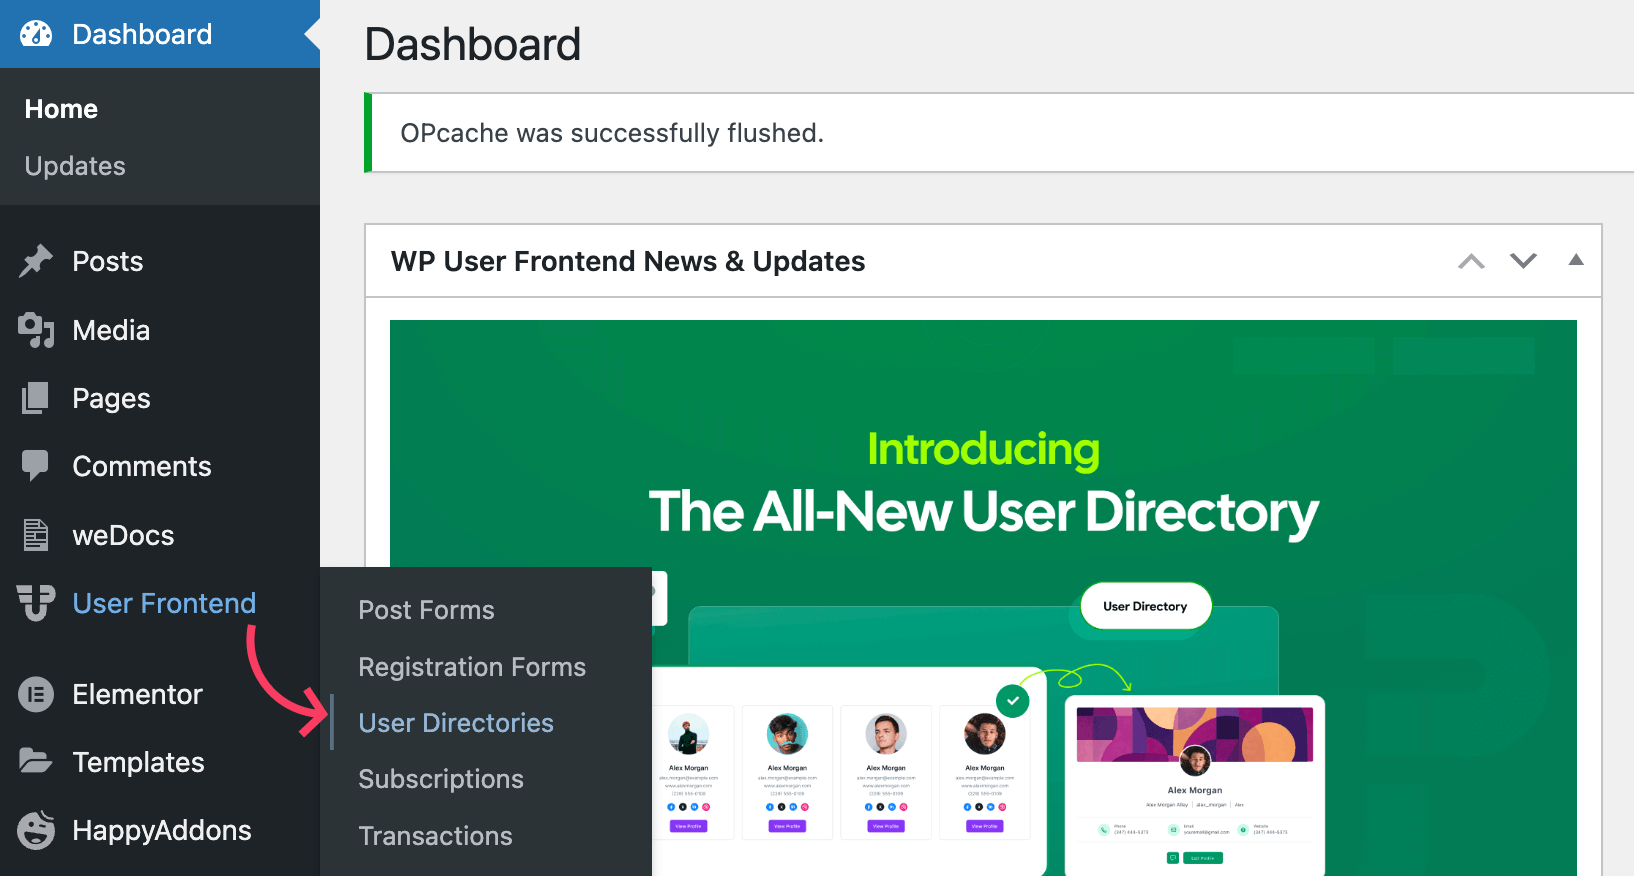
Click the [+ New Directory] button to open the setup wizard.
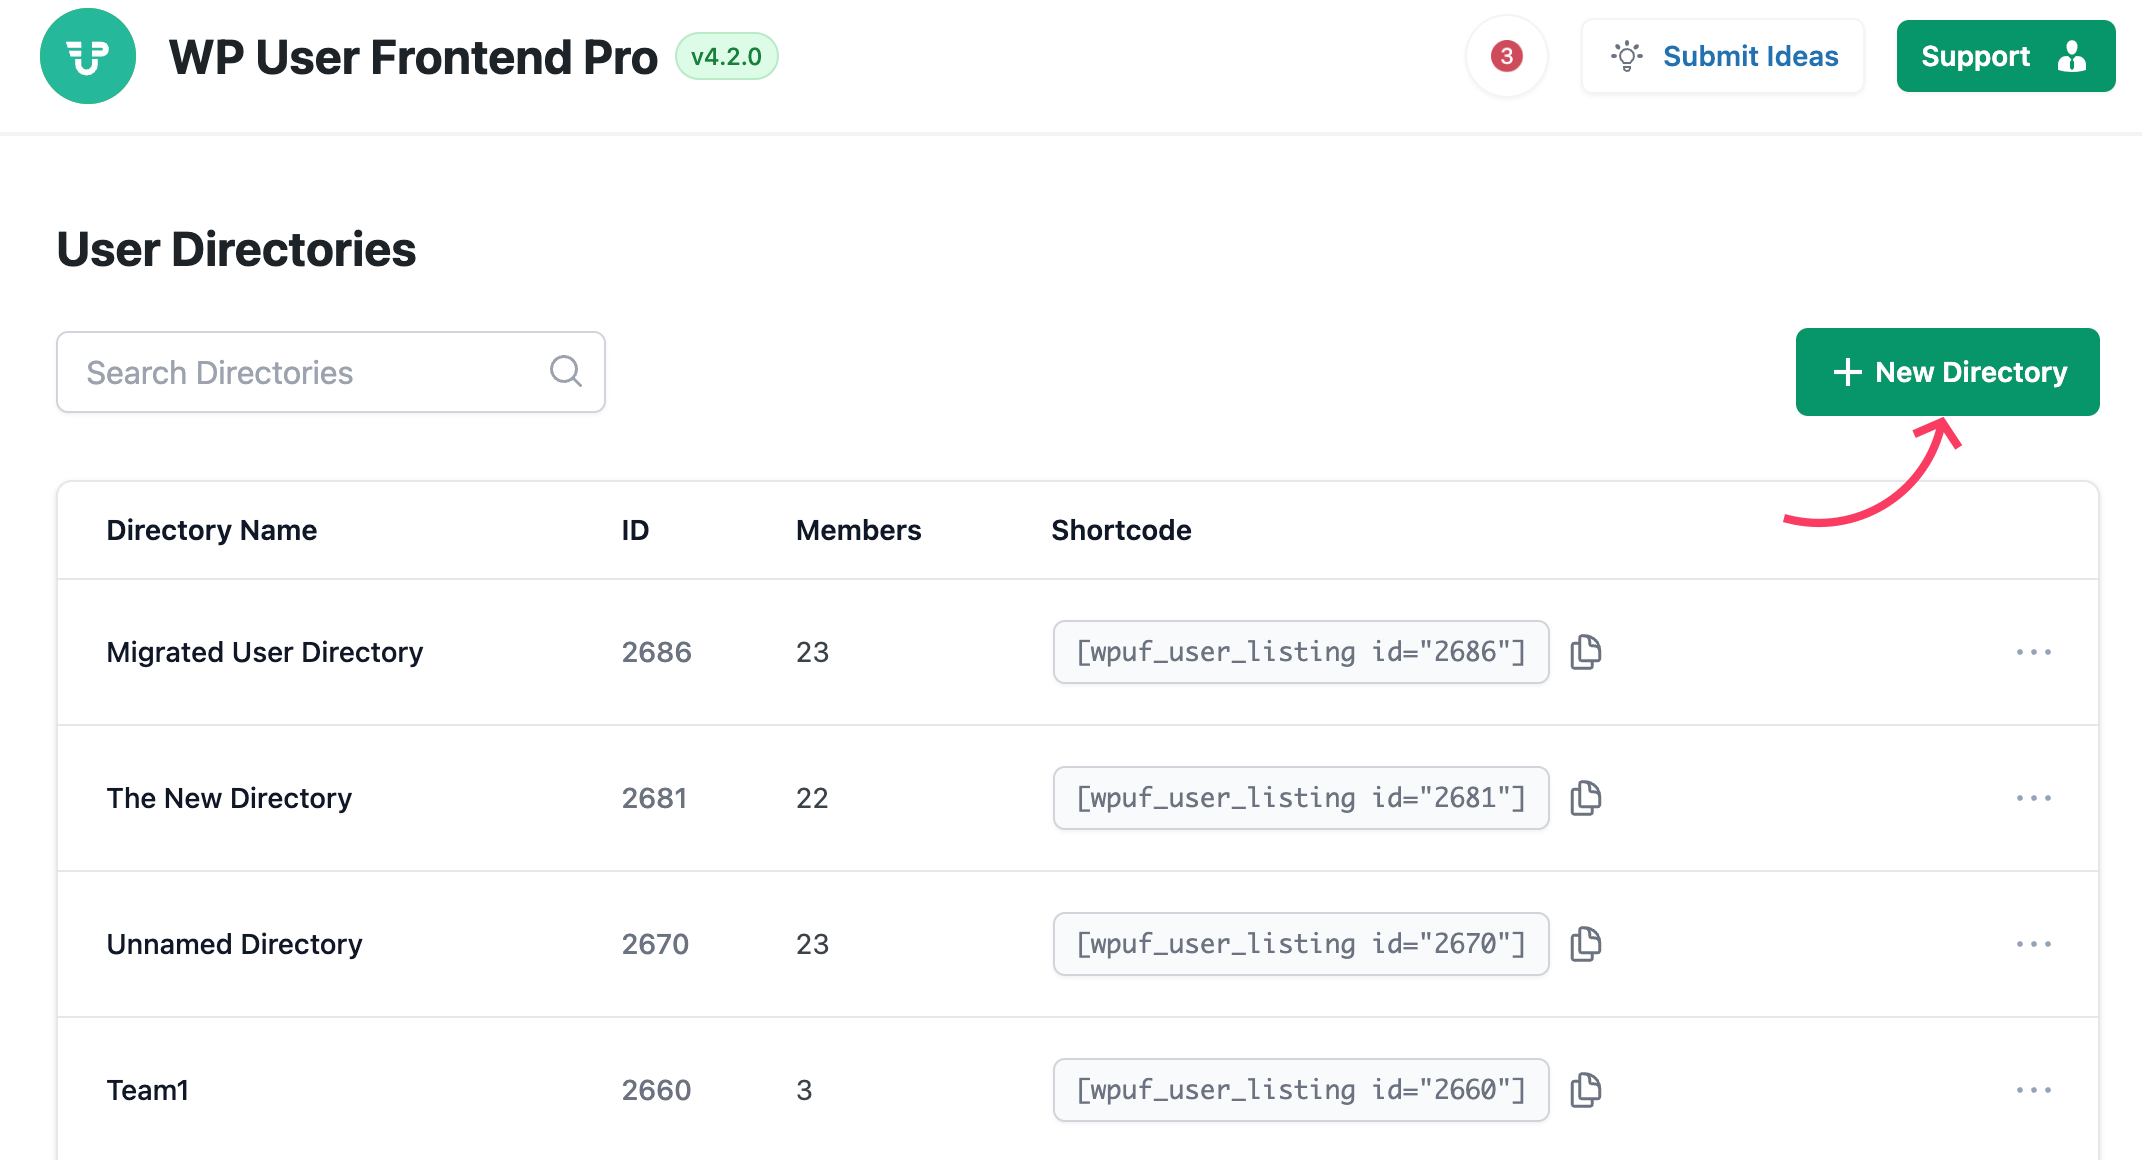
This wizard walks you through a simple, step-by-step process to create your directory. The wizard has steps that let you create an alumni directory with ease.
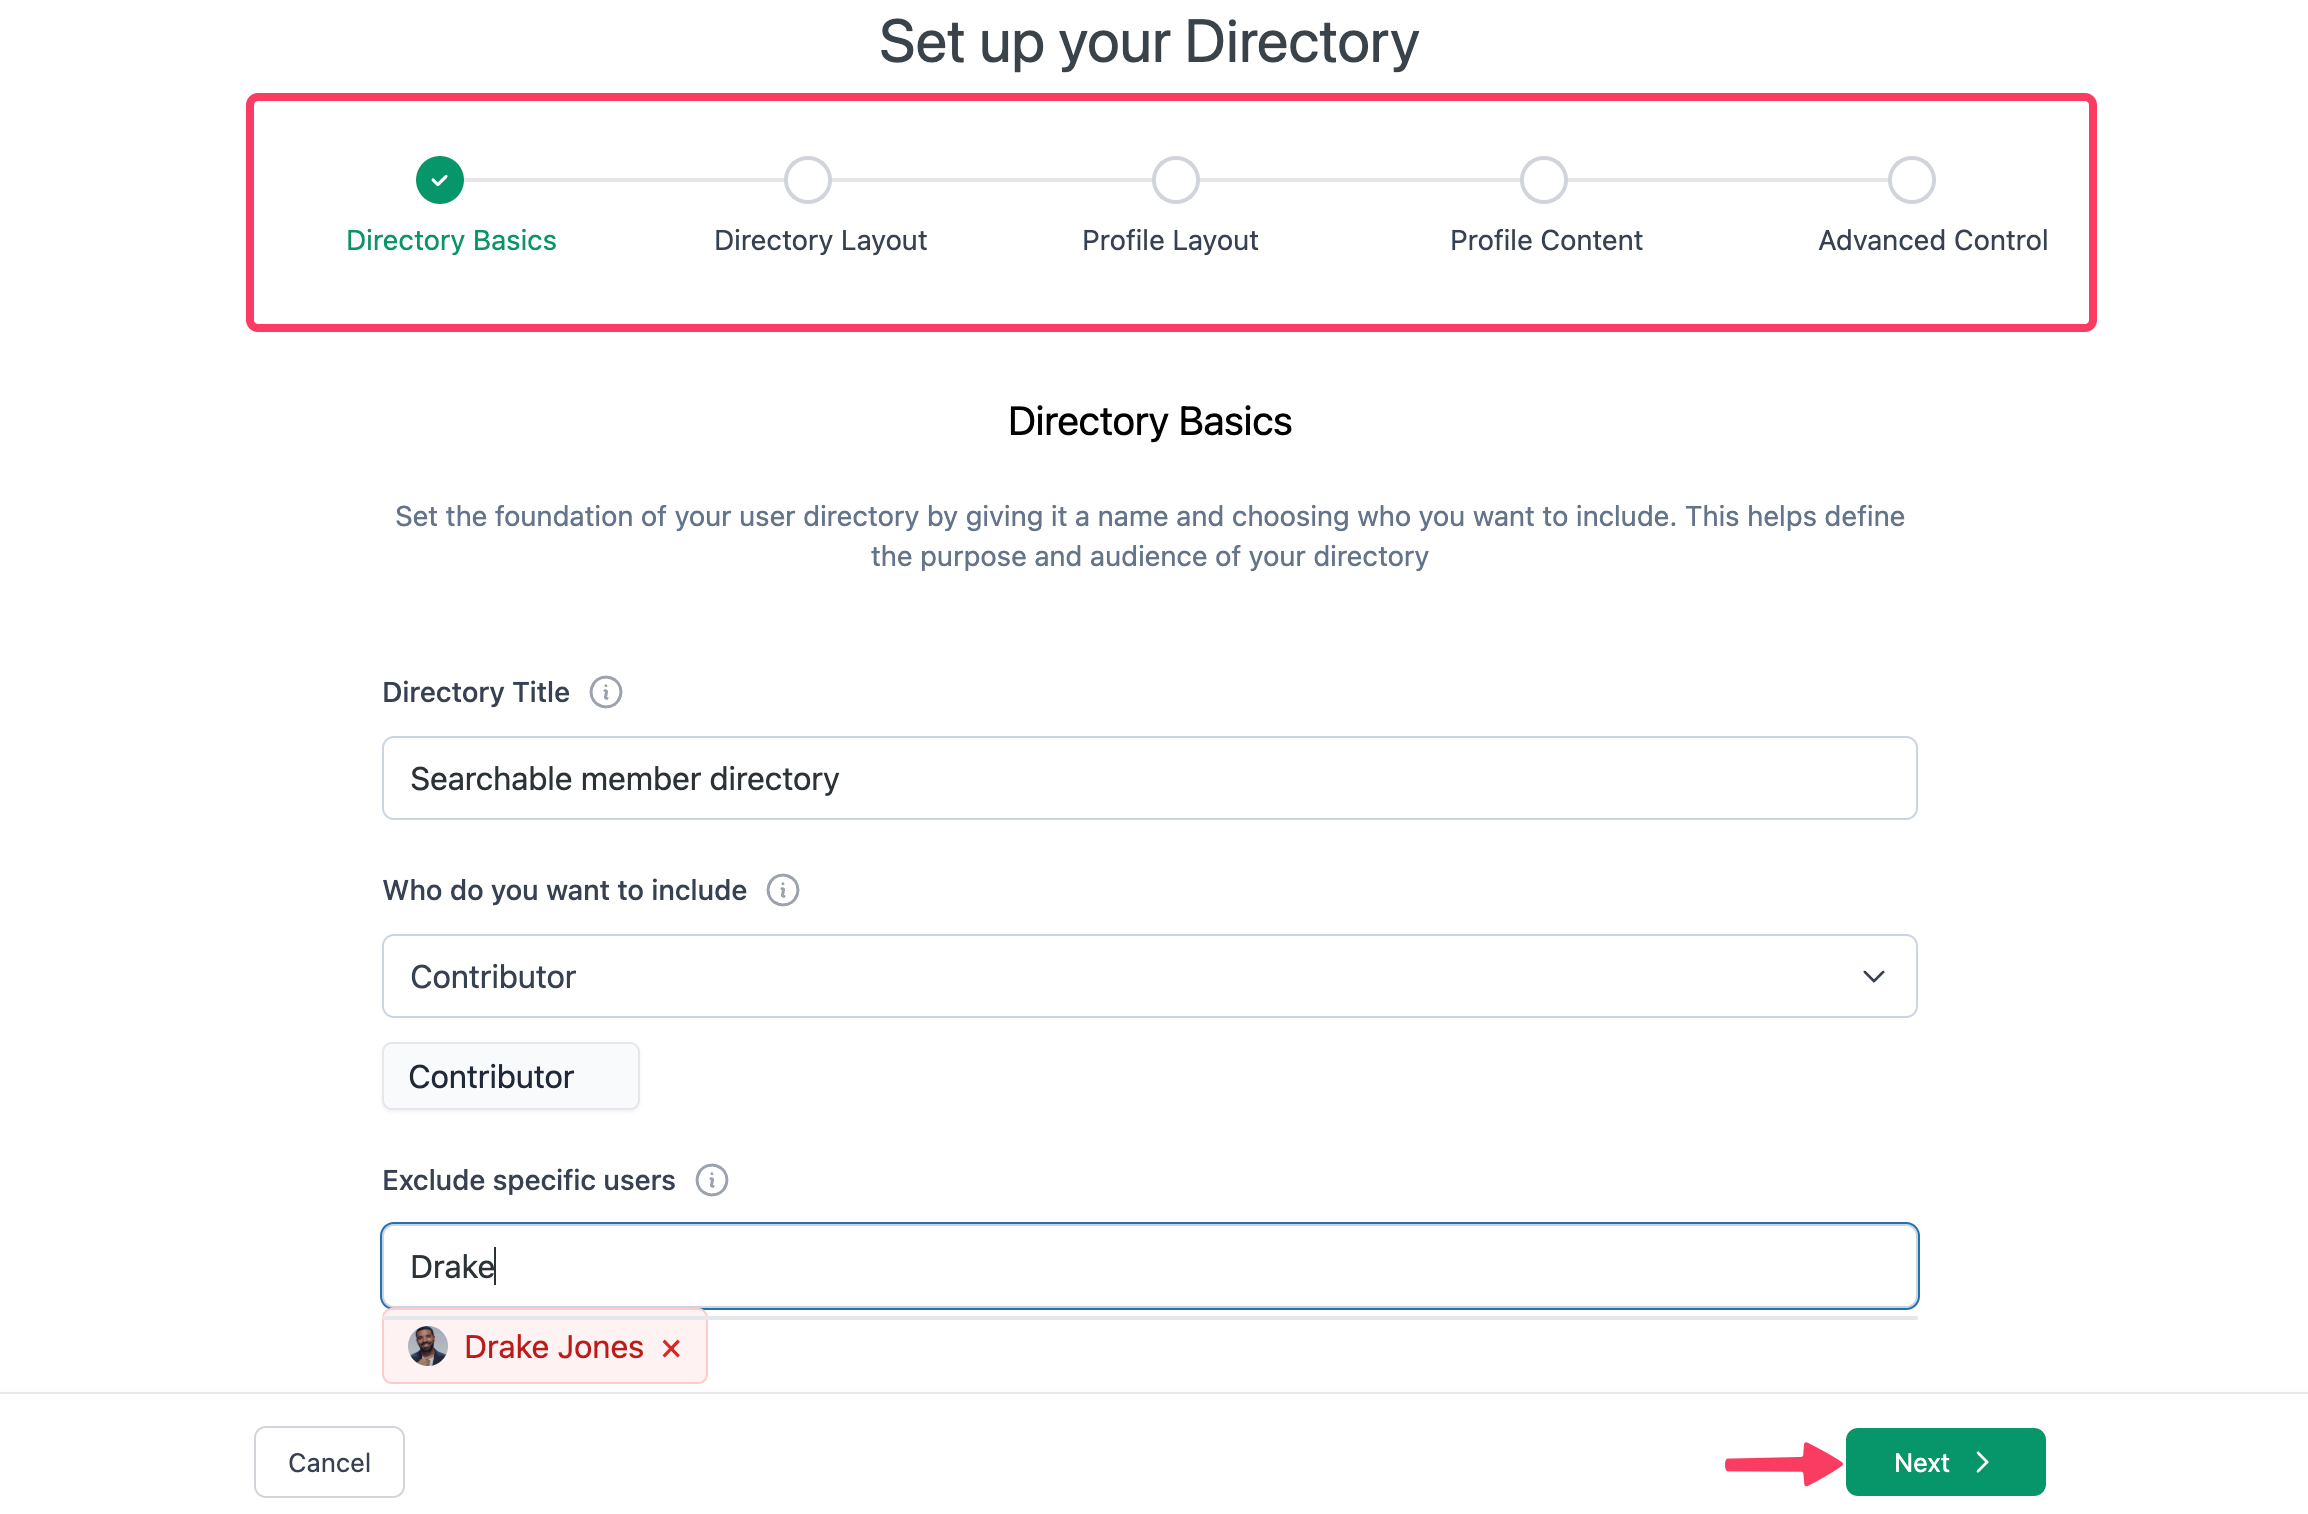
- Directory Basics: Give your directory a clear name, select which user roles to include, exclude specific users if needed, and click Next.
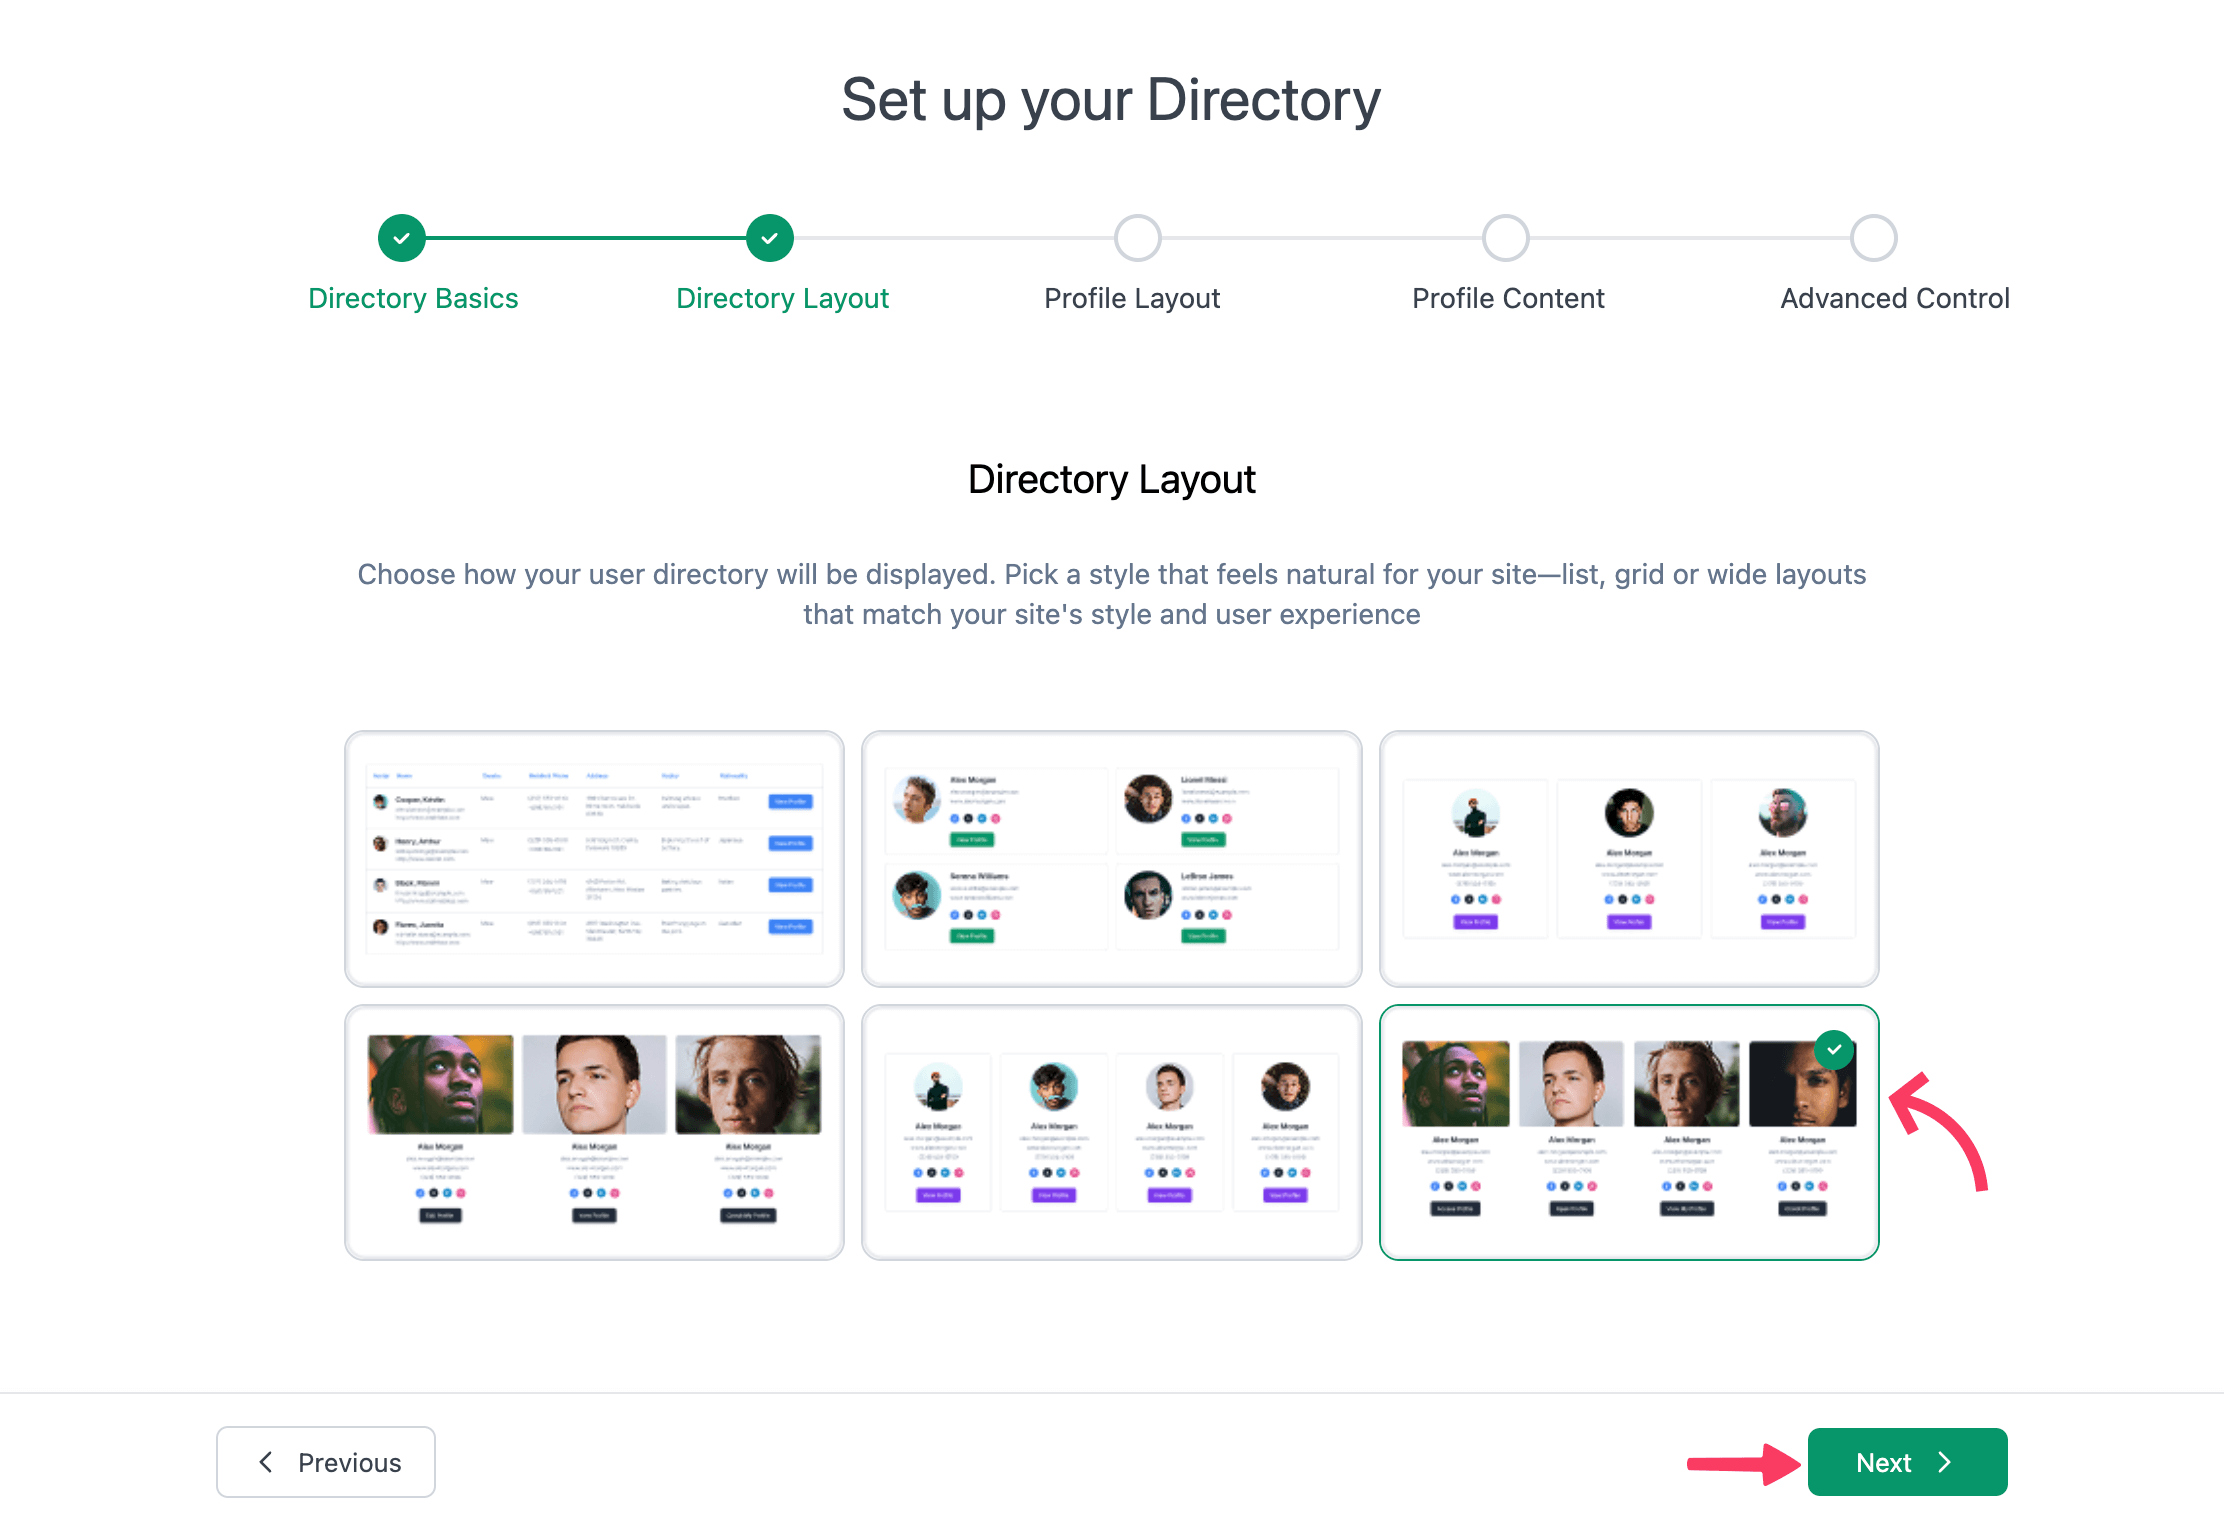
- Layout: Choose how users will be displayed. WP User Frontend offers six layouts, including list, grid, and card styles.
- Profile Layout: Pick one of three premade designs for single-user profiles.
- Profile Content: Select which details and custom fields will appear on each profile.
Step 7: Configure Advanced Settings
Here you fine-tune how your directory works:
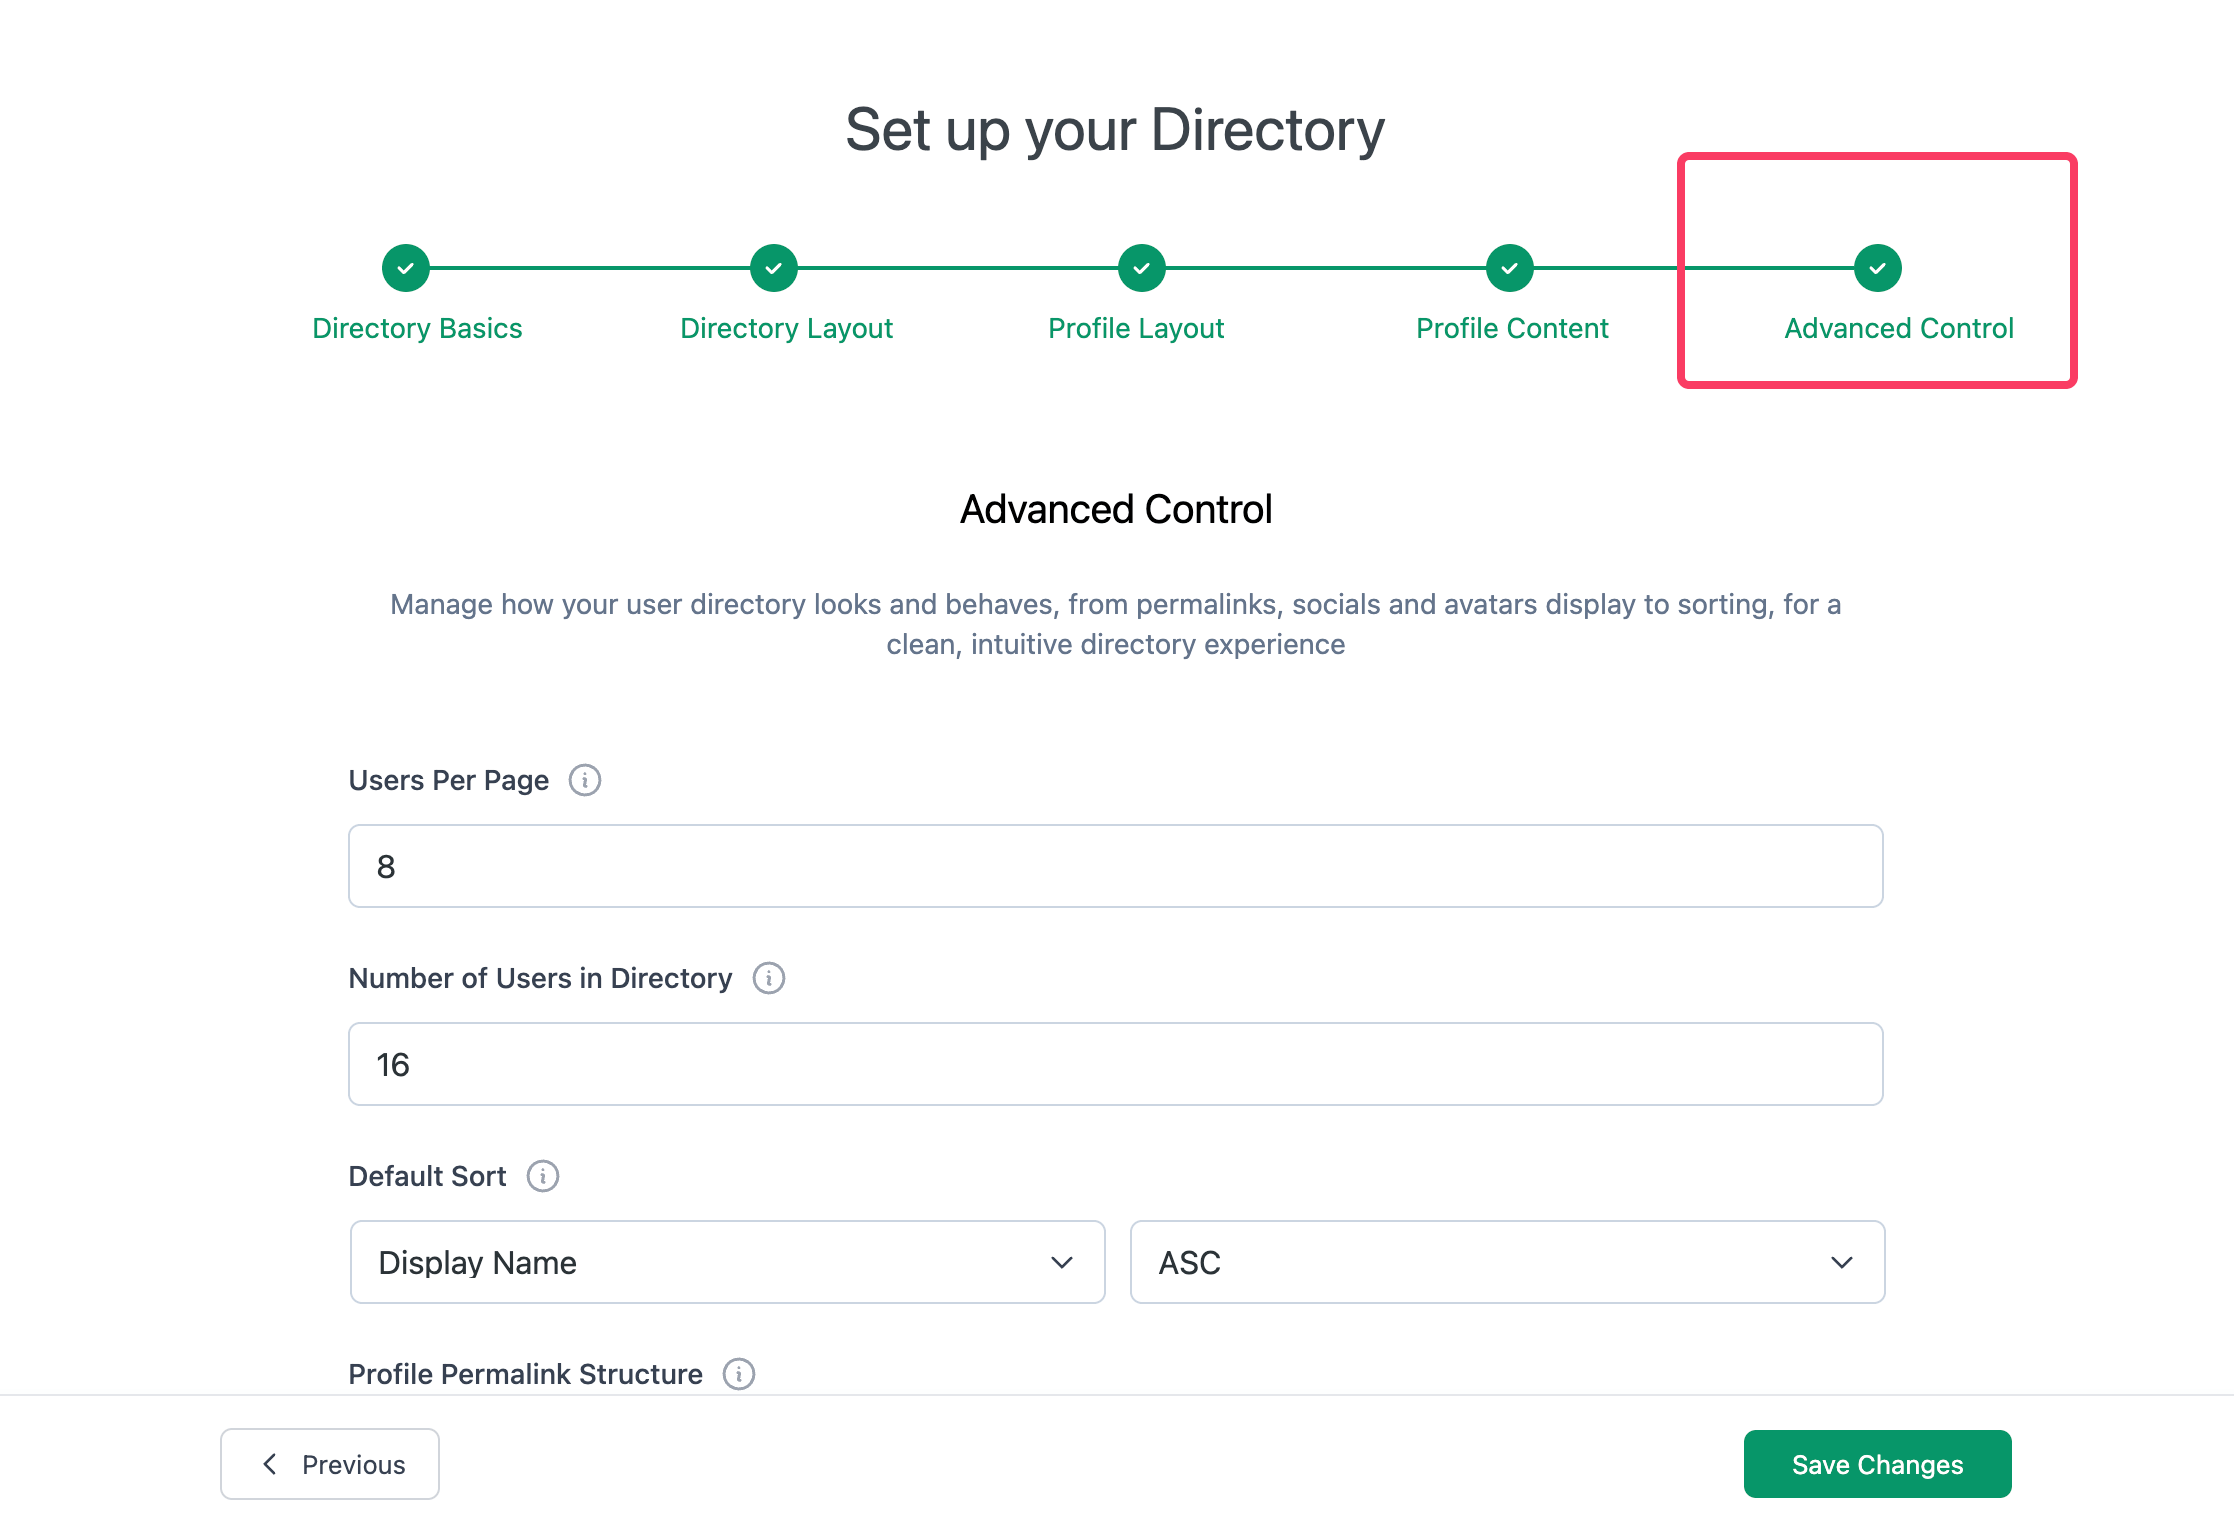
- Set how many users to display per page.
- Define the maximum number of users in the directory.
- Choose a default sorting method (username, user ID, name, email, registration date, etc.).
- Select ascending or descending order.
- Configure permalink structure, gallery image size, social profile display, and avatar size.
When finished, click Save Changes to complete setup.
Step 8: Publish the User Listing Page
Copy the generated shortcode (for example, [wpuf_user_listing id=2695]) and paste it into any page or post. Publish it, and your new user directory will be live for visitors to explore.
Finally, it's time to publish the User Directory page. This step is important to see the alumni members from the frontend. And you are done!
You can also create an alumni directory using the Gutenberg blocks provided by WP User Frontend Pro. Follow this tutorial for the detailed guide → Create a WordPress Searchable Member Directory with Blocks.
Step 9: Check If Everything Works Fine in the Frontend
If your entries have enough information to display, the alumni directory made with WP User Frontend Pro will look like the following image.
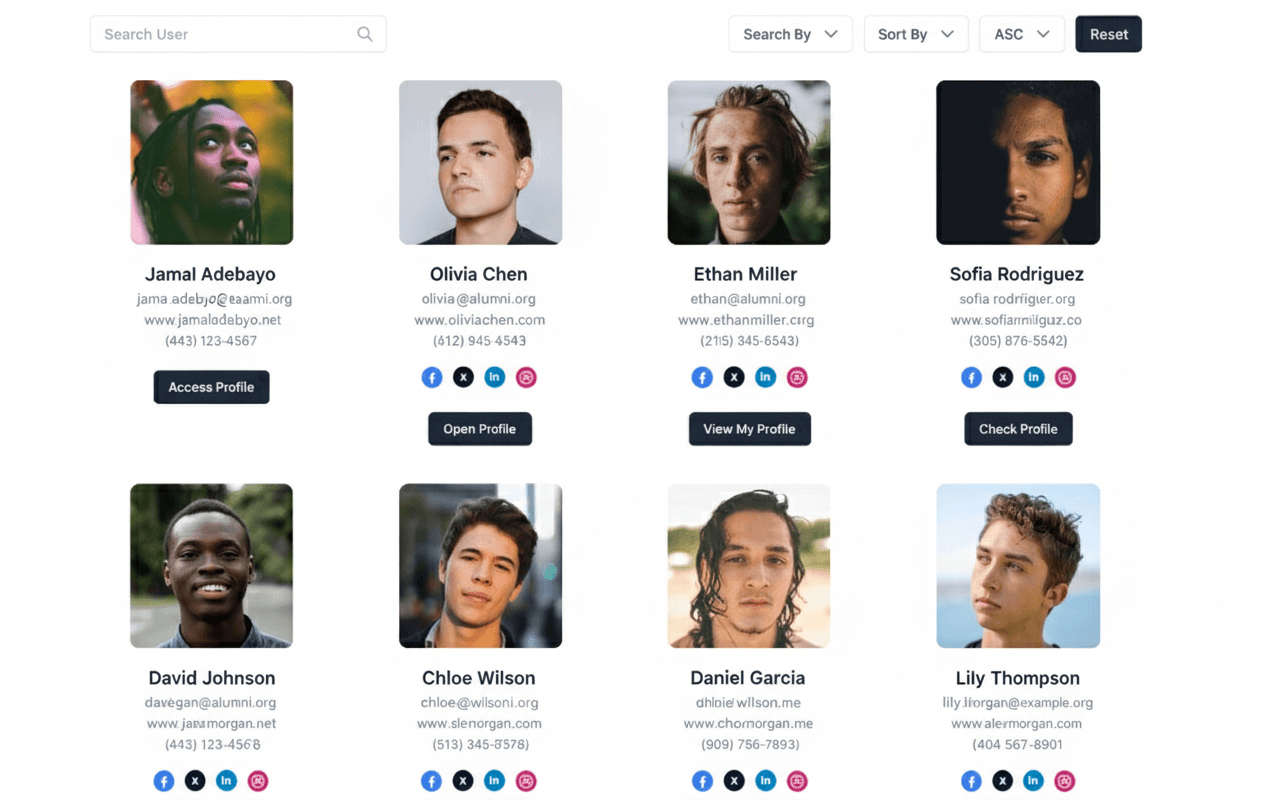
You can also search for any user by name, user ID, or email. That's it! This is how you can easily create a searchable and sortable alumni website with WordPress.
Wrapping up on Alumni Website with WordPress
This is the simplest way to create a paid alumni website with WordPress. The best part is that you can use pretty advanced form fields to collect your users' data.
Besides, you can also monetize your directory using the Stripe payment gateway; the WP User Frontend Pro also supports popular payment gateways like PayPal. You can also use the bank payment system to charge your customers.
Finally, if you do know an easier way to create an alumni membership site than the way I showed here, don't hesitate to mention that in the comment section below. I would love to learn that with great enthusiasm!