


How to Change WordPress Domain Name – 5 Simple Steps for Newbies
Are you looking for an easy way to change the domain name of your WordPress site? If yes, you are in the right place. Today, we are going to show you how to change WordPress domain name only in 5 simple steps.
Changing domain name in WordPress may seem a daunting task to you. But, to be honest, it's easy. You will be able to do it all by yourself, even if you are doing it for the very first time by following this step-by-step tutorial.
In this guide, we will show you why you should change the domain name, the prerequisites to do that, and finally how to change it in a straightforward way. So, without any further ado, let's get started!
Why Would You Want to Change WordPress Domain Name?
Before jumping into the main tutorial – how to change a WordPress domain name, let us discuss why actually you would need to change it.
There could be many reasons behind changing the WordPress domain, here are a few of them:
- Rebranding: If your business or brand has undergone a significant transformation in its mission, services, or target audience, a new domain name can better reflect this change. A rebranded domain name can also help you realign your online identity with your new brand image.
- SEO Improvement: Sometimes, your current domain name may not be optimized for search engines. A new domain name with relevant keywords can improve your search engine rankings and make it easier for potential customers to find you.
- New Domain Extension. Even if you only want to change your domain extension, you need to register for a new name. For example, if you started as a .org website but want to shift to a .com site URL, you need to change your domain name.
Prerequisites to Change Your WordPress Domain Name
Basically, there are 3 major things you should prepare upfront before changing your domain name. Let's talk about that:
- Buy a New Domain: To move your WordPress site to a new domain name, you need to buy a domain name first. If you need any help for choosing and buying a domain name, you can check our blog on how to buy a domain name to get this job done with ease.
- Inform Your Audience: Since you are going to change your domain name to a new domain name address, you should inform your audience upfront to avoid any kind of misunderstanding. You can publish a blog post, send an email newsletter, or add an announcement banner on your site to notify your audience about it.
- Take a Full Backup of Your Site: Before making any change to your site, you should always take a full backup so that if anything goes south, you can easily restore your site using the backup file. Check our blog to learn how to take a backup of your WordPress site.
How to Change WordPress Domain Name – 5 Steps Guide for You
So, here we are! Now we will show you how to change domain name on WordPress only in 5 steps. So, let's get started!
Here are the 5 steps:
- Change Your Site URL
- Update the wp-config.php File
- Update Database Info [Optional]
- Redirect Your Old Domain Name to the New Domain Address
- Notify Search Engines About the Change
Now let's get into the details!
Step 01: Change Your Site URL
Your first task is to change your site’s URL within WordPress. However, this step comes with a word of warning.
Once you save your changes, your site’s backend won’t be accessible until you’ve completed the rest of this procedure.
Log into your WordPress account, and from the dashboard, go to Settings > General. There you'll find these two options:
- WordPress Address URL
- Site Address URL
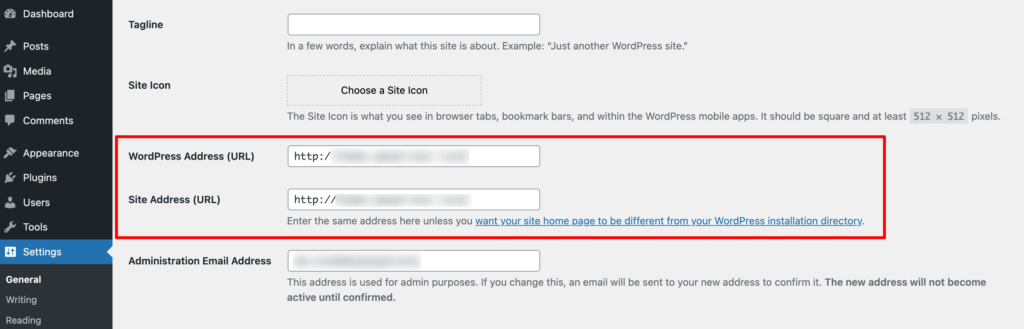
For a WordPress change URL, simply type the new address into both of these fields and click on Save Changes. As we mentioned, this will make your site temporarily inaccessible.
Step 02: Update the wp-config.php File
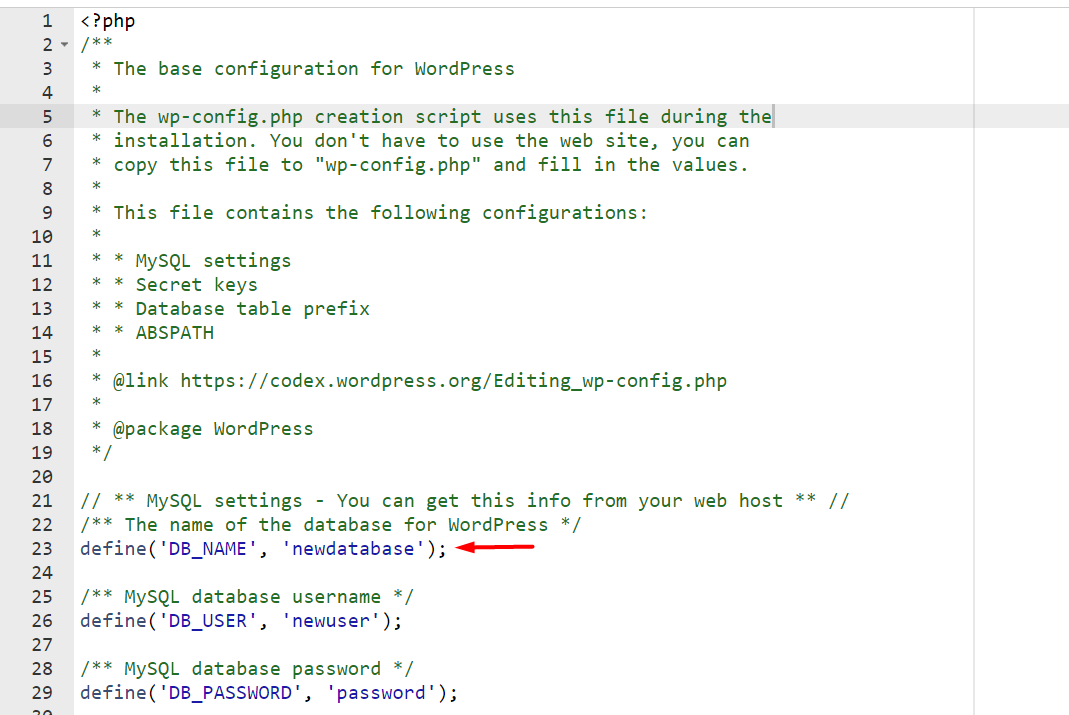
The wp-config.php is a crucial file in your WordPress installation that contains important data and configuration information from your website.
To access and update this with your new domain, you'll need to log in to your control panel. If you have forgotten your credentials, contact your hosting provider for the credentials. Once you have the credentials, log in to your control panel and go to File Manager -> public_html -> wp-config.php.
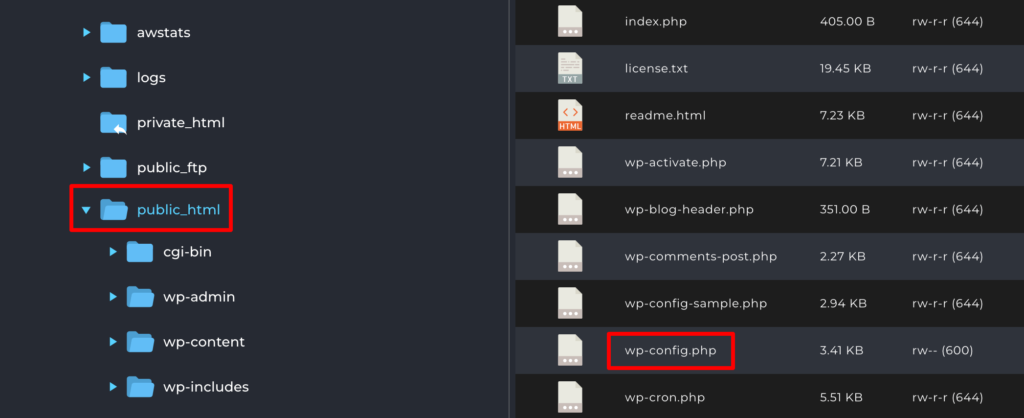
Then right-click the file and select Edit. You should look for:
define('WP_HOME','http://yoursitename.com');

define('WP_SITEURL','http://yoursitename.com');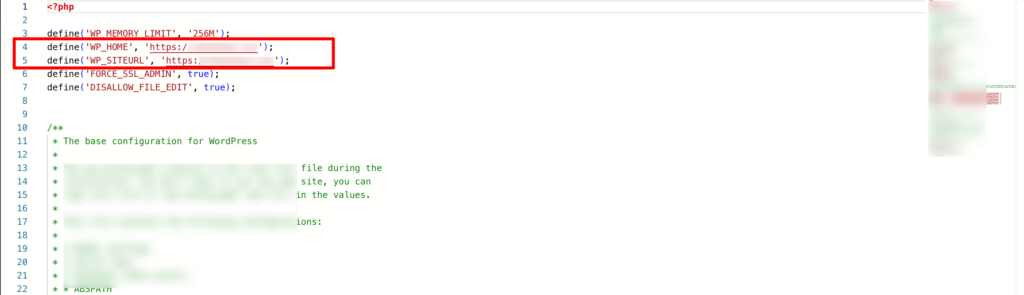
Change ‘yoursitename' to the new domain name, then save.
Step 03: Update Database Info [Optional]
In this tutorial, we are migrating the domain name only, not changing the hosting. Thus, there is no need to change the database. If you need to change the database, you will need to update the database info inside the wp-config file of your WP installation.
Find the wp-config file following the above step (step 02) and right-click to edit the file.
Look database base name and replace the old one with the new one that you have created (if required).
Step 04: Redirect Your Old Domain Name to the New Domain Address
It's time to ensure your old website is redirected to the new website, as audiences might still stumble upon your old URL or forget that you've changed to a new domain. By redirecting, they can type in the old domain and still end up on your new domain.
Even once your domain is successfully changed, you’ll have a lot of links throughout your content and across the web that point back to your previous address. That is why you should set up the permanent redirection.
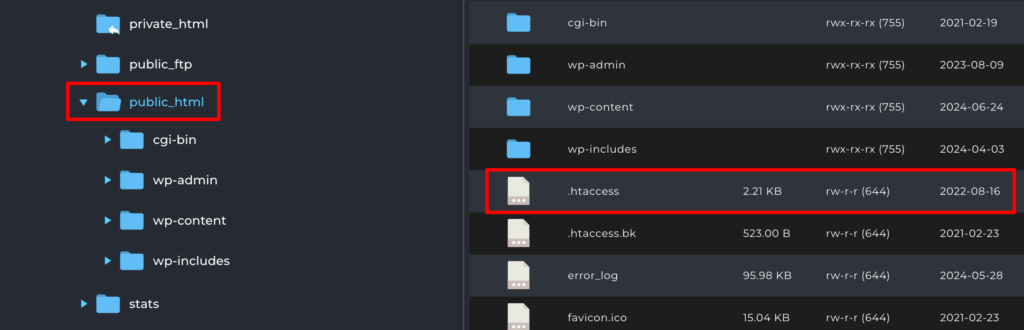
To set up the 301 redirects, as they are called, go to your hosting control panel and choose the file manager. Then go to public_html -> .htaccess, and right-click to edit.
Now add the following code:
#Options +FollowSymLinks

RewriteEngine on

RewriteRule ^(.*)$ http://www.newdomain.com/$1 [R=301,L]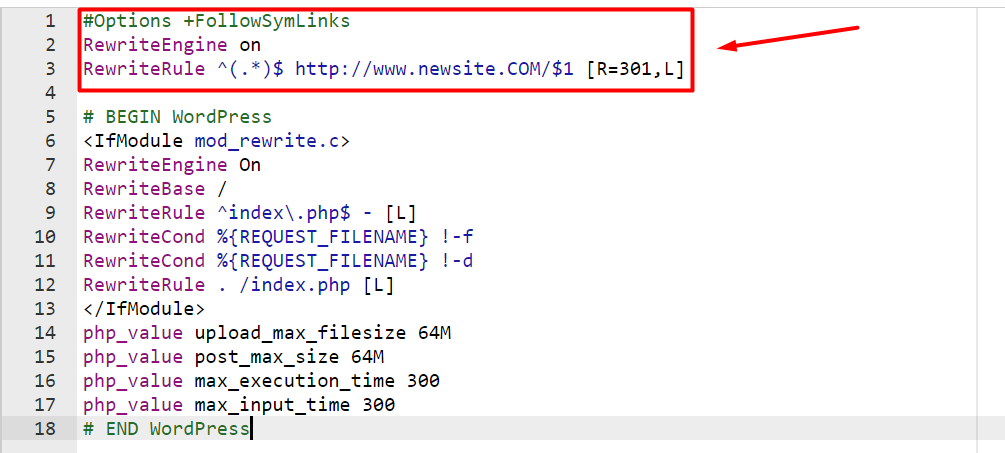
Don't forget to change the newdomain.com to your new domain name.
Update Internal Links and Media URLs
After you set the redirect, you should update all internal links that still point to your old domain. Some pages may have hard-coded URLs inside the content, menus, widgets, or images. These won’t change automatically.
You can update everything in one go using a search-and-replace tool. A popular one is the Better Search Replace plugin.
Search for your old domain and replace it with your new domain. Make sure you run a dry run first to see how many items will change.
Step 05: Notify Search Engines About the Change
Search engines, particularly Google, have tools to change your site address. You'll fill out a simple form to notify search engines of the change, so they can direct search traffic to your new domain name. Make sure you fulfill the requirements for Google here.
Use Google Search Console’s Change of Address Tool
Google gives you a simple tool to tell them you moved from your old domain to a new one. This helps Google index the new domain faster and transfer ranking signals.
Here’s what you need to do:
- Add both domains (old and new) in Google Search Console.
- Verify ownership of both.
- Make sure the 301 redirects are active.
- Open the Change of Address tool and select your new domain.
- Submit the request.
This helps Google update search results faster.
That's all!
That's how you can change WordPress domain name.

How to Change WordPress Domain Name: Common Problems and Quick Fixes
Sometimes things won’t go smoothly. Here are a few issues you might face and how to fix them:
Login problems: Clear your browser cache or log in using:https://yournewdomain.com/wp-login.php
Images not loading: This usually happens when images still use the old domain. Run a search-and-replace to fix the URLs.
Mixed content warnings: Your SSL may not be set up on the new domain. Install an SSL certificate and update any old HTTP links.
Redirect loops: Double-check your .htaccess rules and make sure you didn’t add multiple conflicting redirects.
Old pages still showing: Clear your server cache, plugin cache, and CDN cache if you use one.
WordPress Domain Change – Ending Note
There could be many reasons for changing the domain name in WordPress. Whatever the reason is, you can rely on this tutorial to get your job done with ease. Just make sure you have taken a full backup of your site before changing the domain name.
As we said earlier, this is going to be a very easy process to change the WordPress domain name. So, what do you think? Was it easy or complicated for you?
Also, if you know any other process better than the one that we have discussed in this tutorial, you can let us know using the comment box below. We would love to know your feedback. Cheers!