

How to Run Google Ads: Step-by-Step Tutorial for 2026
Running Google Ads is one of the best ways to reach people who are already searching for what you offer. If you're promoting a product, collecting leads, or just trying to get more traffic, it can help you do it faster.
But starting out can feel confusing. There are campaign types, bidding options, headlines, and images. And it all shows up on screen at once. That’s where this guide helps.
We’ll walk through every step with clear instructions. You’ll learn how to set up your first campaign, write your ads, and launch with confidence. You won’t need experience. Just follow along, and you’ll be good to go.
What is Google Ads?
Google Ads is a platform that lets you show your website or product at the top of Google search results.
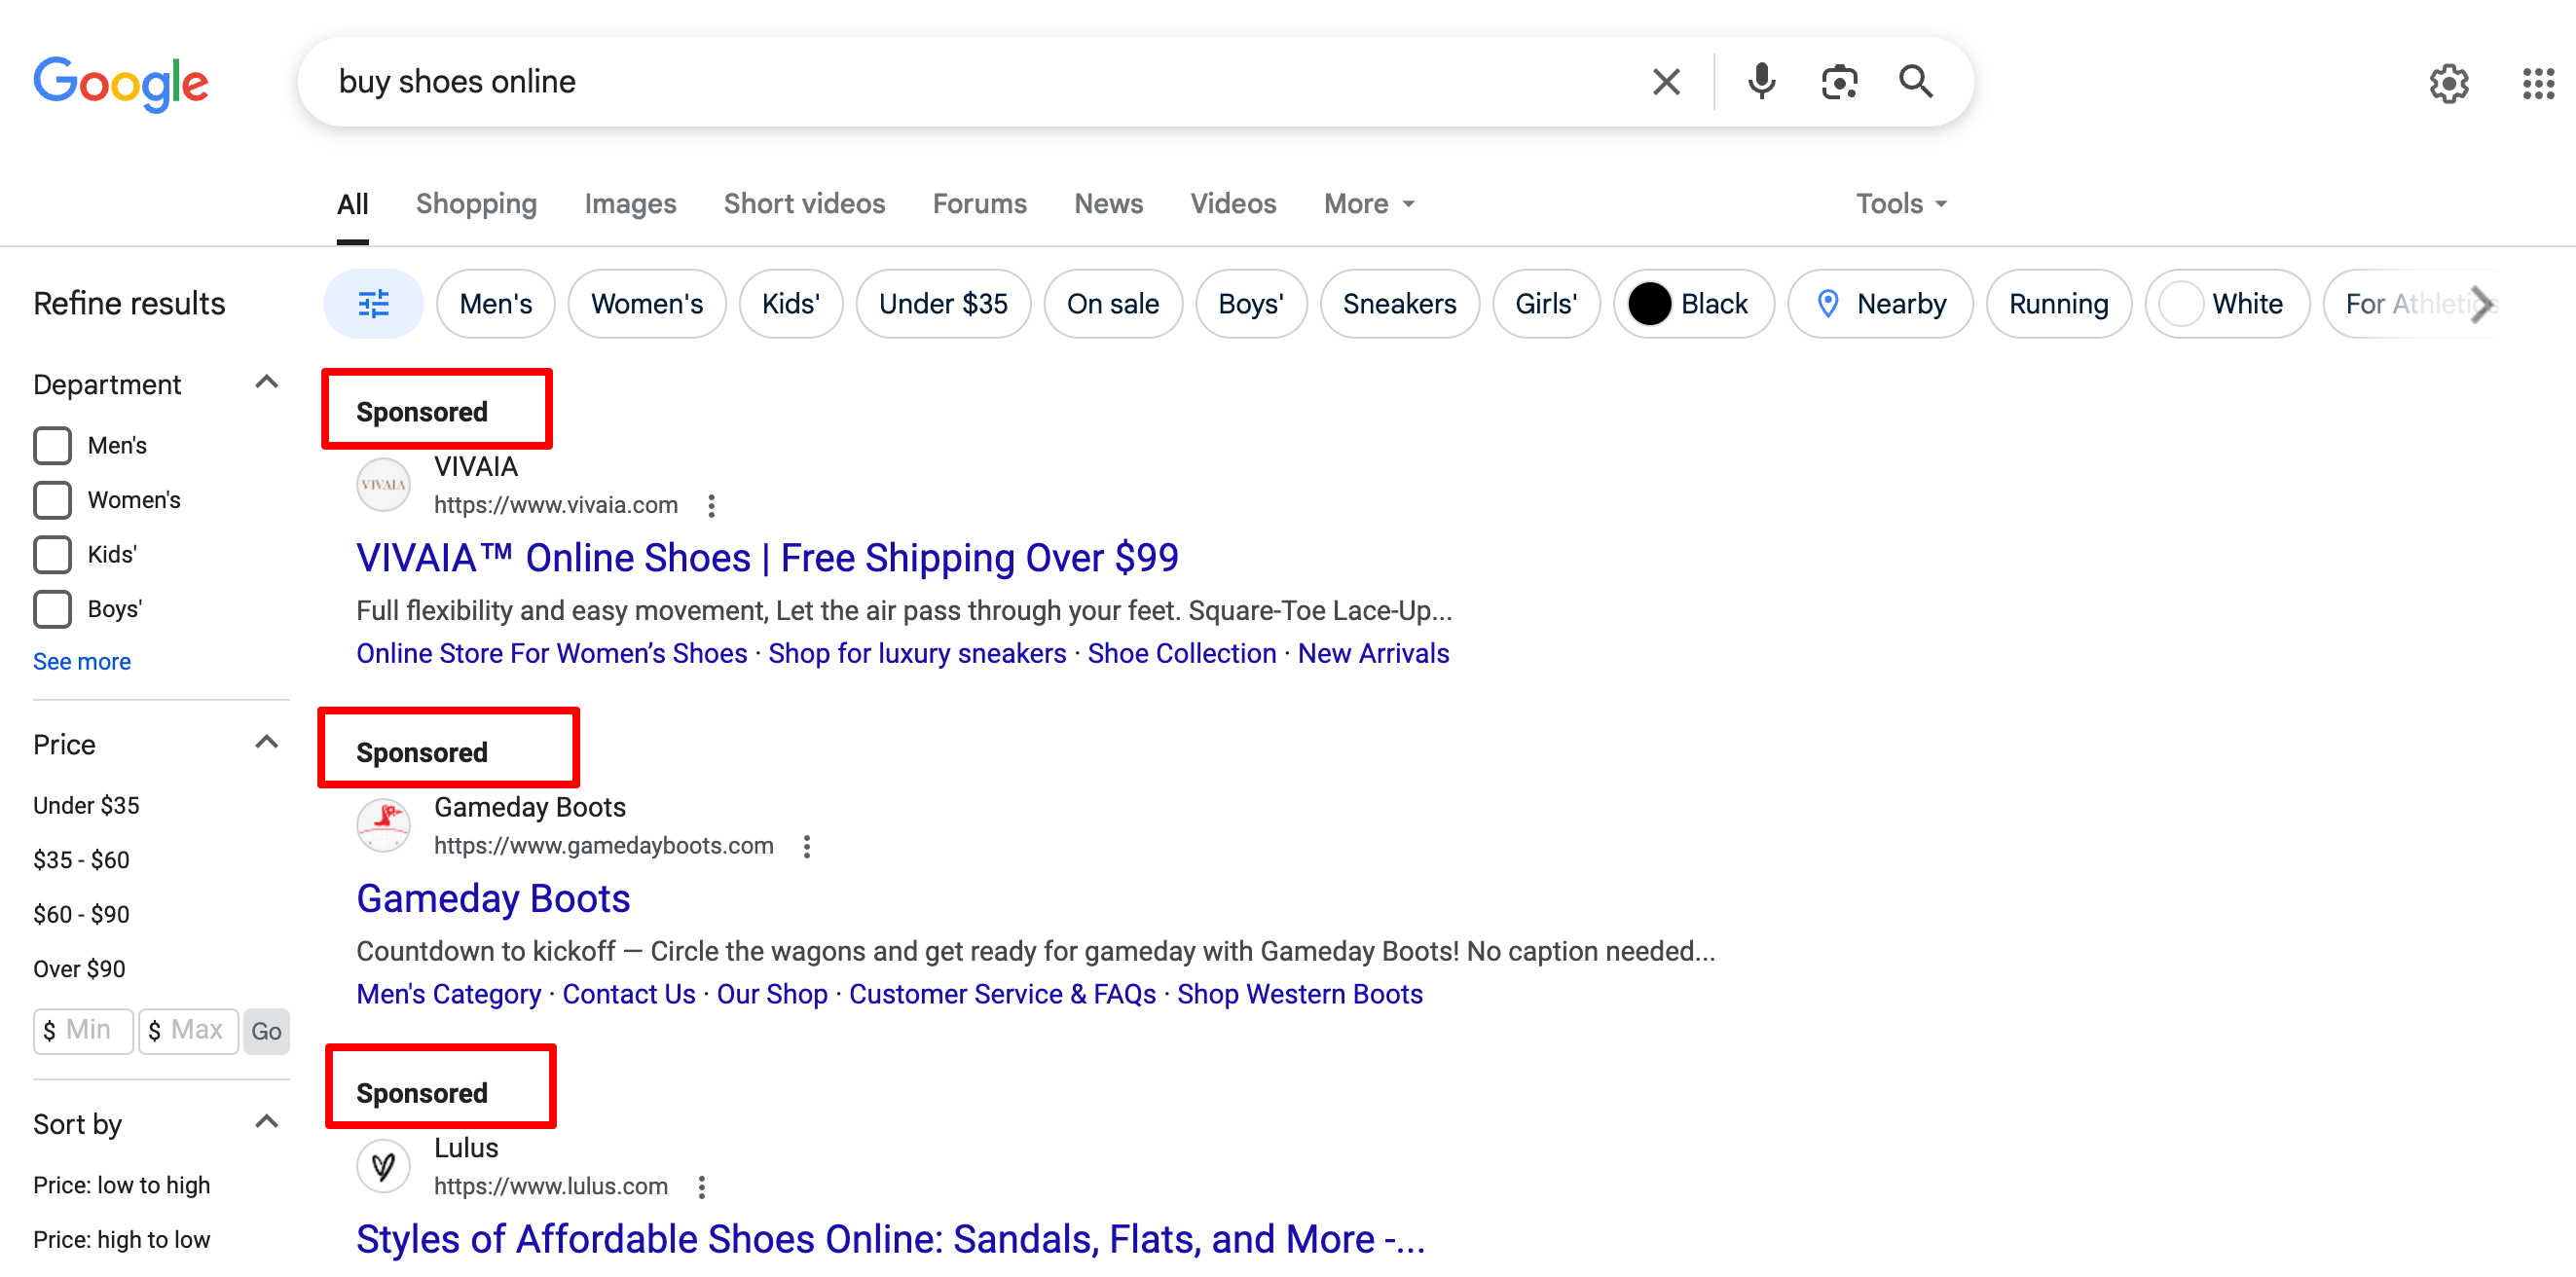
You’ve probably seen them already. When you search for something like ‘buy shoes online,' the first few results are usually ads. You'll find that all the Google ad results are marked as ‘Sponsored'. That’s Google Ads in action.
With Google Ads, you can pay to show your business to people who are already searching for something you offer. It works for any kind of business, e.g., online stores, services, apps, or even blogs.
You only pay when someone clicks on your ad. That’s why it’s called pay-per-click (PPC) advertising.
In short, Google Ads helps you:
- Get more traffic
- Reach your ideal audience
- Show up exactly when people are searching for what you sell
Even if you’re just starting out, you can run your first ad in under an hour. And this blog will guide you through that, step by step.
How Google Ads Work
Google Ads works like an auction, but instead of bidding on items, you're bidding to show your ad to people searching for something on Google.
Let’s break it down.
- You choose a keyword: Say you’re selling handmade candles. You might want your ad to show up when someone types “buy scented candles” on Google.
- You write your ad: You create a short, catchy message that shows up in search results. You also choose where the ad should take people, like your product page.
- You set your budget: You tell Google how much you’re willing to pay when someone clicks on your ad. You can start with as little as $5 a day.
- Google runs a quick auction: When someone searches for a keyword you’ve picked, Google looks at all the advertisers bidding for that keyword. It checks a few things, like your bid and the quality of your ad.
- The winner’s ad shows up: If your ad wins, it shows up in the search results, usually right at the top.
- You only pay if someone clicks: That’s the cool part. You’re not charged for just showing the ad. You only pay when someone clicks and visits your site.
It’s that simple.
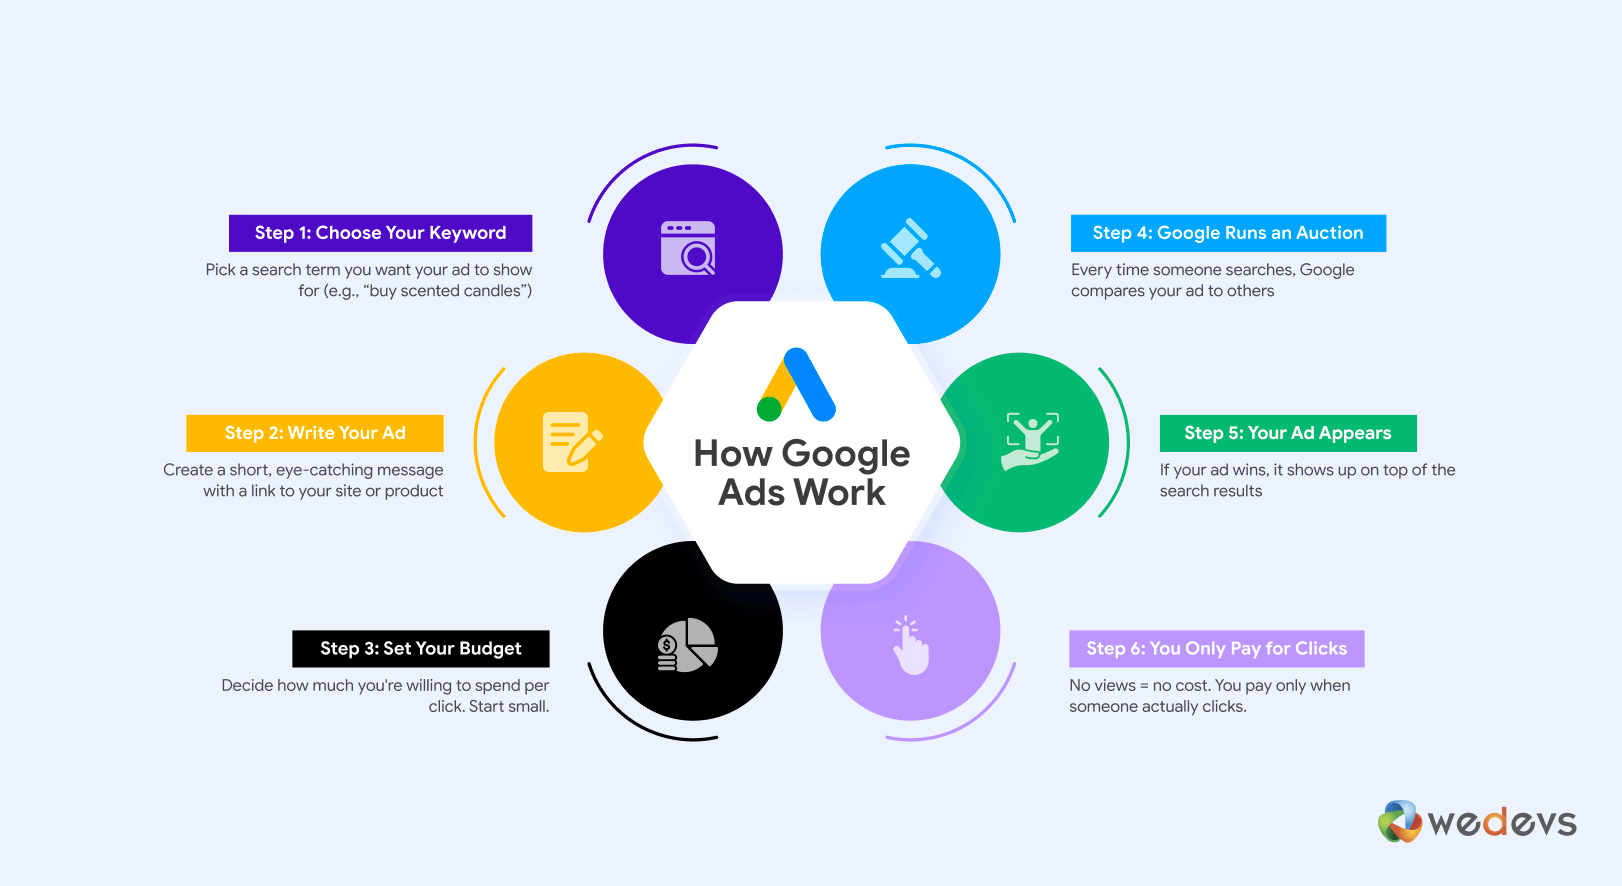
You tell Google who you want to reach, what message to show, and how much you want to spend. Google handles the rest.
Prerequisites to Run Google Ads for Beginners
You don’t need much to launch your first Google Ads campaign. But a few things should be ready before you jump in. These will make the whole setup smoother and help your ad actually work.
Here’s what you need:
I. A Google Account
Google Ads is part of the Google family. So you need a Google account to sign in. If you are already using Gmail, YouTube, or Google Drive, then you already have one. If not, you can create an account at accounts.google.com in under a minute.
II. A Website or Landing Page
This is where your ad will send people once they click.
You can use:
- Your homepage
- A product or service page
- A dedicated landing page for a special offer
It doesn’t have to be fancy, but it should:
- Load fast
- Work well on mobile
- Match what your ad promises
If your ad says “50% off all shoes,” your landing page better show those discounted shoes. Otherwise, people bounce, and your money goes to waste.
III. A Clear Goal
Before you run your ad, be clear on what you want from it. This helps you choose the right campaign type and track results properly.
Some common goals:
- Get more visitors to your site
- Get people to call or message you
- Sell a product
- Collect emails or form signups
IV. A Daily Budget in Mind
How much do you want to spend per day?
Google Ads gives you full control here. You can start with as little as $5 to $10 per day. You can change this anytime, so there’s no pressure to get it perfect on day one.
Just remember: you only pay when someone clicks.
V. A Few Keywords to Target
Think like your customer. What would they search for if they needed what you offer?
Example: If you sell handmade candles, some keyword ideas could be:
- buy scented candles
- handmade candles online
- soy candles with essential oils
You don’t need to overthink it. A short list of 5–10 keywords is a great start. Google will also suggest more during setup.
How to Run Google Ads: 9 Easy Steps for Beginners

If you’ve never used Google Ads before, don’t worry. It’s not as complicated as it might seem.
In this section, we’ll walk you through the full process from start to finish. You’ll learn how to set up your account, create your first ad, and launch a campaign that gets real clicks.
Let’s break it down into 7 beginner-friendly steps.
- Step 1: Start Your Google Ads Journey
- Step 2: Enter Your Business Information
- Step 3: Set Your Goal for the Campaign
- Step 4: Select a Campaign Type
- Step 5: Define Who Should See Your Ads
- Step 6: Create Your Ad
- Step 7: Set Bid Strategy
- Step 8: Set Budget
- Step 9: Enter Payment Details
Now let's get into the details!
Step 1: Start Your Google Ads Journey
To start your Google Ads campaign, first go to ads.google.com.
Once you're on the homepage, click the “Start now” button in the top-right corner of the screen. This will take you into the Google Ads setup flow, where you'll begin creating your first campaign.
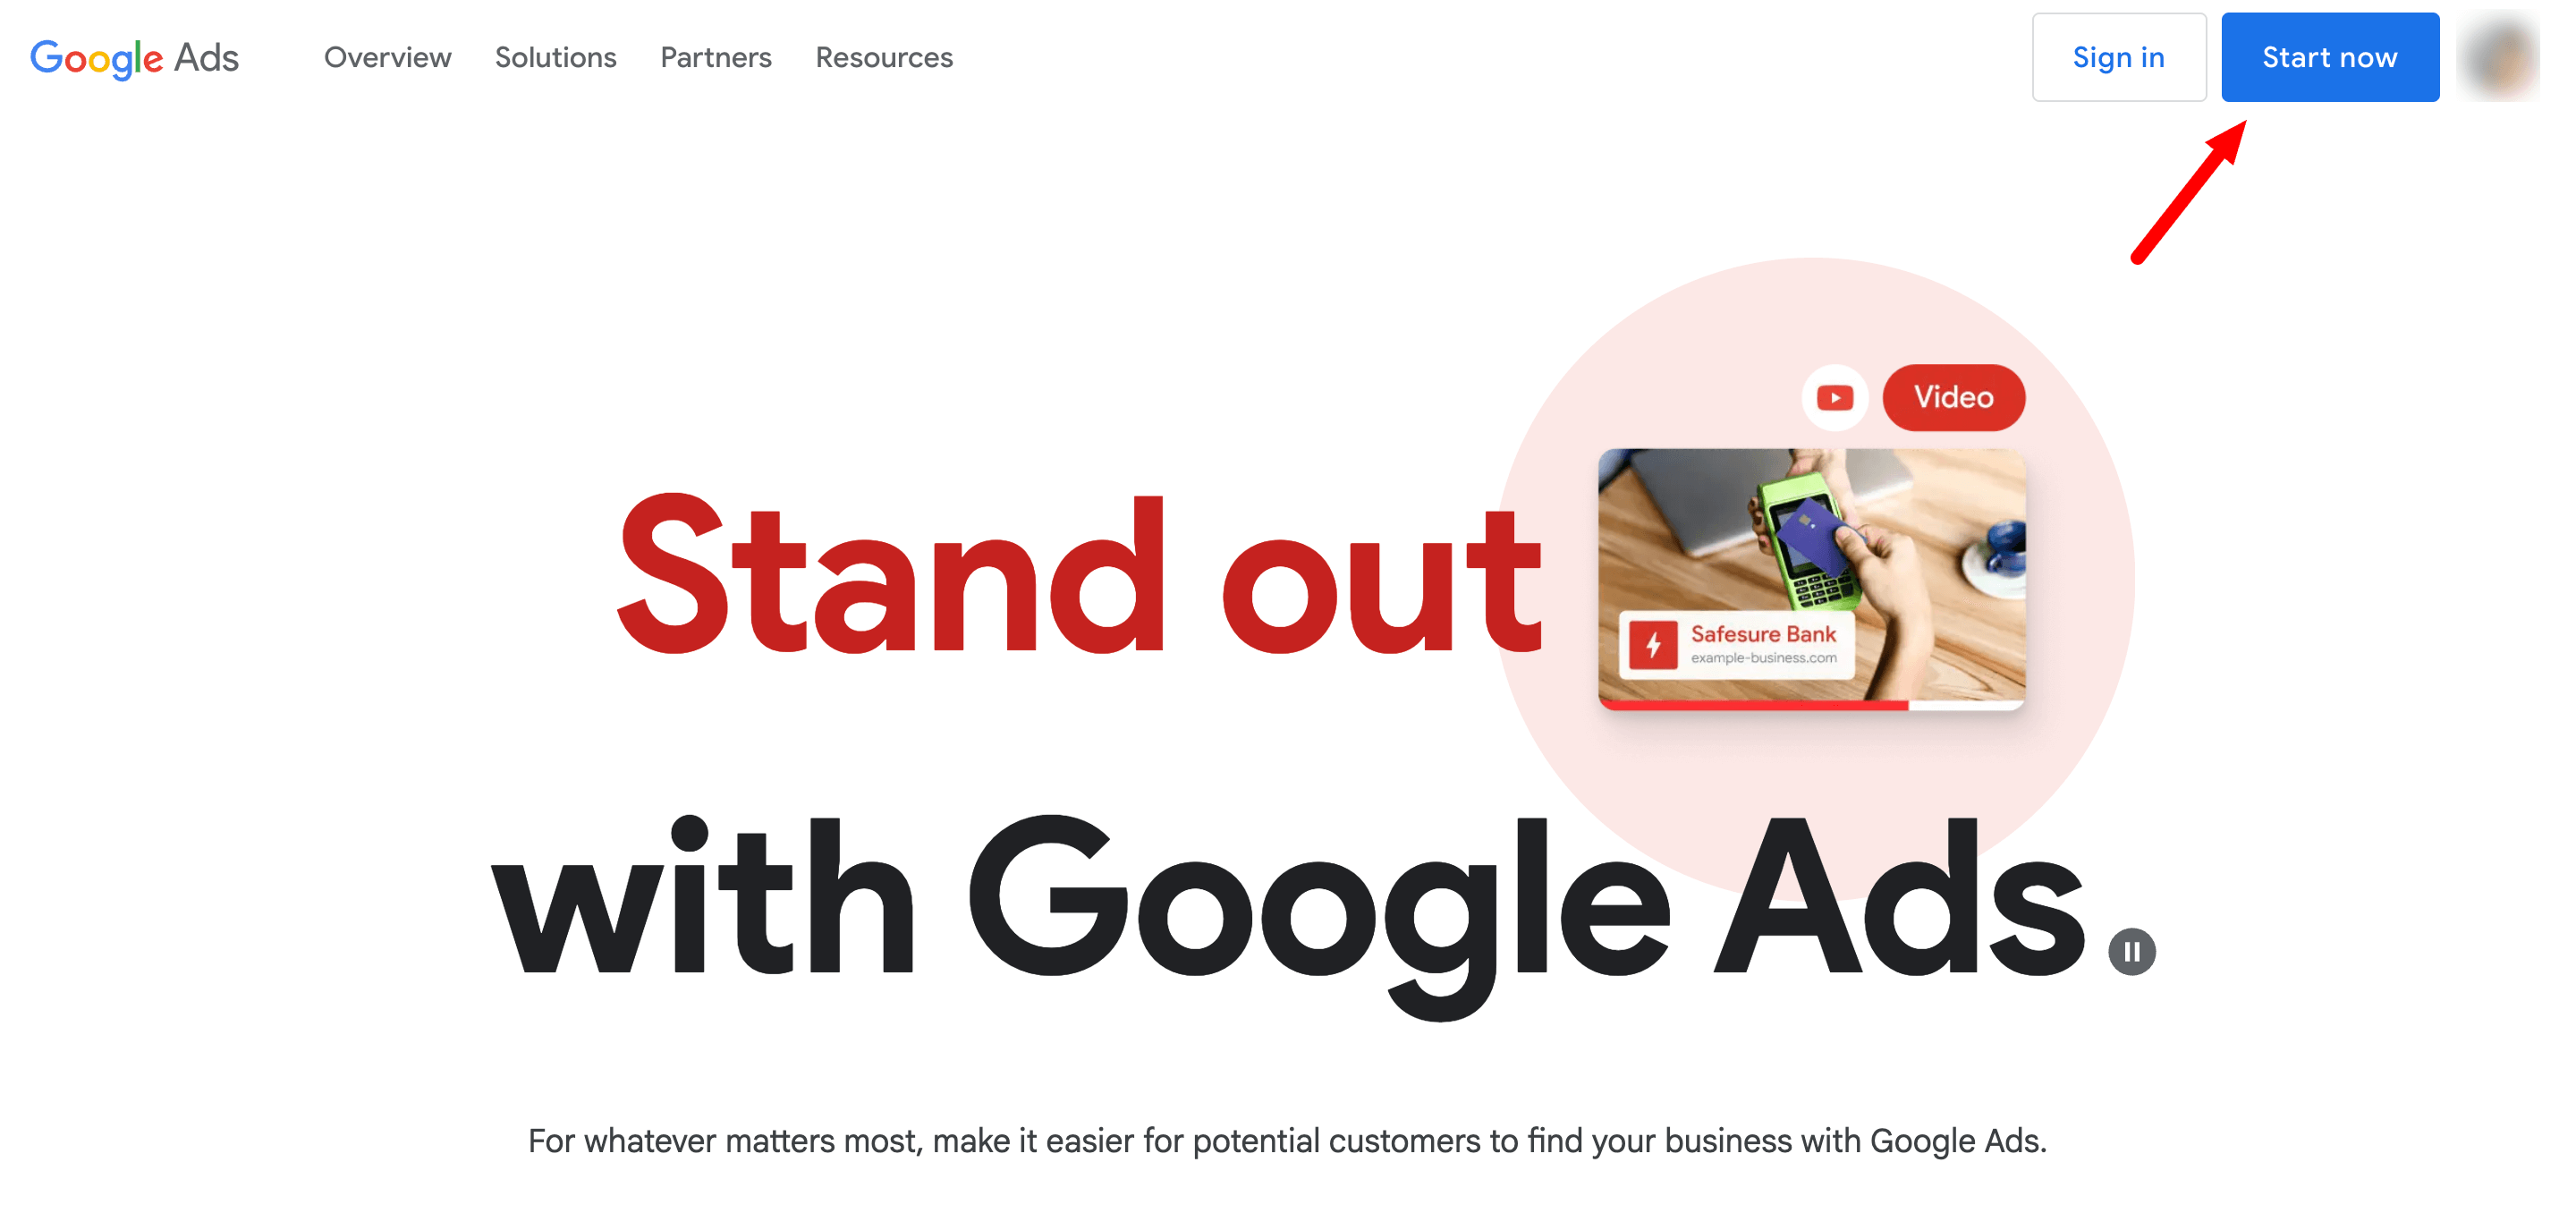
If you're not signed in already, Google will ask you to log in with your Google account, preferably the one you want to use for managing your business ads.
Once you click “Start now” and sign in, you’ll arrive at a screen that says: Create your first campaign in a few simple steps.
This screen is part of Google’s guided setup for new advertisers. It outlines a simple 3-step process:
- Add your business information
- Create your ads
- Set your budget
Click the blue “Create your first campaign” button to proceed.

This will take you to the next section, where you’ll provide business info and start setting up your actual ad.
Step 2: Enter Your Business Information
In this step, you’ll tell Google a bit about your business so it can create ads accordingly.
- Business Name: Type in your business name (optional but recommended).
- Where should people go after clicking your ad: Choose where you want your ad to send people. You have three options:
- Your website – best for most businesses. Enter the most relevant URL (e.g., your homepage, product page, or landing page).
- Your business phone number – for call-based campaigns.
- Your app download page – if you're promoting a mobile app.
Once filled, click the blue “Next” button to continue.
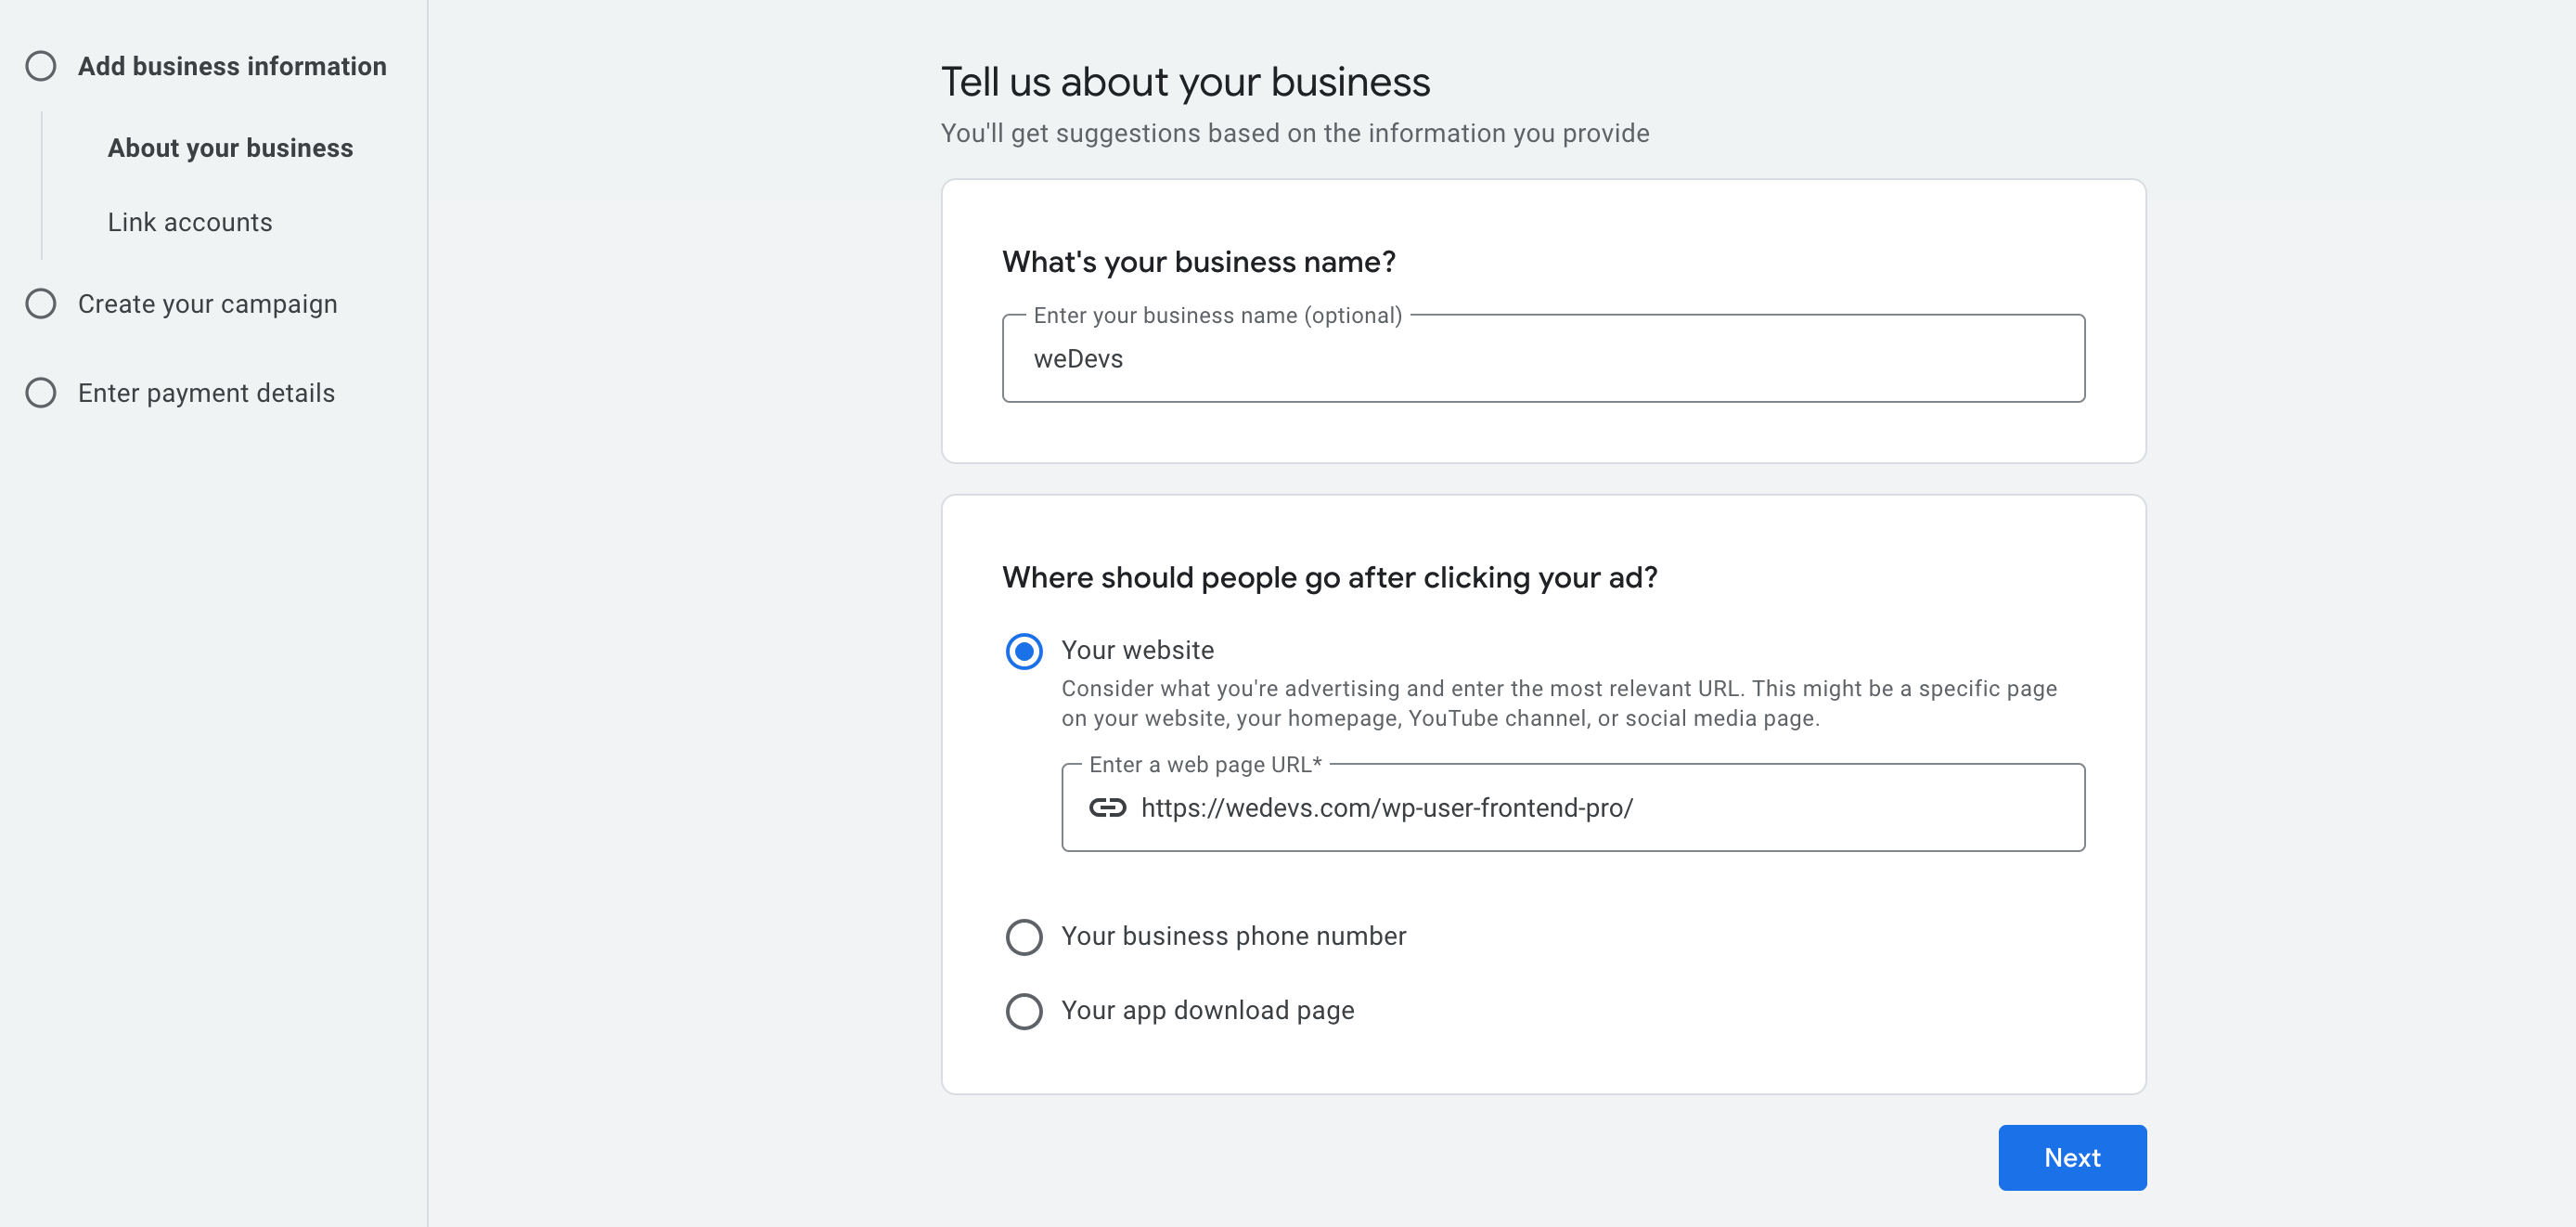
Beginner Tip: Always send people to a focused, relevant page (not just your homepage) to increase conversions. If you’re promoting a product, link directly to that product’s page.
After entering your business name and website URL, the next screen allows you to link additional Google products to your Ads account for enhanced campaign performance.
You’ll see two options you can connect:
- Google Merchant Center – for eCommerce brands that want to run product-based ads (e.g., Shopping Ads).
- YouTube – helpful if you plan to run video ads or retarget YouTube viewers.
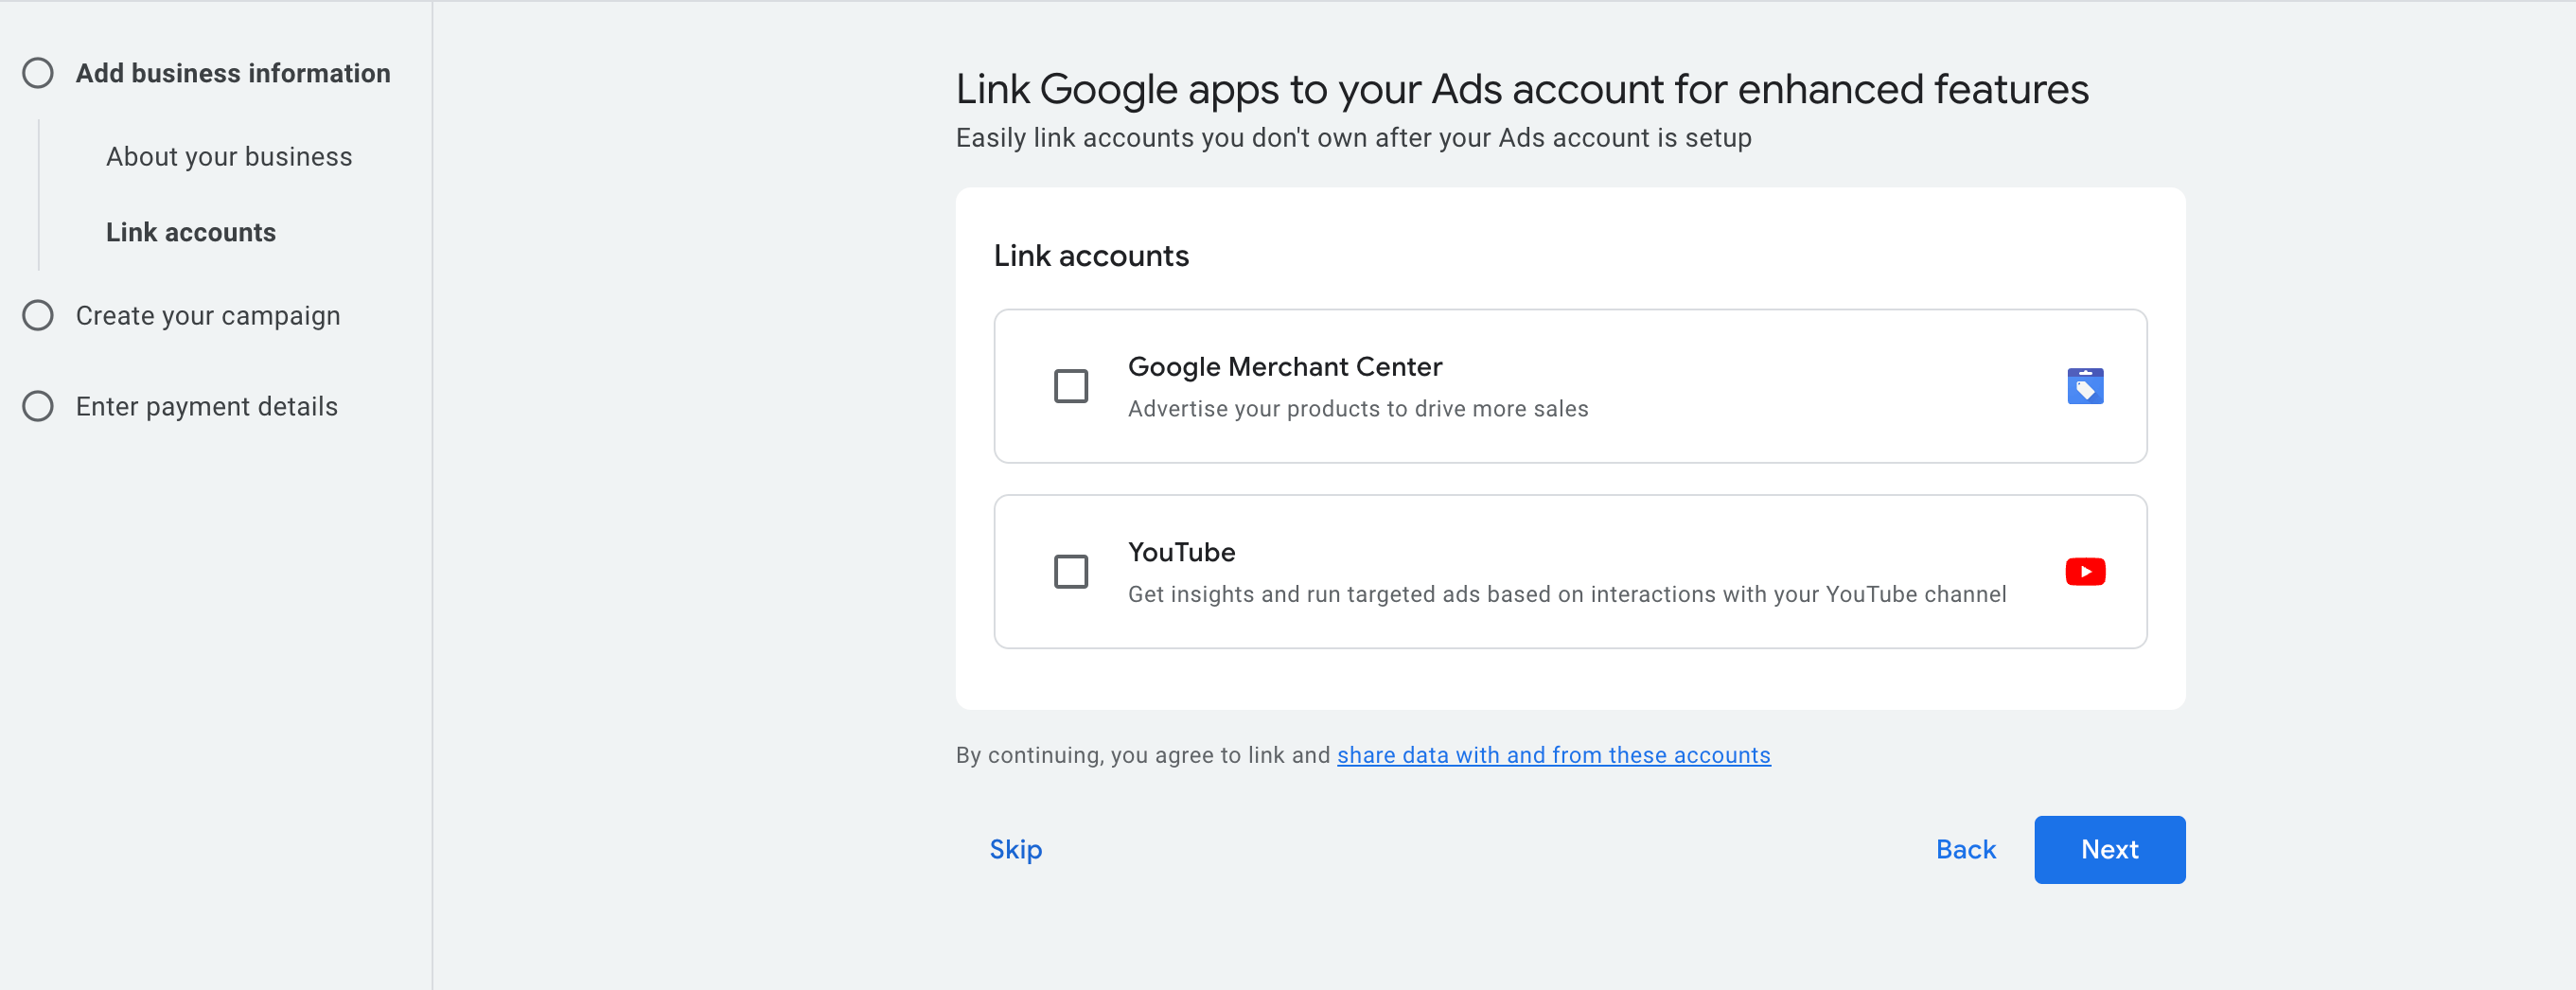
These are optional and can be skipped for now.
If you already use Merchant Center or a YouTube channel for your business:
- Tick the relevant box
- Then click “Next” to continue
Note: You can always link these accounts later from your Google Ads dashboard under Tools> Data Manager.
Step 3: Set Your Goal for the Campaign
In this step, you’ll choose what you want your ad campaign to accomplish. Google will use this goal to guide your campaign setup.
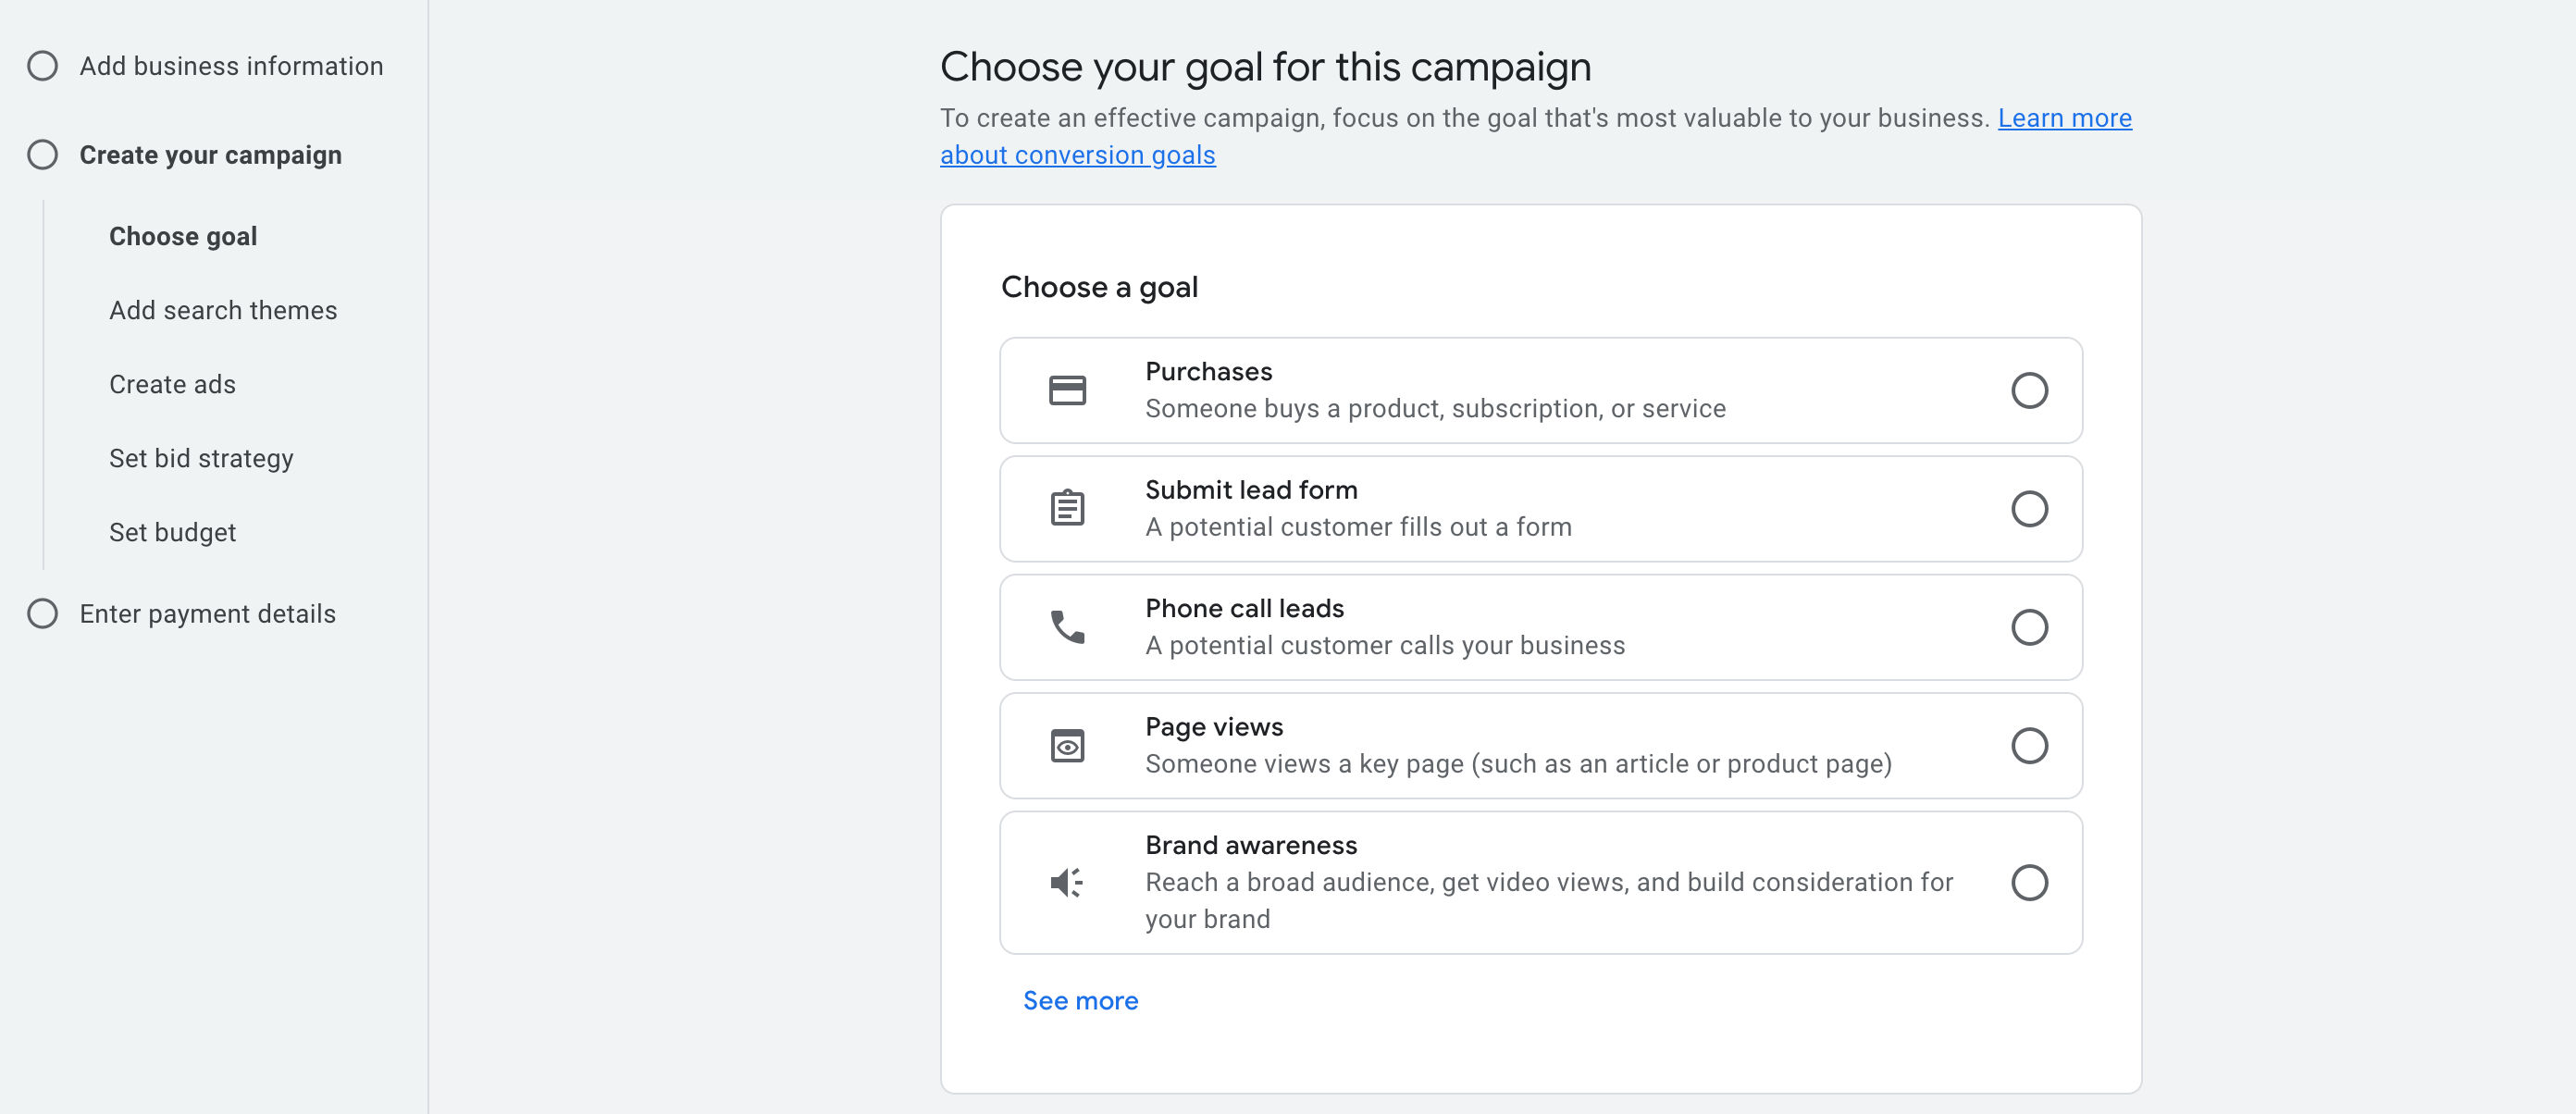
You’ll see a list of common goals. Here’s what each one means, explained in simple terms:
(a) Purchases
Choose this if you want people to buy something from your website. It’s ideal for online stores, software subscriptions, or any product/service that can be paid for online.
Example: You sell WordPress plugins and want people to buy the pro version from your product page.
(b) Submit lead form
Use this if your goal is to collect information from potential customers. It works well for service businesses, consultants, agencies, or SaaS companies looking to grow their email list or sales leads.
Example: A user fills out a contact form to request a demo or consultation.
(c) Phone call leads
Choose this if you want people to call your business directly. This is great for local businesses, service providers, or anyone who prefers phone inquiries.
Example: A cleaning service runs an ad that lets people tap to call for booking.
(d) Page views
Use this goal if you want to drive traffic to a specific page, like a blog post, pricing page, or product details. This is useful for education, awareness, or remarketing purposes.
Example: Sending users to a detailed comparison page to learn more about your service.
(e) Brand awareness
Pick this if you want to reach as many people as possible to promote your brand, videos, or content. It’s good for campaigns focused on visibility rather than direct actions.
Example: Promoting a YouTube video or running display ads to make more people recognize your brand.
For this tutorial, we are choosing ‘Purchases' as our goal.
If you are choosing ‘Purchases' as your goal, you need to enter the URL someone reaches after completing a purchase.
This is usually your “Thank You” page or order confirmation page, a unique URL that only appears after someone makes a successful payment.
You can also set it up later on using code.
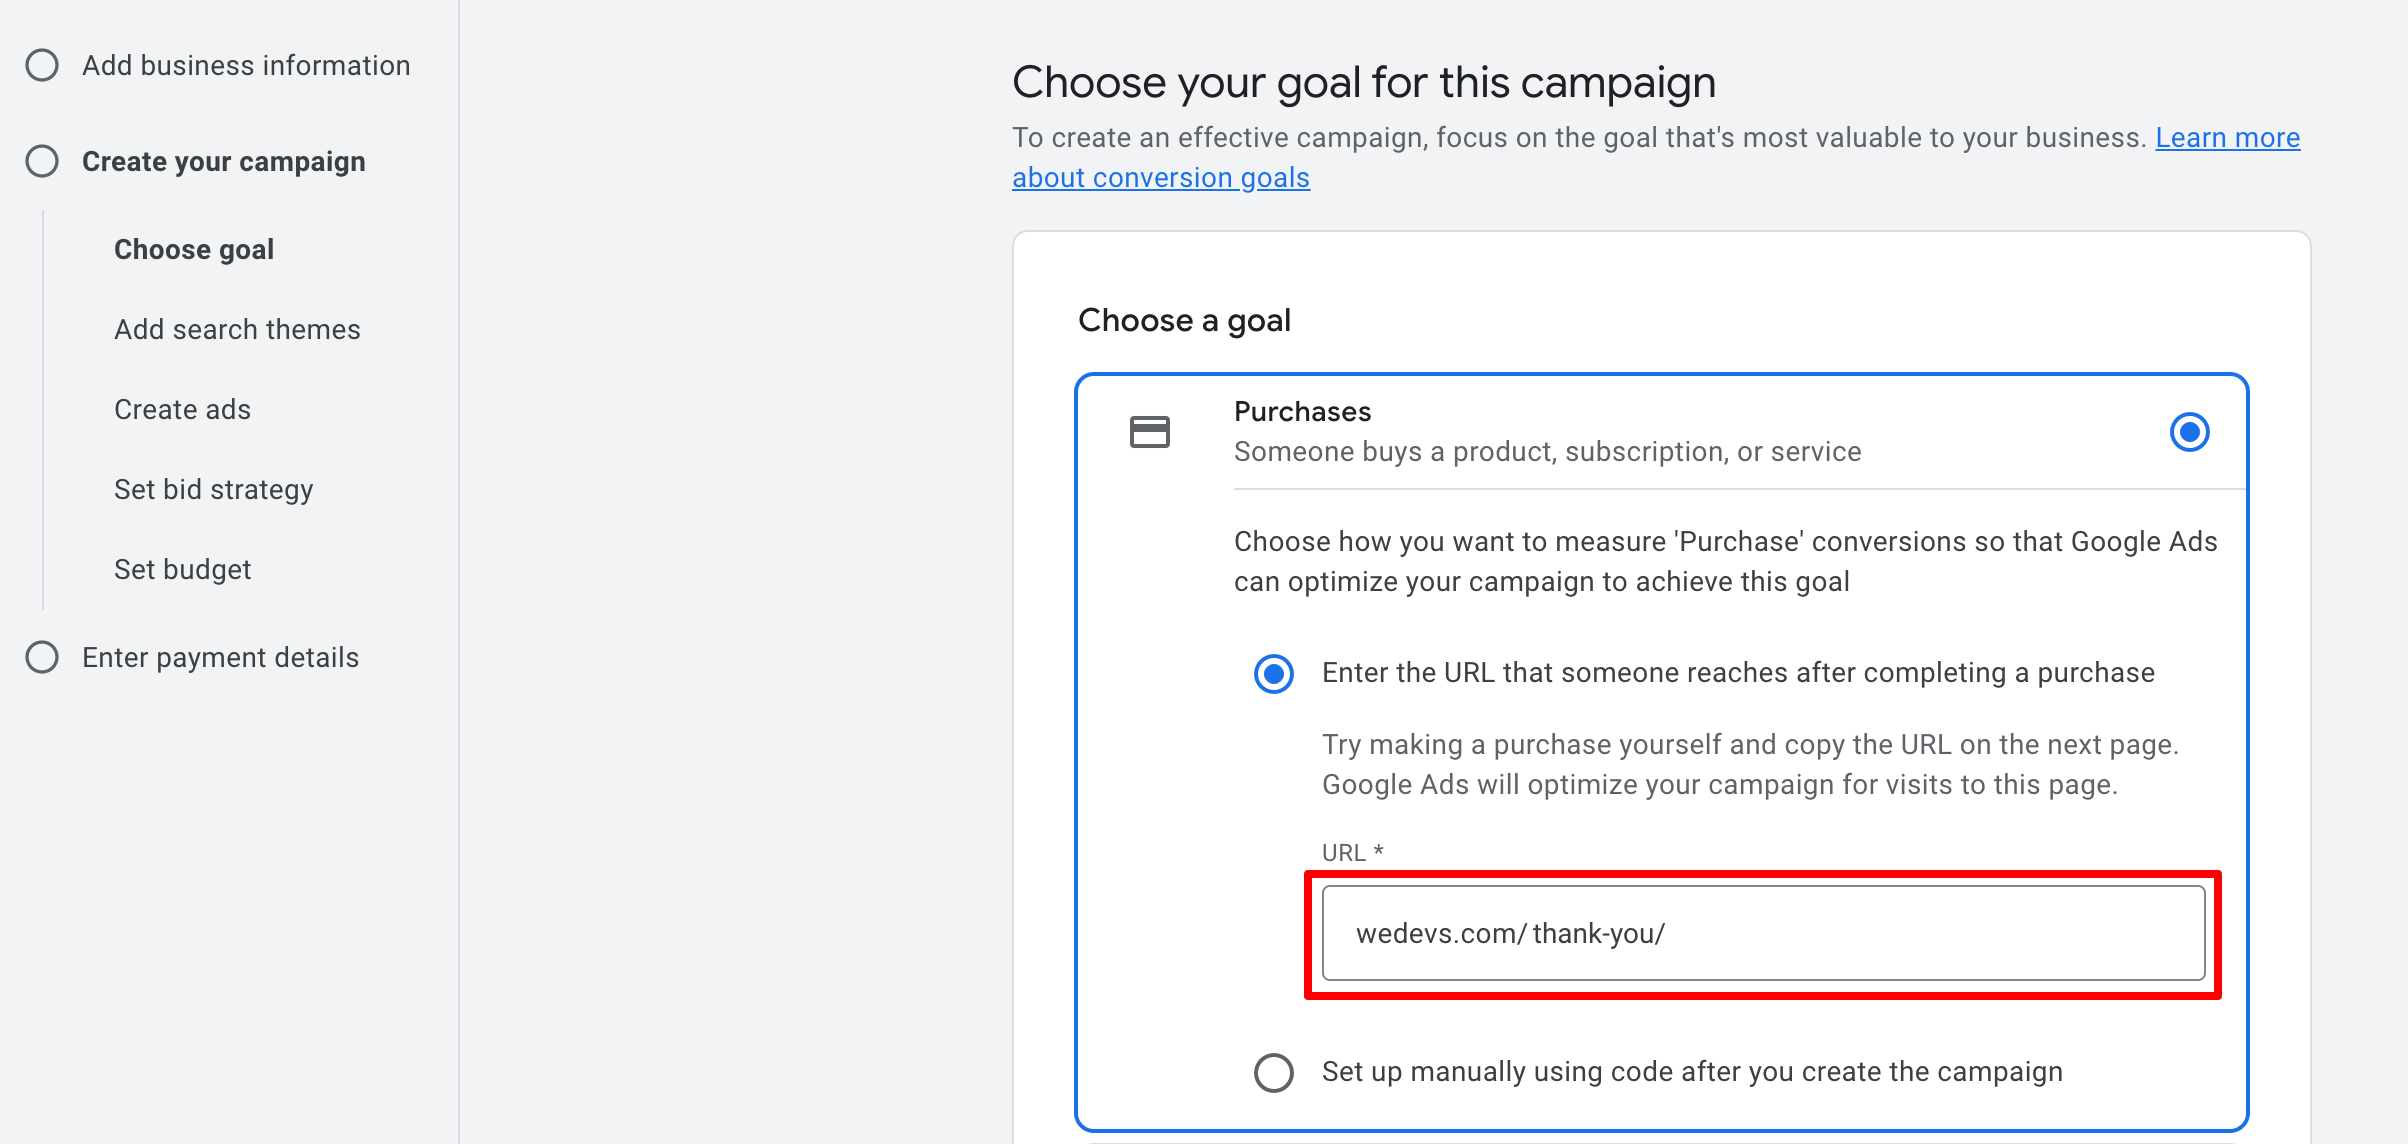
Do not enter your homepage or product page here. It must be a page that confirms the purchase has already happened.
Step 04: Select a Campaign Type
This is one of the most important decisions you'll make in your Google Ads setup. The campaign type you choose determines where your ads will appear, what kind of formats you can use, and how your budget will be distributed across Google’s network.
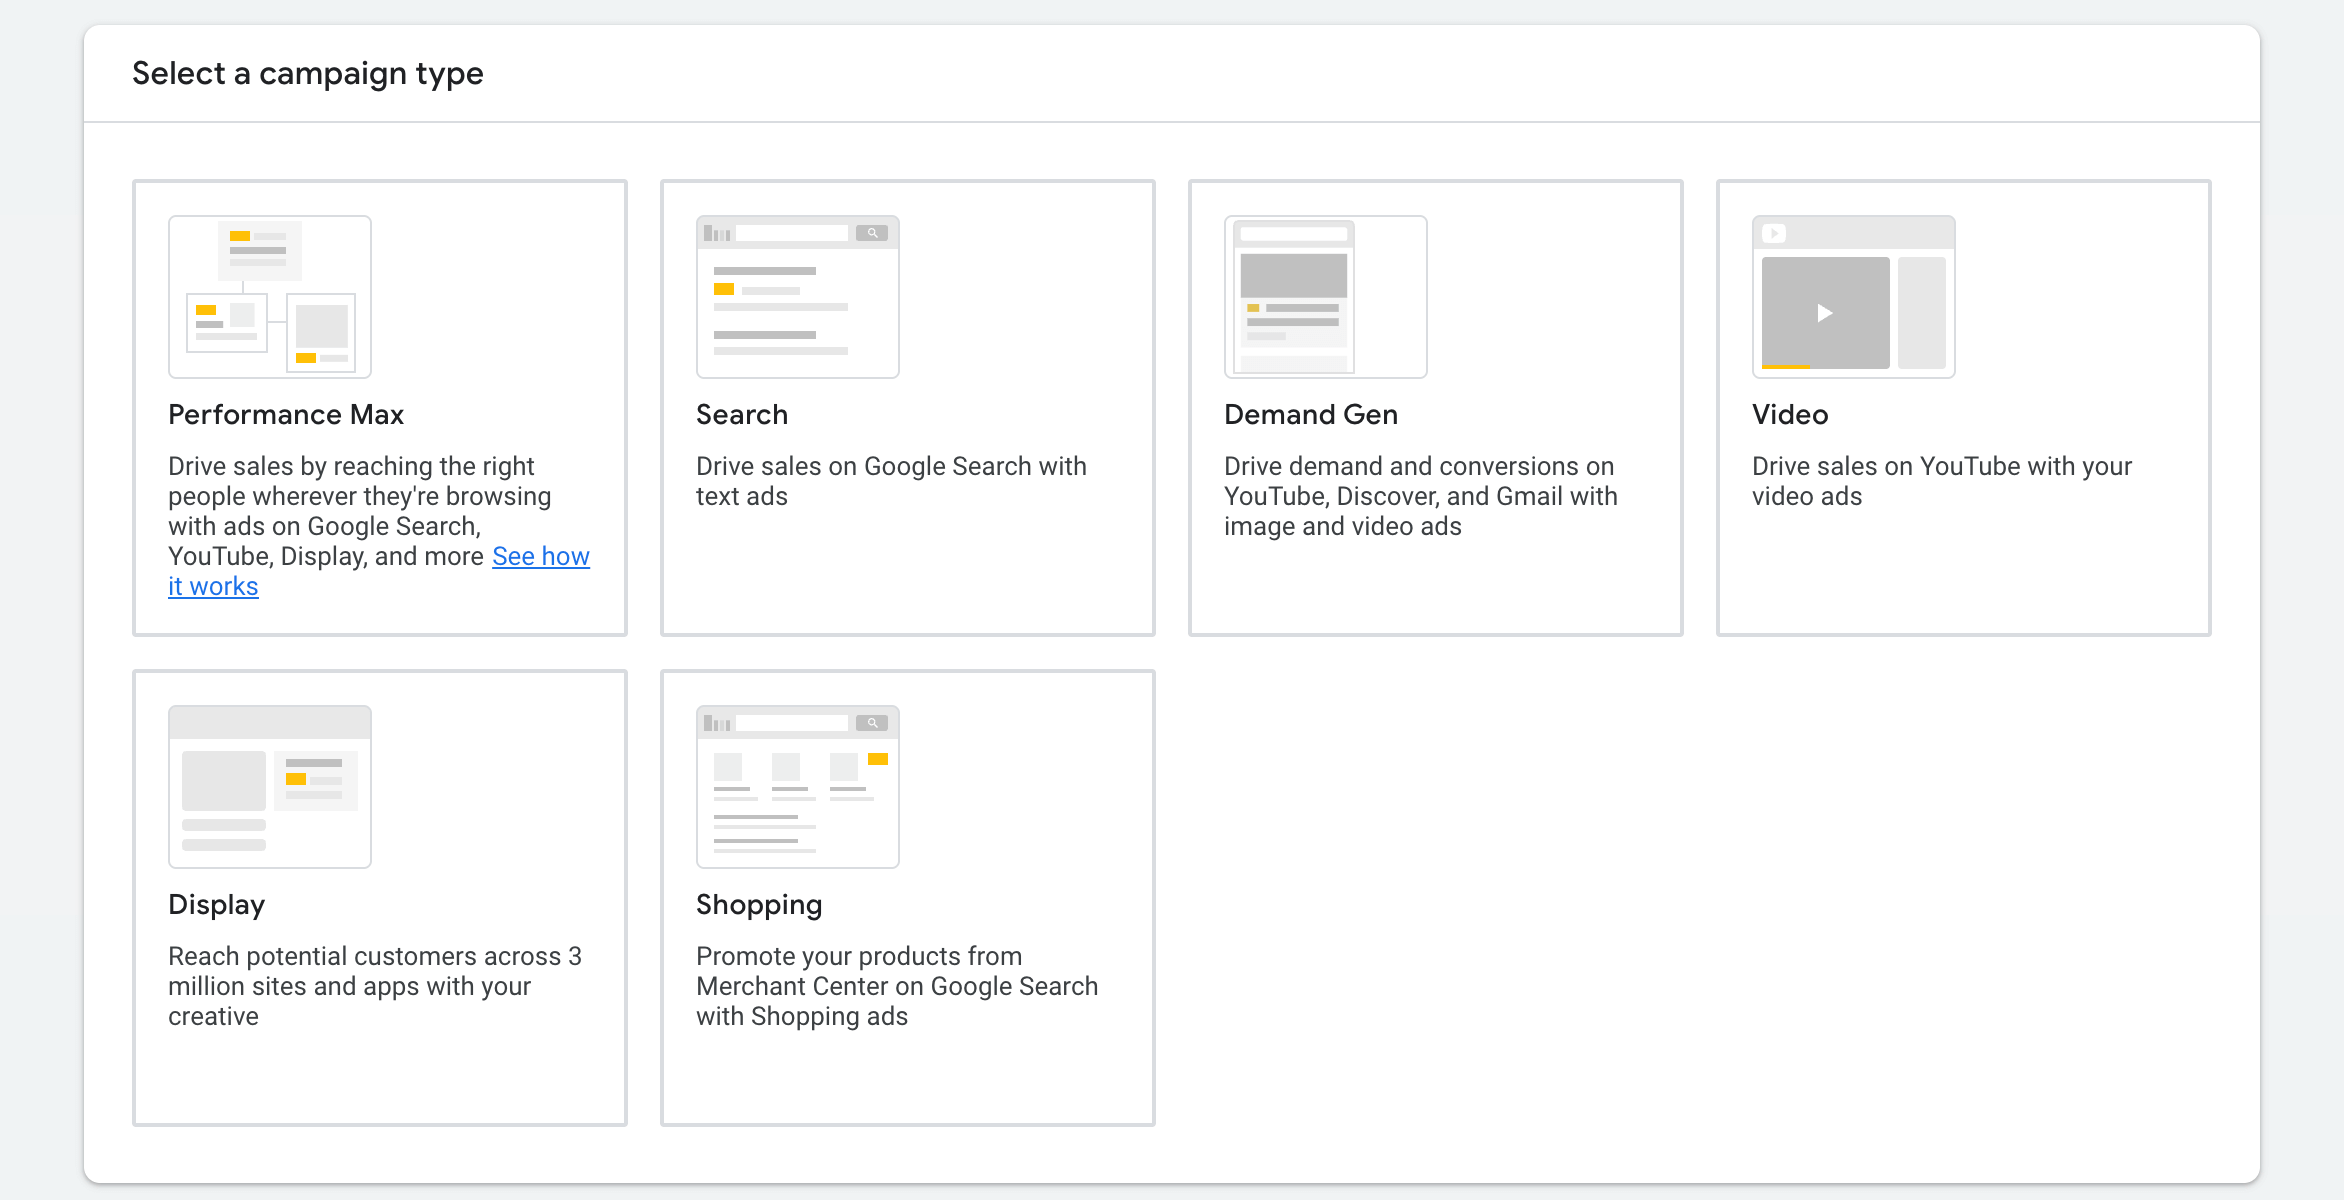
(a) Performance Max
Best for beginners who want maximum visibility with minimal manual setup.
This campaign runs across all Google platforms: Search, Display, YouTube, Gmail, Discover, and more, using one campaign. Google’s AI decides where to show your ads based on your goals (like purchases or leads).
Great for:
- Promoting a paid plugin or free trial
- Getting leads/sign-ups
- Driving conversions with multiple asset types (text, image, video)
You have less control over placements and keywords. It works best when you have solid assets and are open to automation.
(b) Search
Ideal if you want to appear when people search for specific terms on Google.
These are text-only ads that appear on Google Search when someone types in a relevant query (e.g., “frontend post submission plugin” or “WordPress user registration form”).
Great for:
- Capturing high-intent users actively searching for a solution
- Running lead-gen or purchase campaigns for WP plugins
You’ll need to set keywords and write compelling text ads.
(c) Demand Gen
Optimized for visually rich campaigns across YouTube, Gmail, and Discover.
This campaign is designed for awareness and demand creation using image and video ads. It reaches users who are not necessarily searching, but may be interested in what you're offering based on their browsing behavior.
Great for:
- Introducing WP User Frontend Pro to new audiences
- Building brand awareness with visual assets
Lower conversion intent compared to Search or Performance Max.
(d) Video
Specialized for YouTube video advertising.
This campaign shows your ads directly on YouTube, before, during, or beside videos. Works best when you have engaging, short video content that explains your product or demonstrates features.
Great for:
- Product walkthroughs
- Testimonials
- Tutorials
You must have a YouTube video uploaded to use this type.
(e) Display
Visual ads shown across Google’s Display Network (over 3 million websites & apps).
Display campaigns are primarily for awareness and retargeting. You upload banners or image-based ads, and Google shows them across websites, blogs, mobile apps, and more.
Great for:
- Retargeting people who visited your plugin’s site but didn’t convert
- Running visually branded ads at scale
These ads don’t appear on search results, so they’re better for broader reach.
(f) Shopping
Only for eCommerce products listed through Google Merchant Center.
Shopping campaigns are designed for promoting physical products listed through Google Merchant Center. They show rich product listings, including image, price, store name, and more, directly in search results and across the Google network.
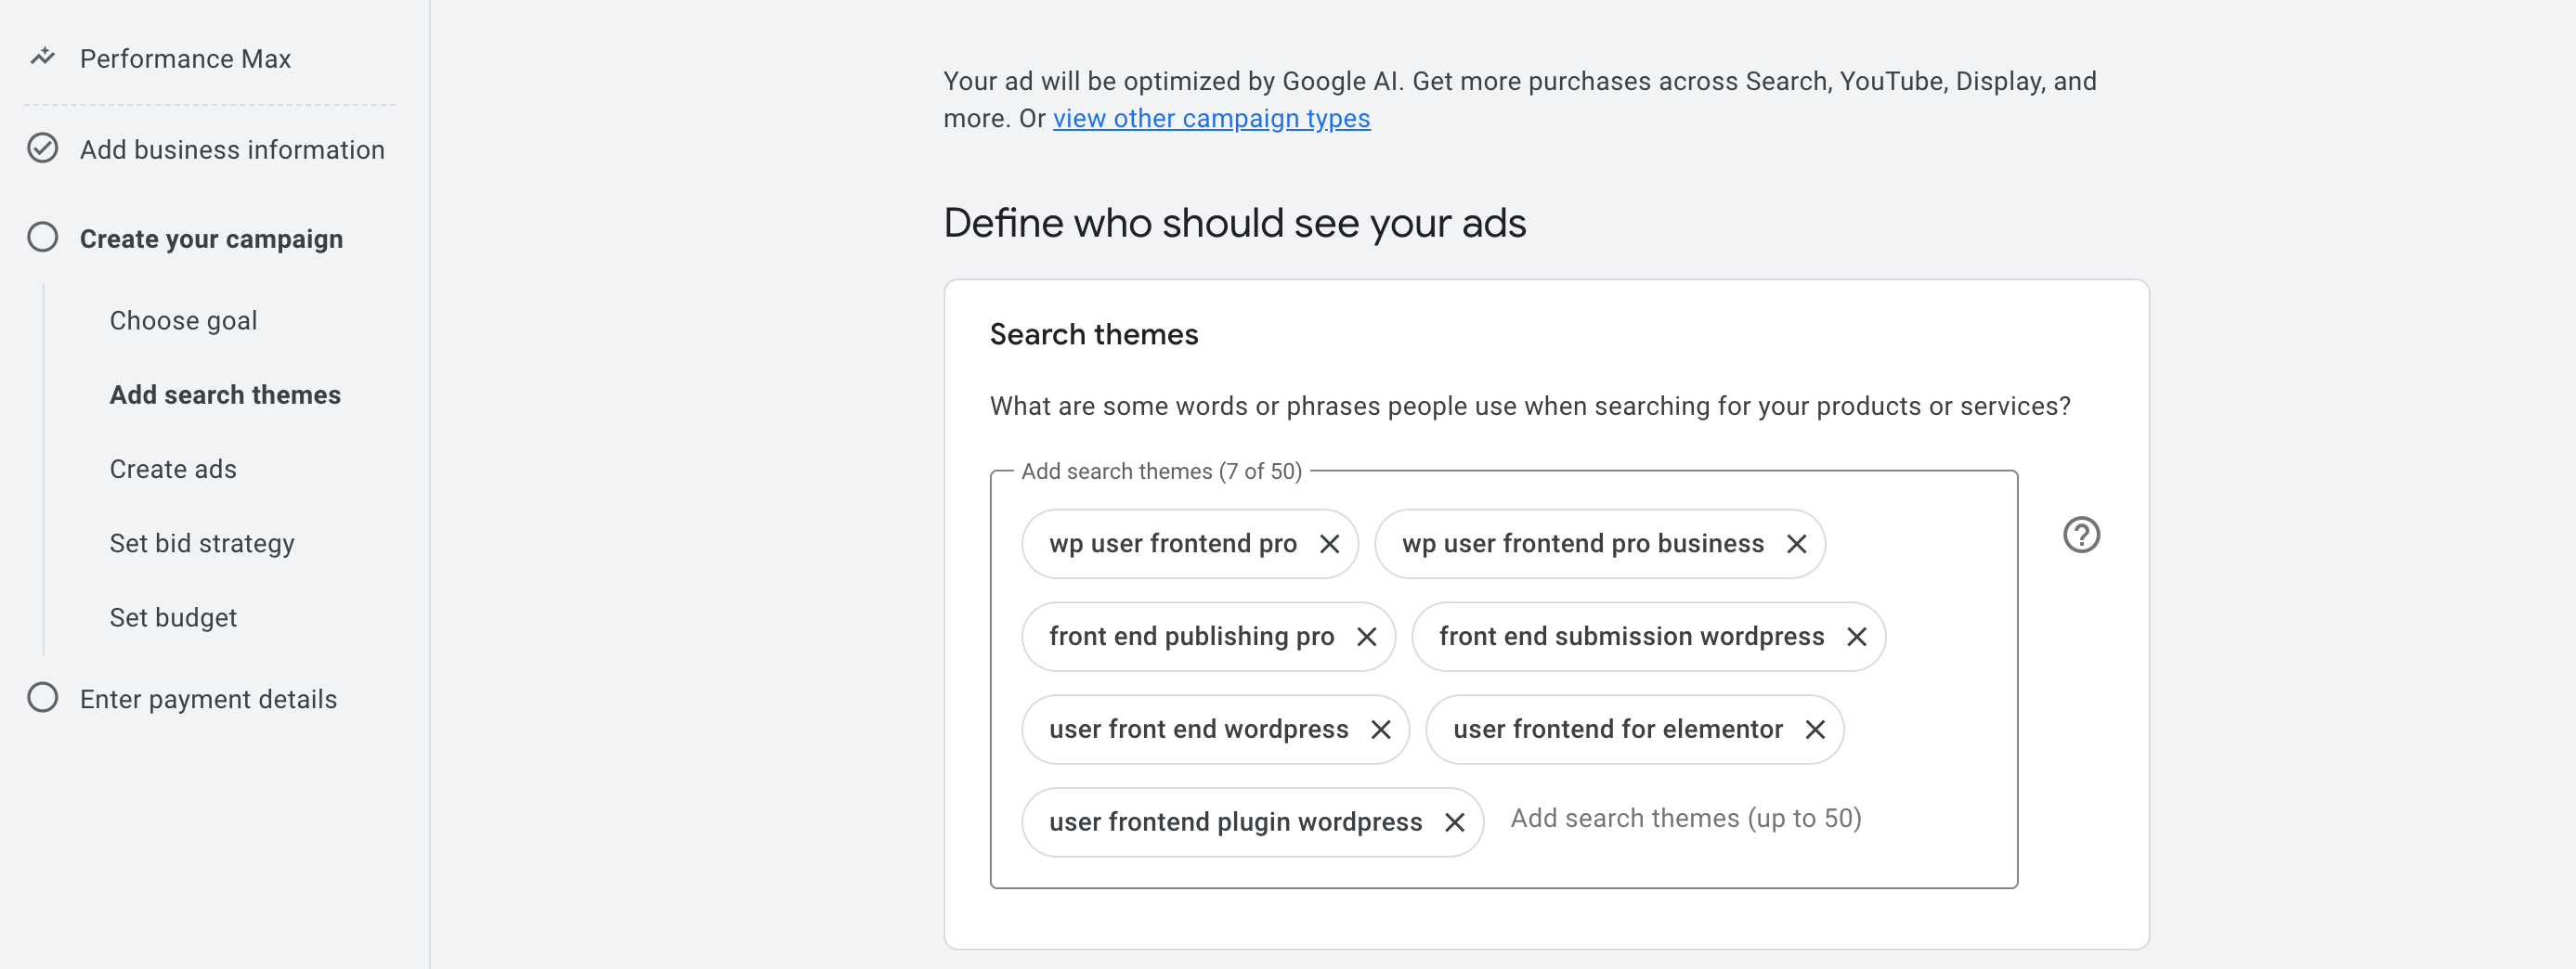
Step 5: Define Who Should See Your Ads
In this step, you help Google understand which audience you want to target, both by the kinds of searches they’re doing and where they’re located.
(a) Search themes
Search themes are phrases or topics that describe what your product, service, or offering is about. Google uses these to match your ad with the right audience, people actively searching for something related to what you provide.
They are not exact keywords, but they serve a similar purpose in guiding Google’s AI to understand your targeting intent.
You should think about:
- What your ideal customer would type into Google
- What problems your product solves
- What industry terms people use to describe what you offer
Here are a few free (and beginner-friendly) ways to discover effective search themes:
- Google Search Autocomplete: Go to Google and start typing a phrase related to your product. Look at the suggestions – these are real searches people are making.
- Google Keyword Planner: Available for free inside Google Ads (under Tools > Keyword Planner).
- Answer the Public: Type in a topic, and it shows common questions and phrases people search related to it.
- Competitor Sites: Browse the landing pages of your competitors and look at their wording.
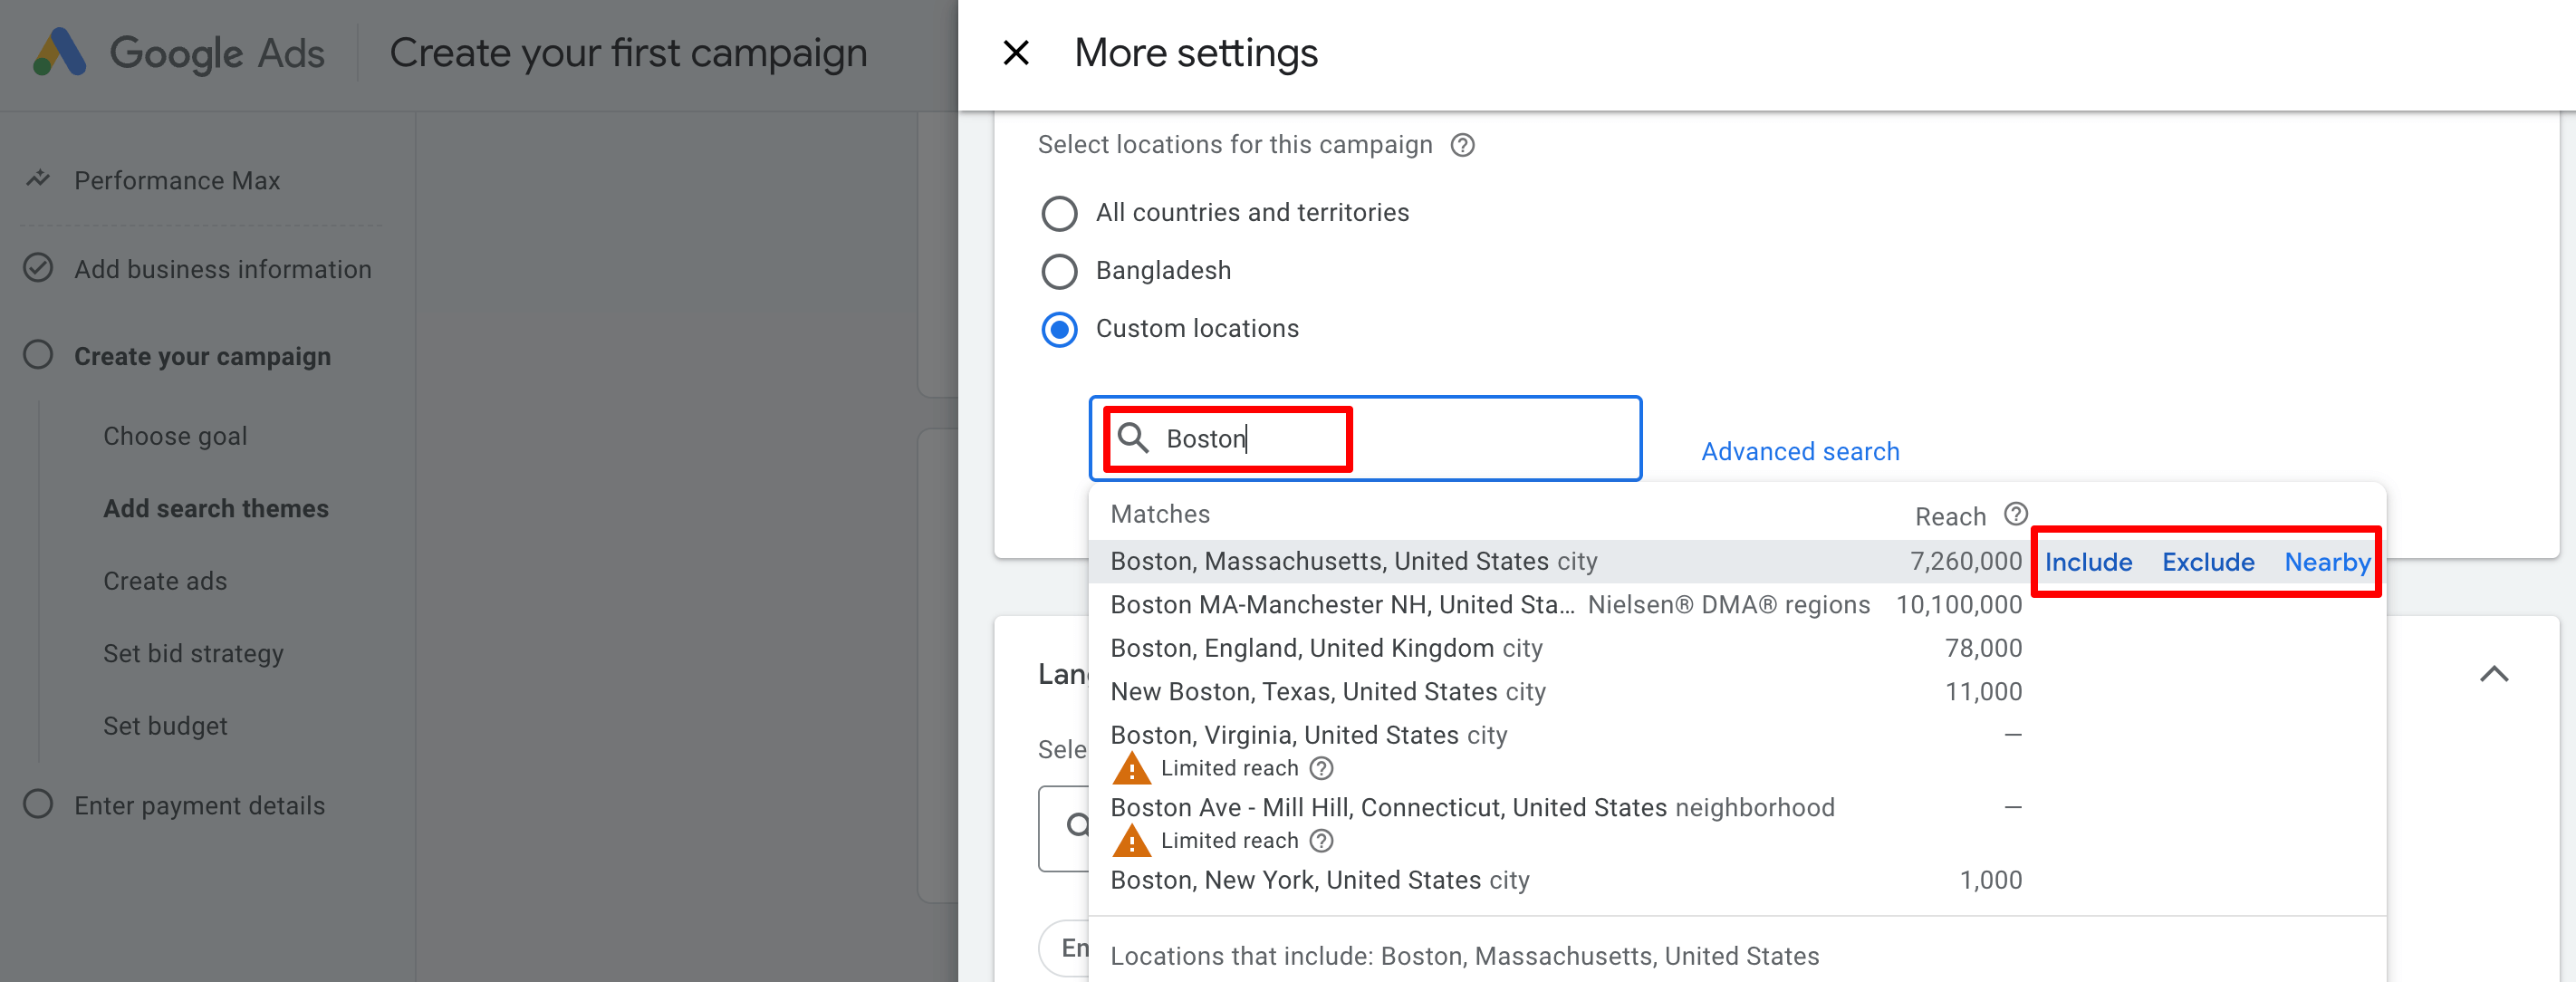
(b) Locations and Languages
When defining your audience, Google Ads lets you target people by geographic location, whether globally or down to specific cities and neighborhoods.
You have 3 main options:
- All countries and territories – Your ads show worldwide.
- Your country – Target users only in your country.
- Custom locations – Select specific cities, states, countries, or regions.
When you are selecting a location, there will be 3 options:
- Include: Your ad will show to users in this location.
- Exclude: Your ad will not show to users in this location.
- Nearby: See adjacent cities or regions, you may also want to include.
Step 6: Create Your Ad
In the next step, you'll find this interface. Now, you need to create and design your ad. Don't panic, we'll go step-by-step to make everything easier.
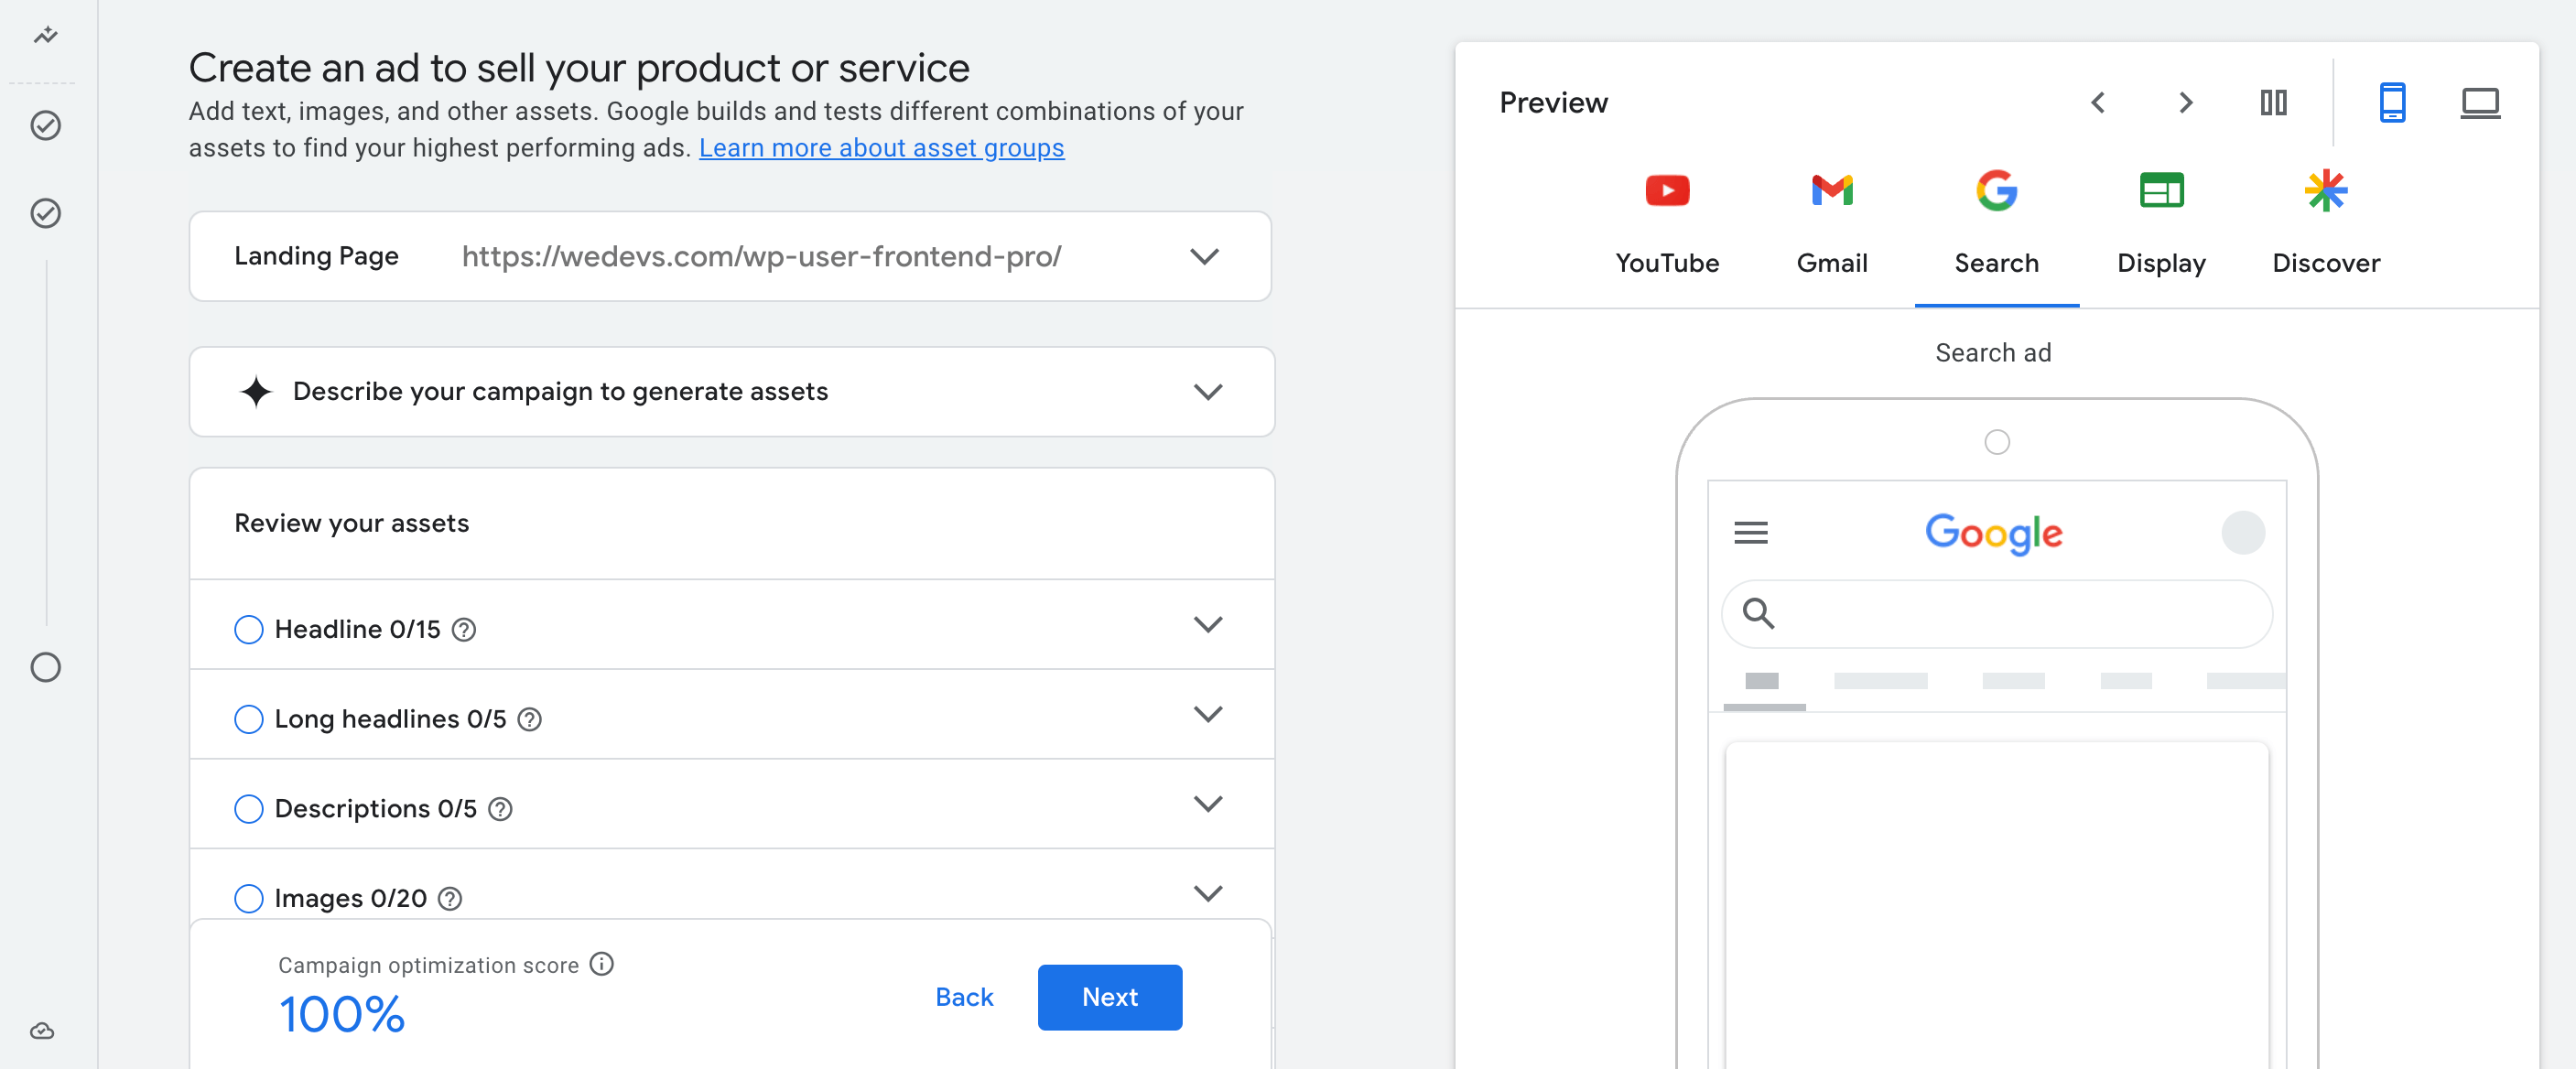
The first field you’ll notice is the Landing Page. This is the URL where users will be sent after clicking your ad. Google automatically pulls this from the earlier step, but it’s important to make sure it’s the most relevant and focused page, not just your homepage.
Now, if you click on the ‘Describe your campaign to generate assets‘, it will expand, and you'll see a couple of options:
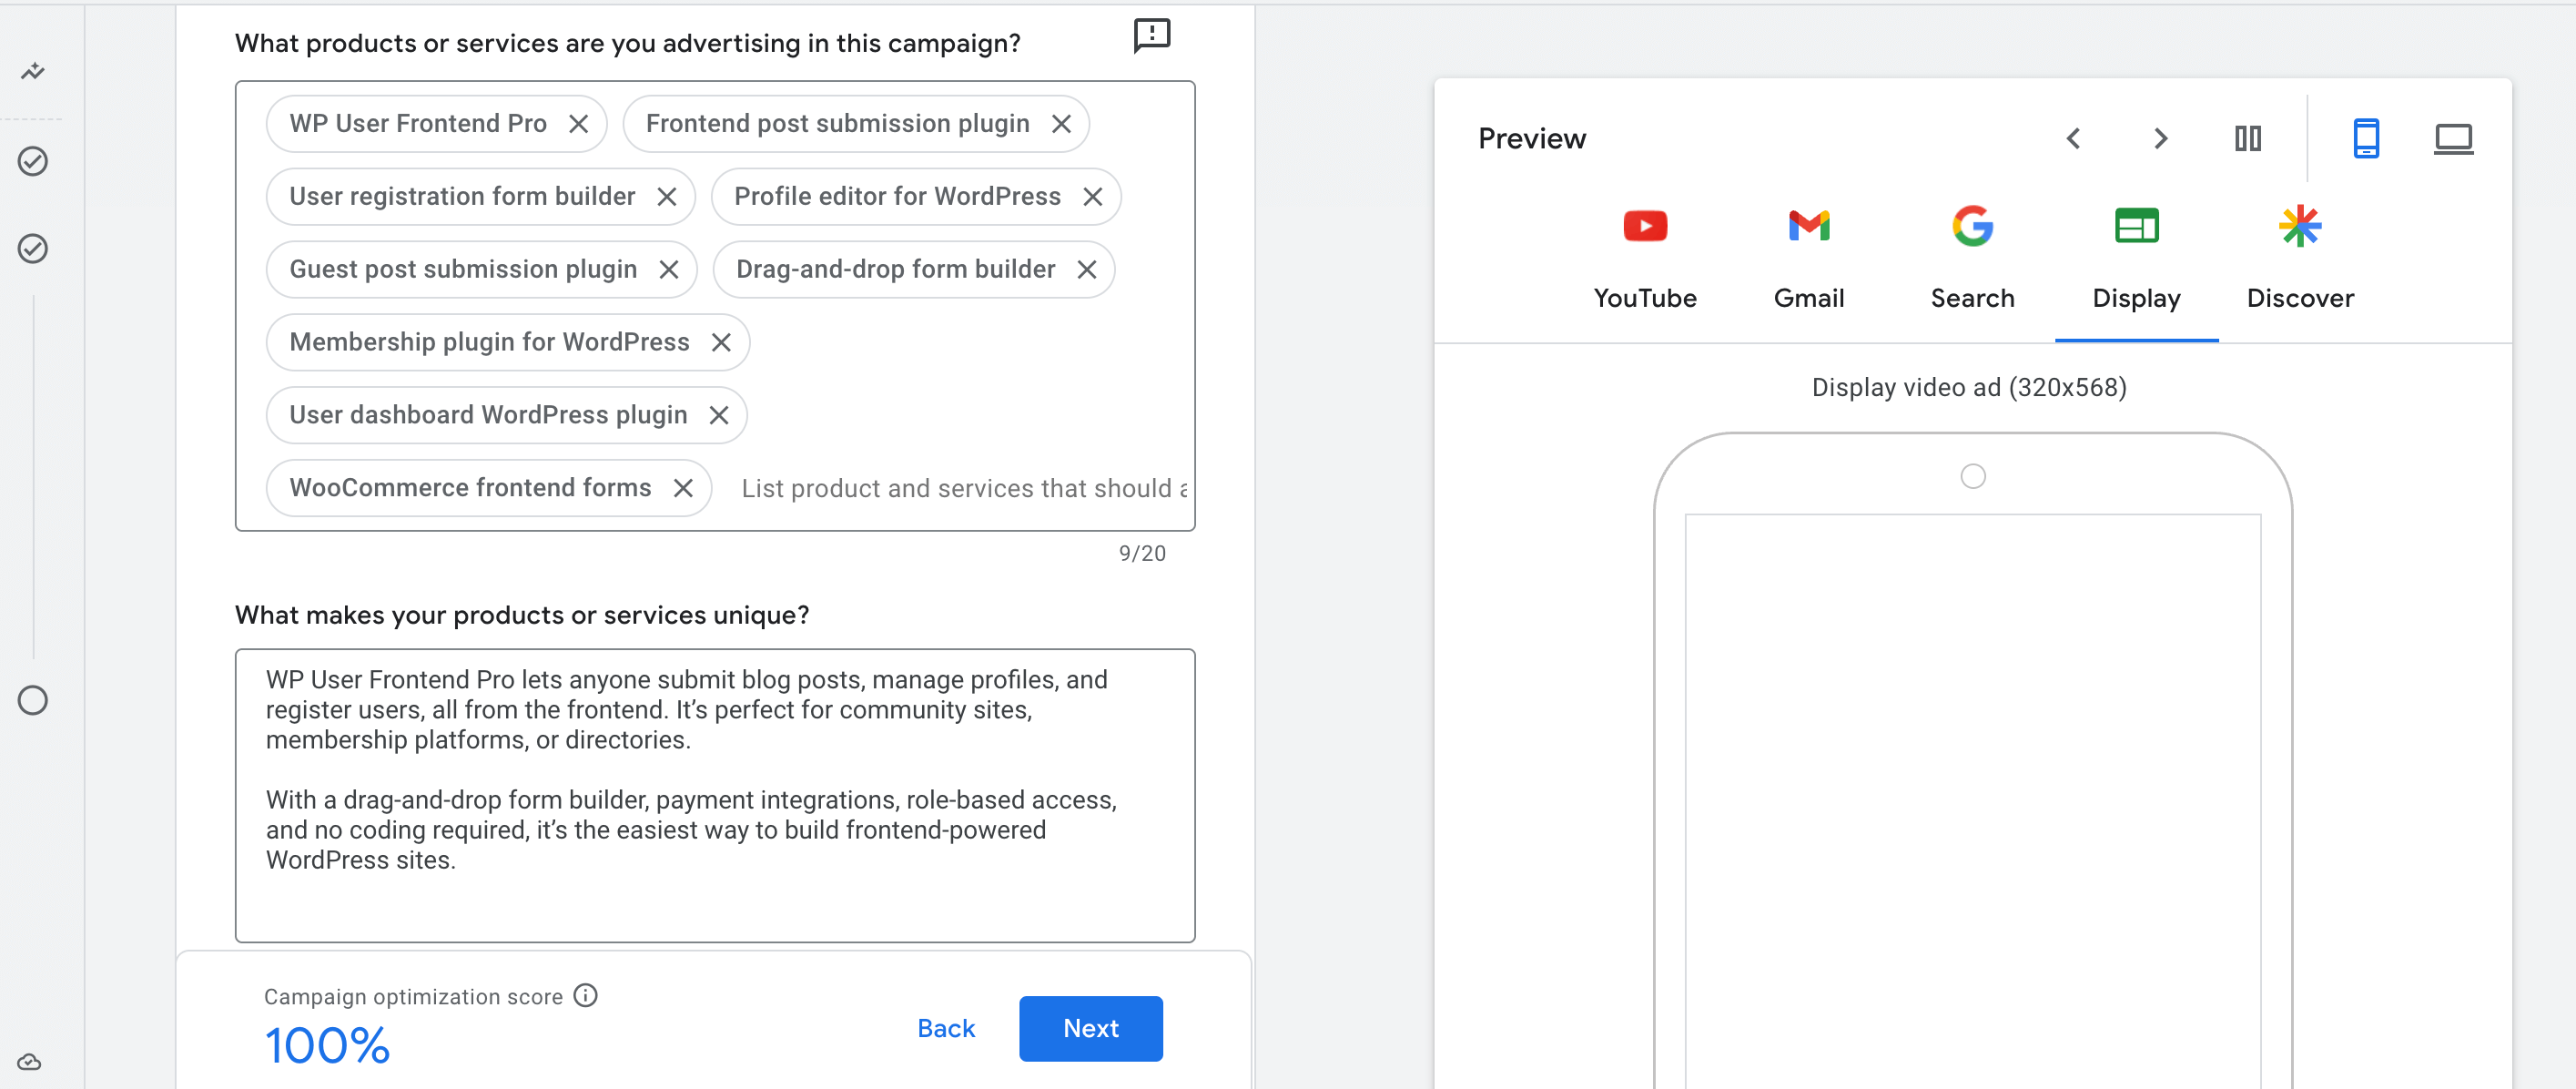
I. What products or services are you advertising in this campaign?
This field is used to list the actual products or services you want Google Ads to focus on while generating your campaign assets, like headlines and descriptions.
You can enter up to 20 individual items, and each one must be 100 characters or less. These are entered as separate tags, not a paragraph or sentence. Each item should be short, specific, and directly related to what’s being advertised.
Since we’re advertising WP User Frontend Pro, the goal here is to help Google understand what this product is, who it’s for, and what features or services are core to it.
II. What makes your products or services unique?
This step is about helping Google understand what differentiates your product from others in the same category. It’s not just a feature list, it’s your chance to communicate the core value your product delivers.
Focus on what the user can achieve with it, what problems it solves, and why it’s a smarter choice than similar solutions.
This is our copy for this tutorial:
WP User Frontend Pro lets anyone submit blog posts, manage profiles, and register users, all from the frontend. It’s perfect for community sites, membership platforms, or directories.
With a drag-and-drop form builder, payment integrations, role-based access, and no coding required, it’s the easiest way to build frontend-powered WordPress sites.
Then there is another option – ‘Select pages to enhance and suggest images from', you can skip this option if you want to insert images manually. This is an optional step.
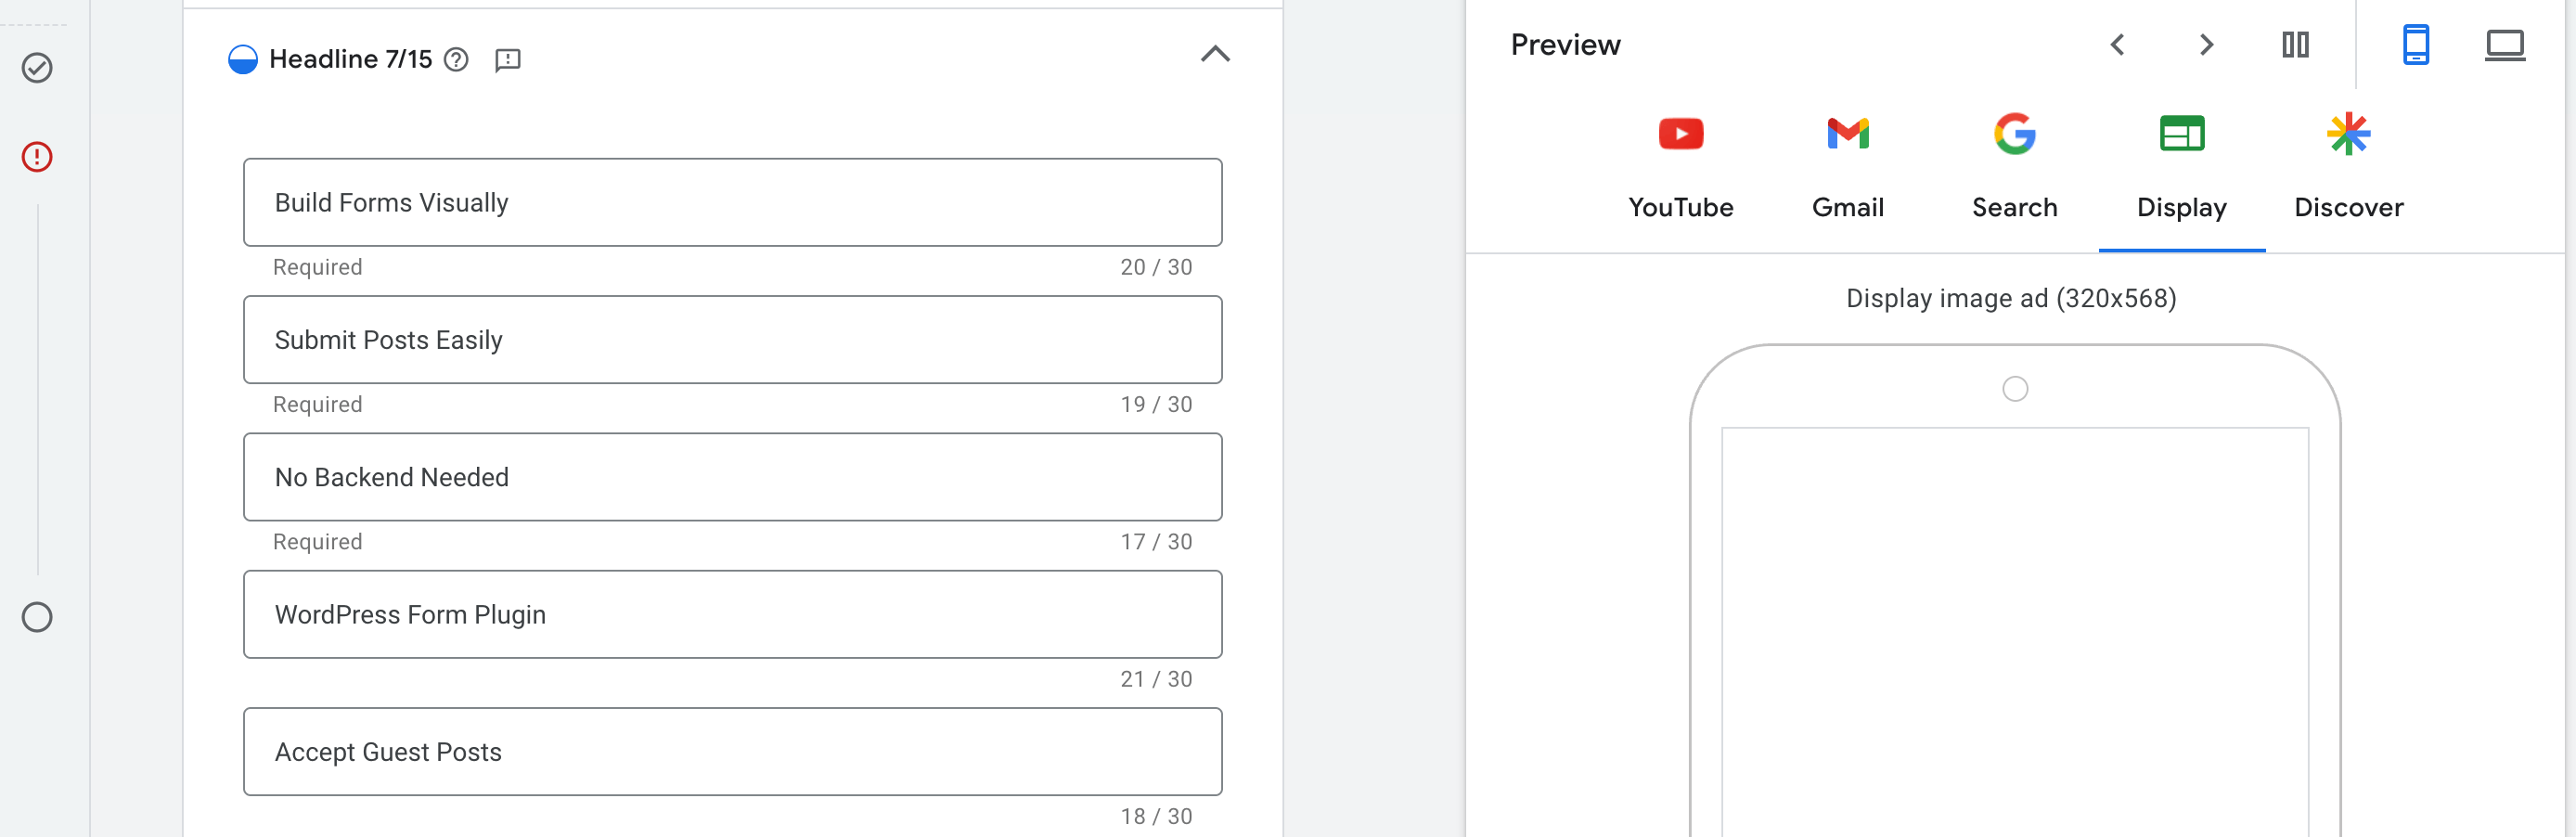
III. Headlines
This step is about writing short, punchy lines that will appear as the main text in your ads. These headlines are what users see first in places like Google Search, YouTube, and Gmail ads, so they need to grab attention and highlight what you’re offering in just a few words.
You can enter up to 15 headlines, but at least 3 are required to proceed. Each headline can be a maximum of 30 characters. Google will rotate and test combinations of your headlines with other assets (like descriptions and images), so variety is important.
IV. Long Headlines
Long headlines give you more space to explain your offer in a complete sentence. These are shown in placements like Gmail, Discover, and certain Display formats where more text is allowed. You can enter up to 5, but at least 1 is required. Each long headline can be up to 90 characters.
A well-written long headline clearly tells the user what the product does or what they can achieve with it. It should be easy to read and sound complete on its own.
Here are examples optimized for WP User Frontend Pro:
- Create frontend forms that allow users to submit posts and manage their profiles
- Let users register and publish content without accessing the WordPress dashboard
- Build a membership site with user dashboards and custom profile features
- Accept guest posts and payments through simple frontend forms
- Launch user-generated websites without writing any code
Each headline highlights a key benefit or use case using natural language. Aim to be clear, specific, and benefit-focused.

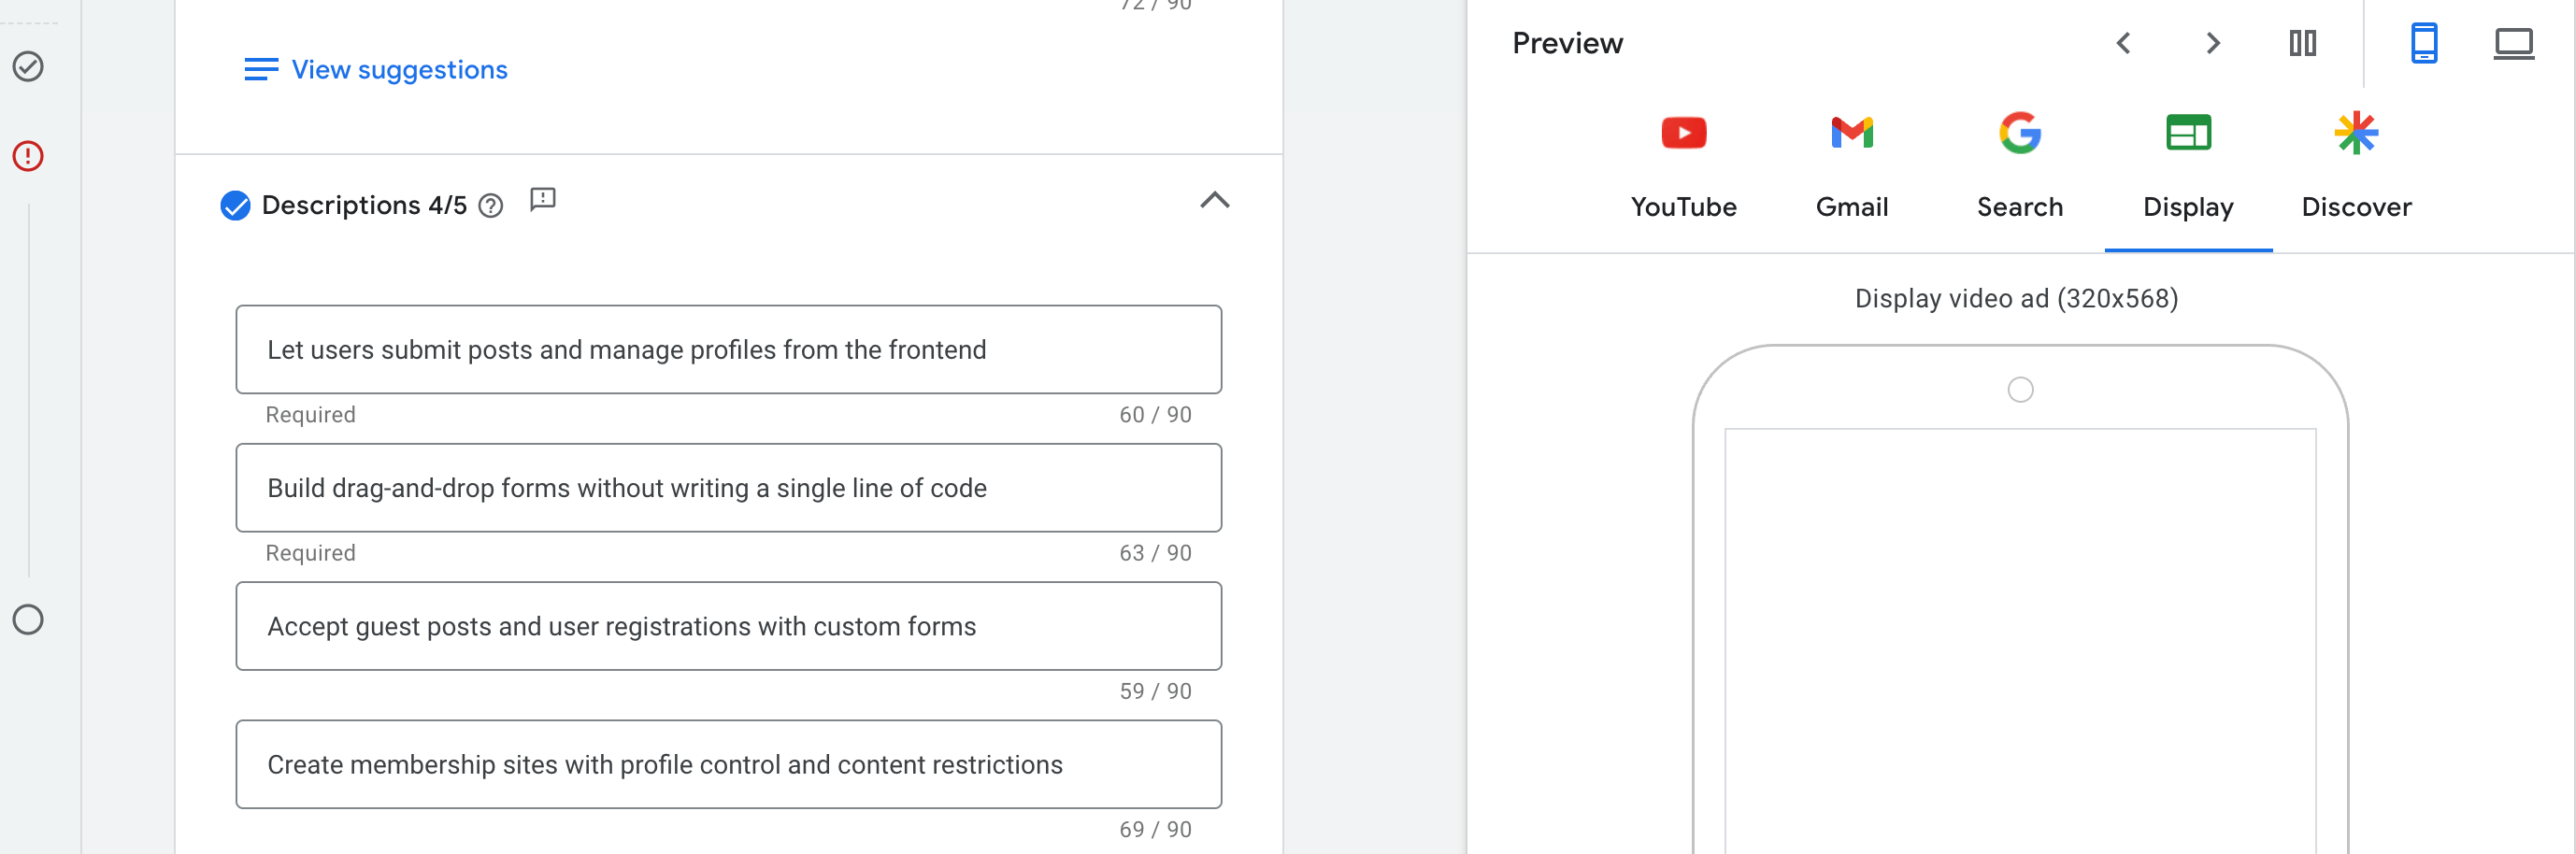
V. Descriptions
Descriptions give you space to explain what your product does and why someone should take action. These appear below your headlines and help users understand your offer in more detail. You can enter up to 5 descriptions, but at least 2 are required to move forward. Each one can be up to 90 characters.
The best-performing descriptions are clear, benefit-focused, and written in plain language. Rather than repeating headlines, use this space to support them with specific advantages, pain-point solutions, or use cases.
VI. Images
This section allows you to upload visuals that will appear with your ads on platforms like YouTube, Gmail, and the Google Display Network. Visuals play a critical role in attracting clicks, especially on placements where users scroll quickly.
To proceed, you’re required to upload at least:
- 1 landscape image (typically 1200×628 pixels)
- 1 square image (typically 1200×1200 pixels)
You can add up to 20 images in total, but these two formats are mandatory.
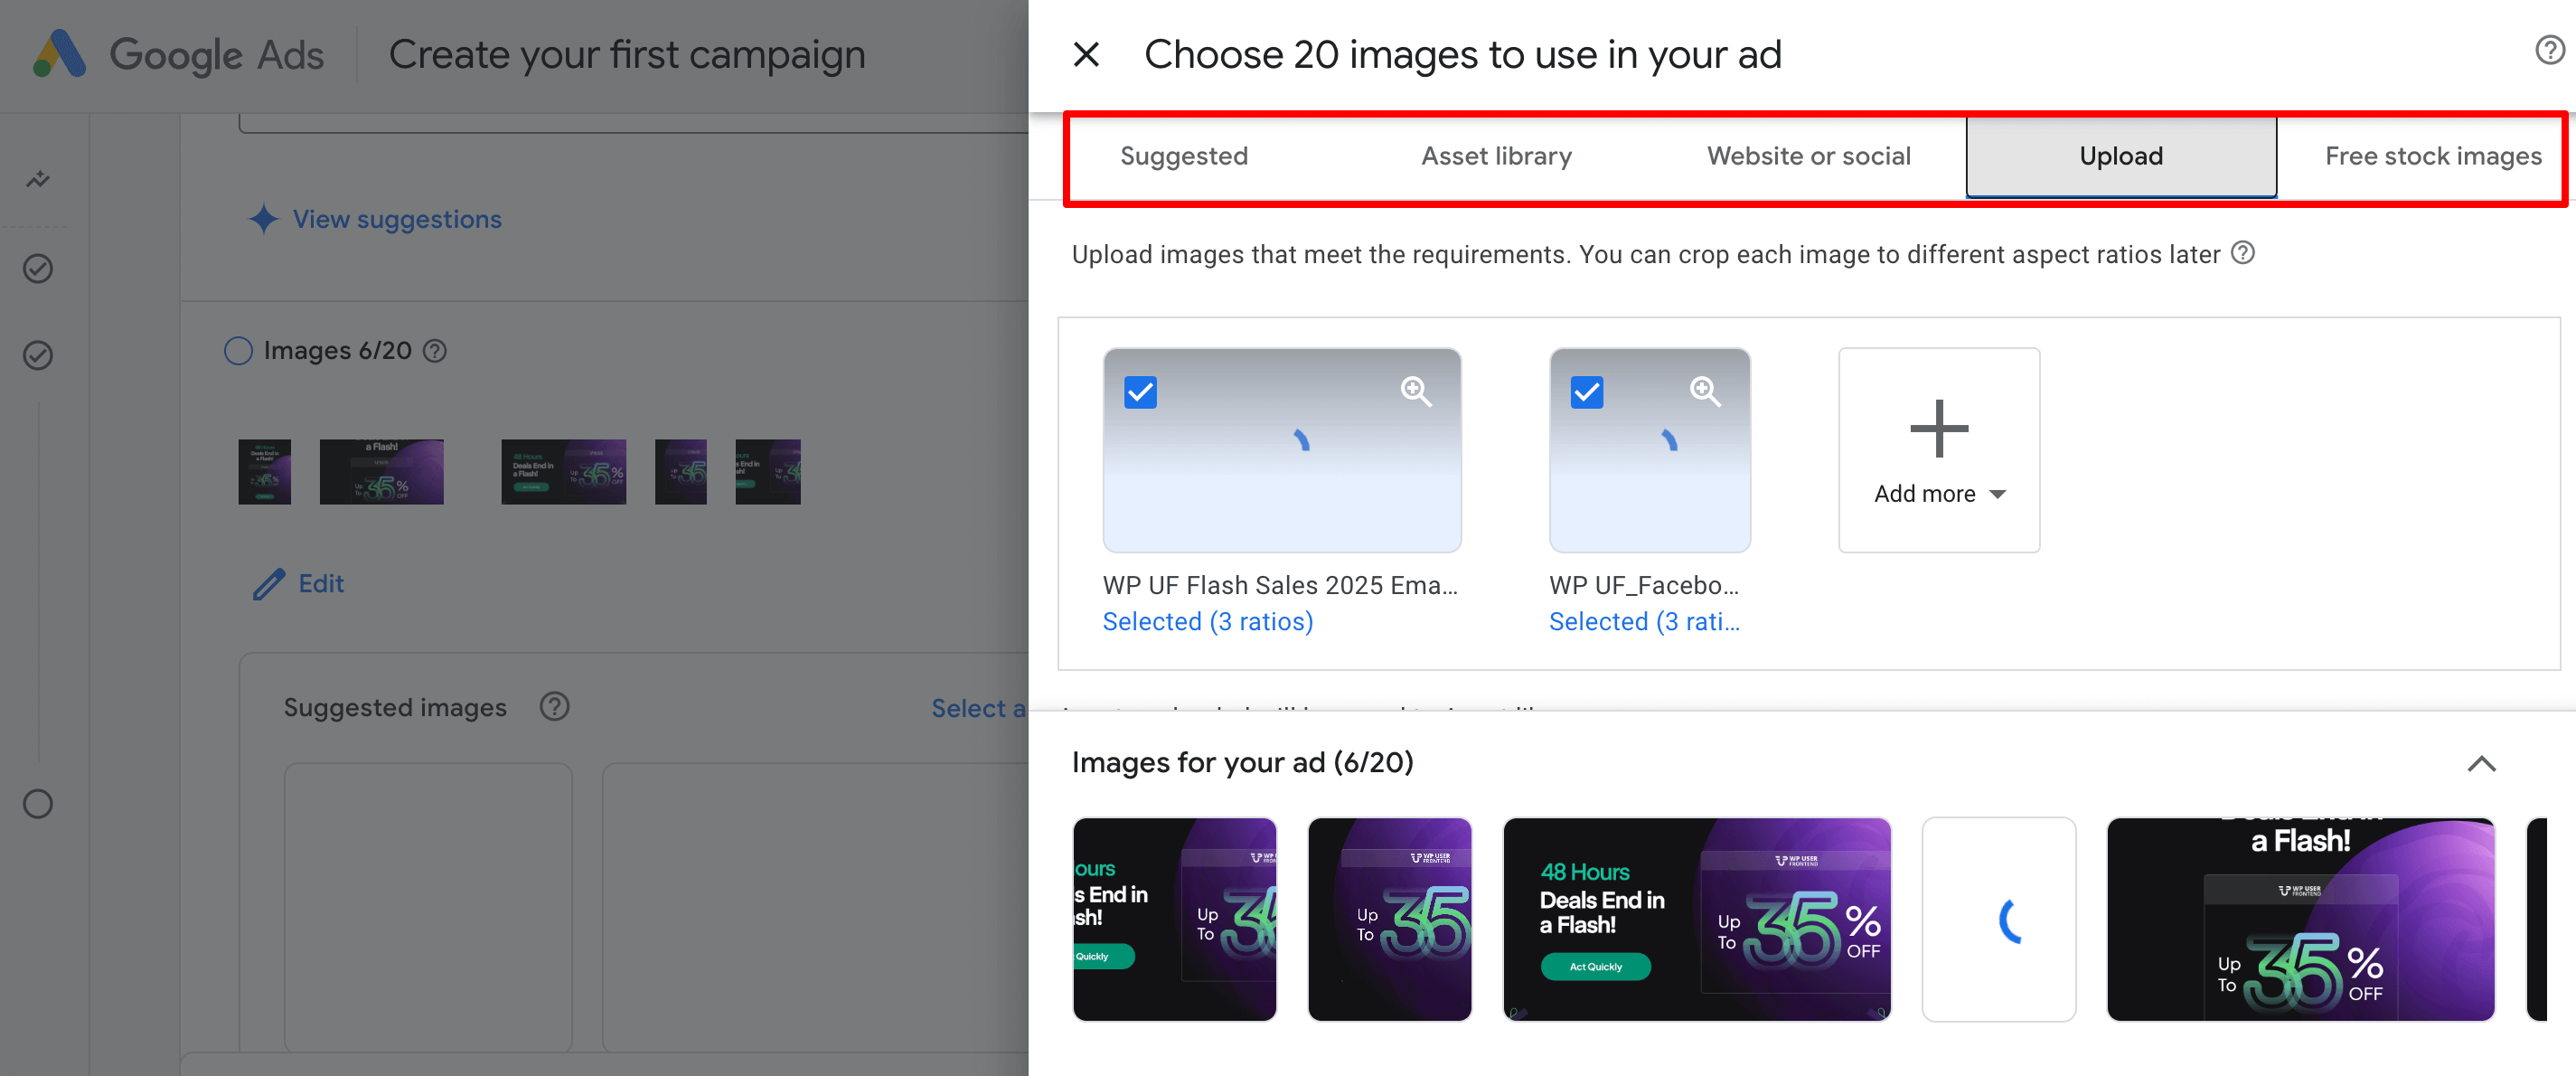
Following the same way, upload logos for your ads campaign.
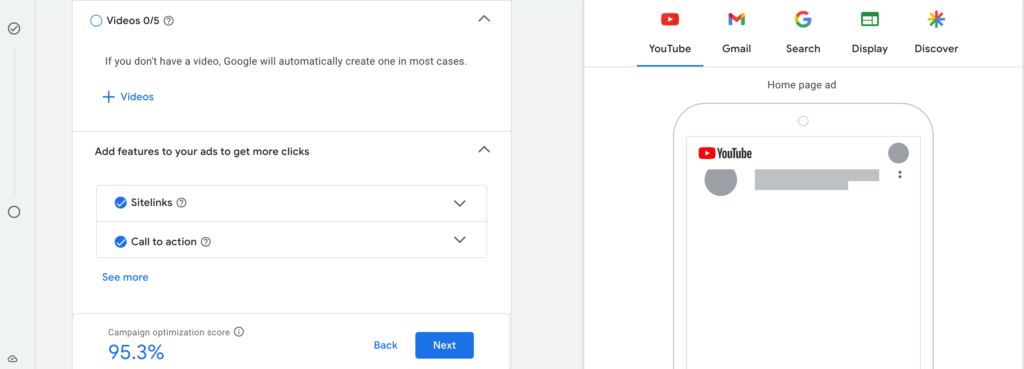
VII. Videos
In this section, you can add a video to make your ad more dynamic. Uploading a video isn’t mandatory, but highly recommended for placements like YouTube and Discover. If you don’t provide one, Google may automatically generate a video using your headlines, descriptions, and images, but the result is generic and often lacks polish.
Below the video section, you’ll find optional ad features that help improve click-through rates:
- Sitelinks let you add extra links below your main ad. These can lead to important pages like Pricing, Features, Documentation, or FAQs. This increases ad visibility and offers users more options to engage.
- Call to Action (CTA) allows you to choose a CTA button text like “Sign Up,” “Learn More,” or “Get Started.” Pick a CTA that aligns with the action you want users to take after viewing the ad.
Once you're done, click on the Next button to move on to the bid strategy option.
Step 7: Set Bid Strategy
This step tells Google how to spend your money in order to get the best possible results. In simple terms, it’s about choosing what Google should focus on when showing your ads, like getting more clicks, conversions, or views.
Just below that, you’ll see an option: “Set a target cost per action (Target CPA),” and this is where you might get confused. Here’s how it works:
CPA stands for Cost Per Action — meaning how much you’re willing to pay for one conversion (e.g., one sale, one registration, one lead form submission).
For example:
- If you're okay with spending up to $8 for each person who submits a form, set the target CPA to $8
- If you're selling something that costs $30, and you want to keep your cost per sale under $5, then set the CPA as $5.
Google will try to get you conversions at or below your target, but it's not a hard limit. Some conversions might cost more, others might cost less, but Google will aim to average it out.
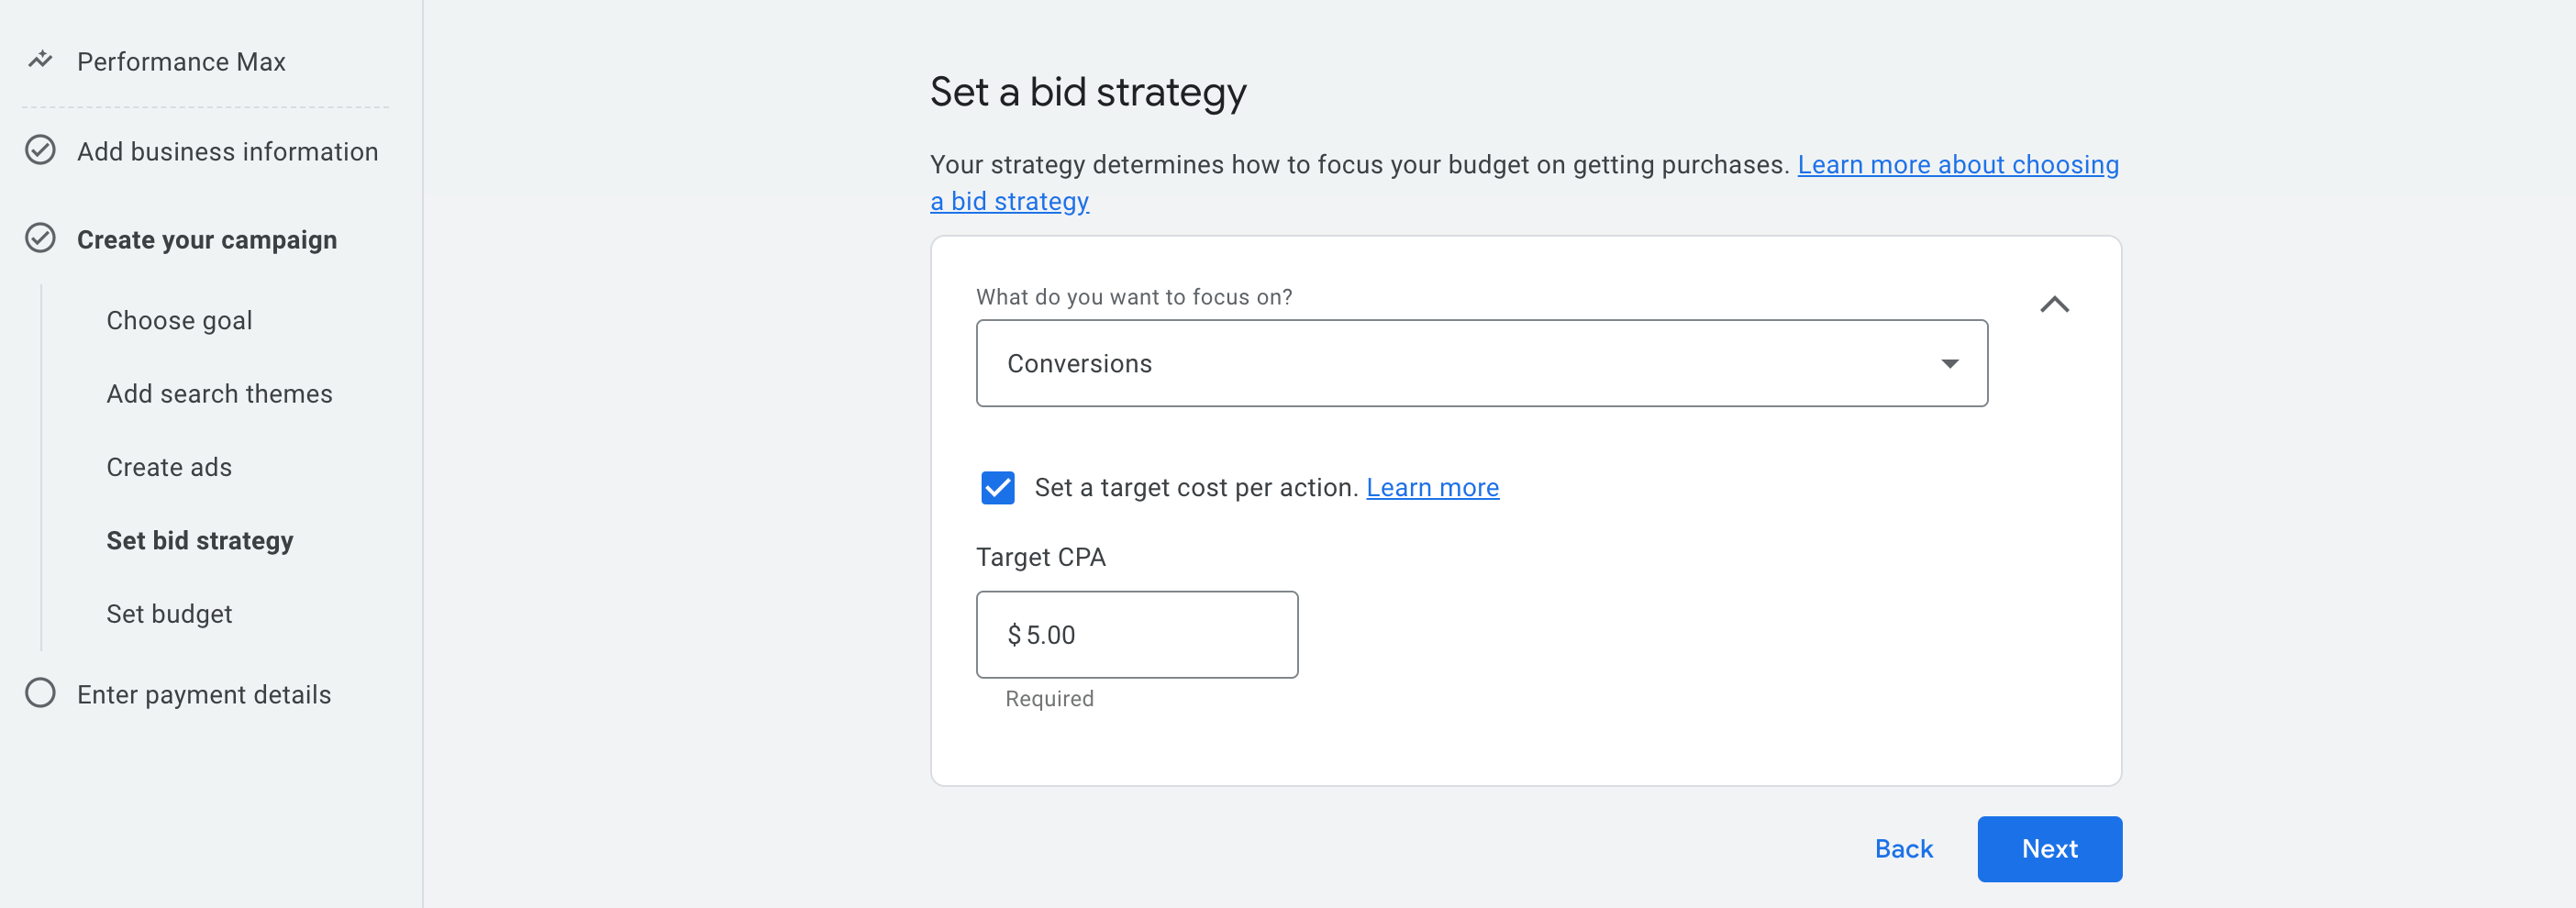
If you prefer not to set a CPA right now, just uncheck the box. Google will still optimize for conversions using its own learning model.
Step 8: Set Budget
This step is where you decide how much you want to spend per day on your campaign. Google uses this number to determine how aggressively it should show your ads across its platforms (Search, YouTube, Gmail, etc.).
You can choose a preset daily budget from the list, or you can enter your own custom amount. The system will take your daily budget and multiply it across the month, but don’t worry, it tries to average it out without exceeding your total monthly budget
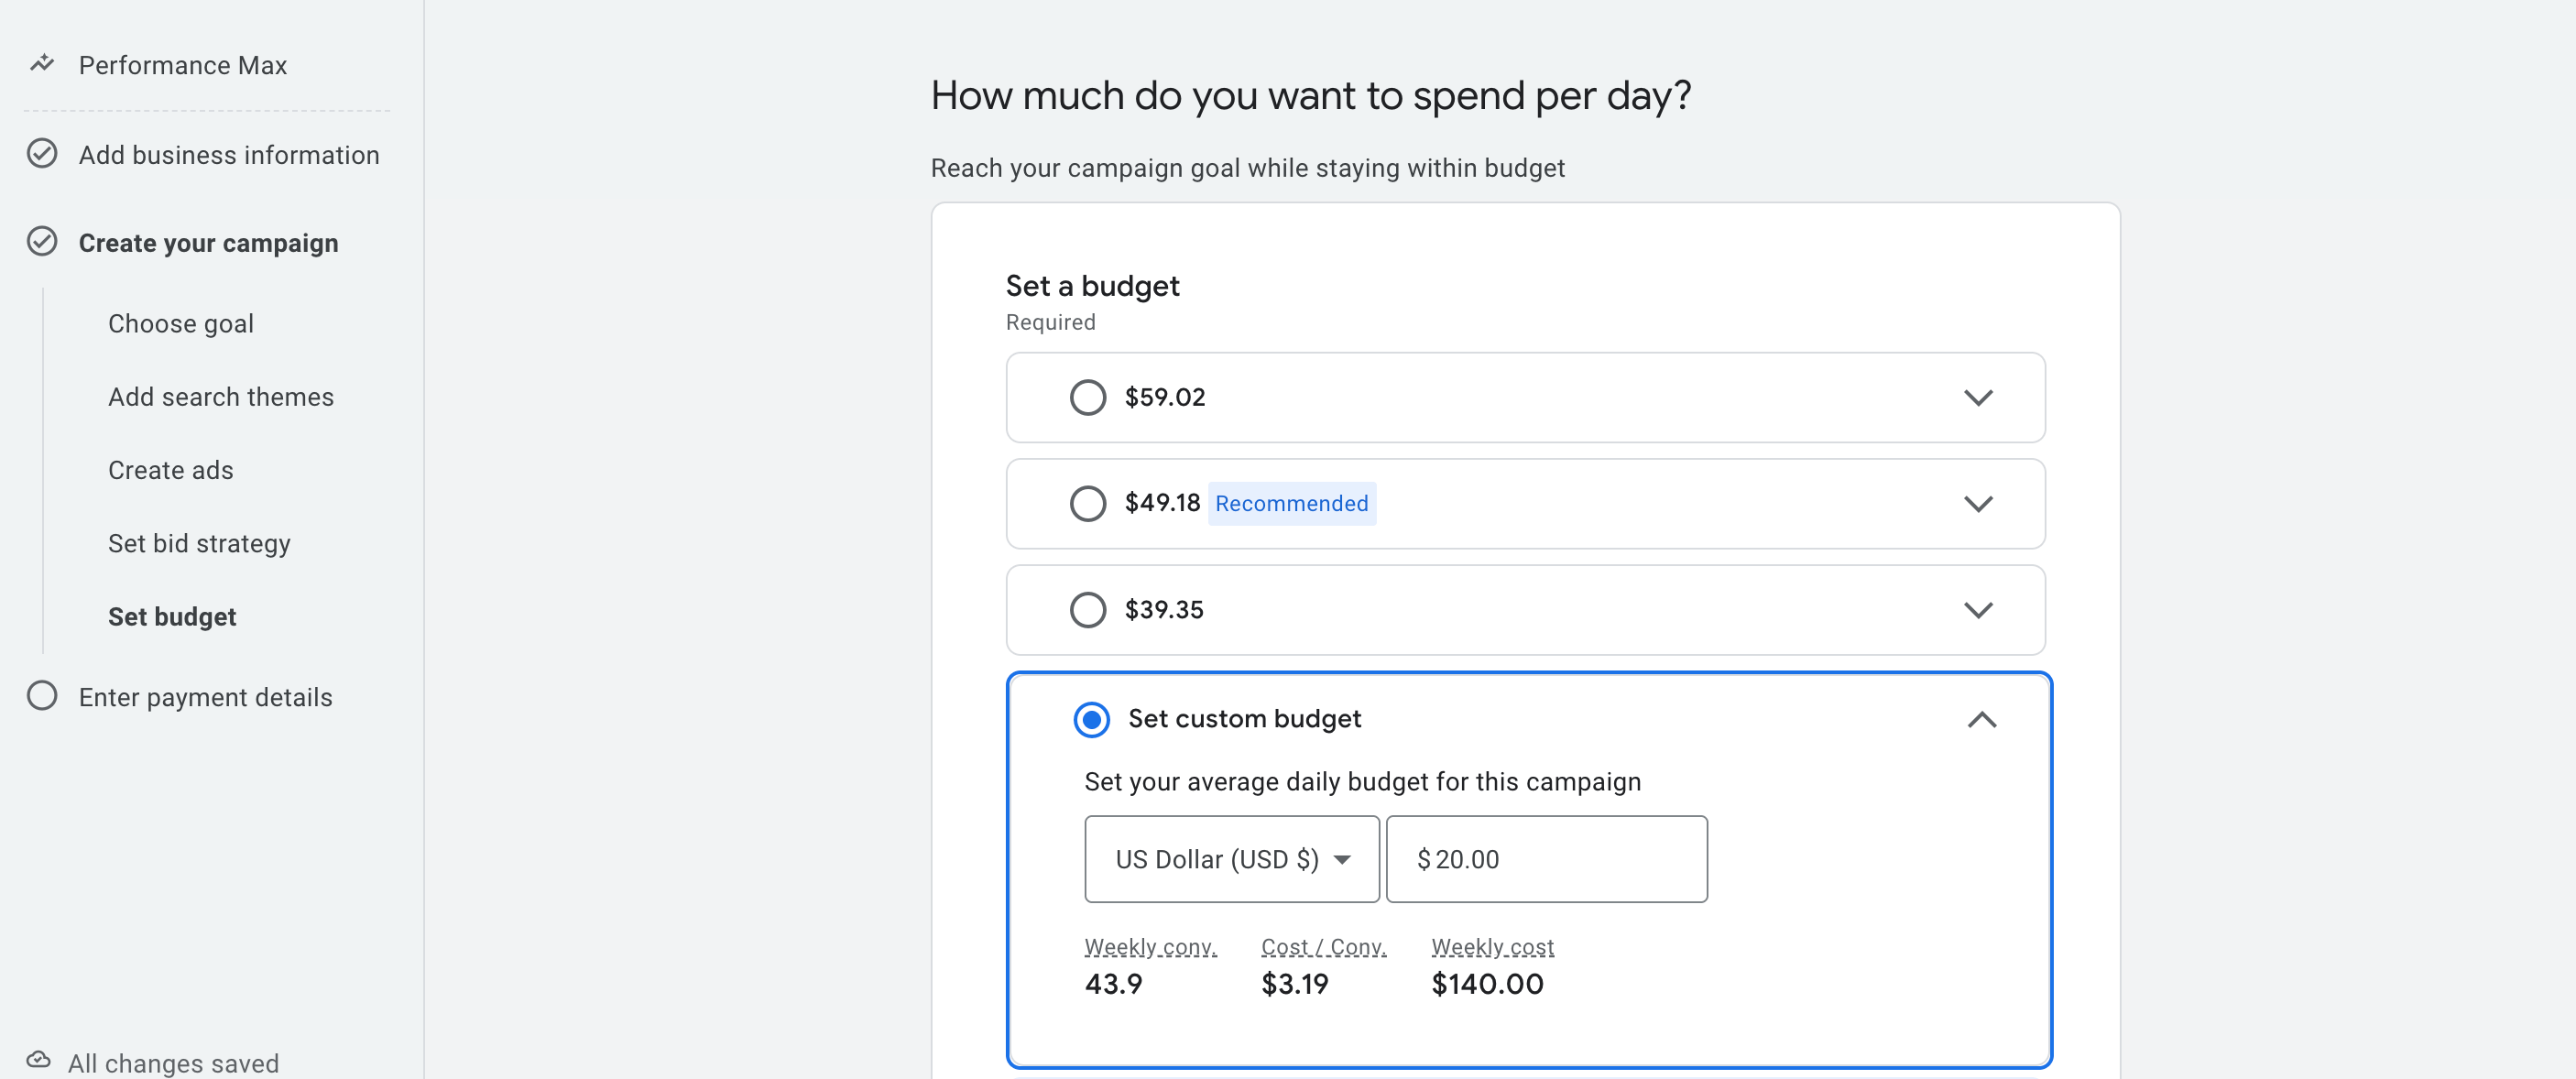
How to think about a daily budget?
- If you set a $20 daily budget, Google might spend up to ~$22–$25 on some days and less on others, but it tries to stay around $140/week.
- Your daily budget directly impacts how many clicks, conversions, or impressions you can get.
- If your target CPA is $5, and your daily budget is $20, then ideally you could get 4 conversions a day (based on performance).
What should beginners do?
If you’re just starting out and testing a product like WP User Frontend Pro, here’s a safe and effective approach:
- Start with a daily budget between $10–$20. This gives Google enough room to experiment while keeping your spending under control.
- Use the custom budget option to enter a clean, manageable number instead of choosing the preset ones.
- Keep the campaign running for at least 7–14 days to let Google learn and optimize.
Once you see what works, you can gradually increase your budget to scale results.
No need to overthink, you can always adjust your budget later from the Google Ads dashboard without resetting the campaign.
Step 09: Enter Payment Details
This is the final step before your campaign goes live. Here, you connect your Google Ads account to a valid payment method so Google can charge you for the ad spend.
Let’s break this down simply:
Payments Profile
This section shows the Google payments profile linked to your account. It includes:
- Your name or business name
- Your Google payments ID (used across all Google services)
- The country/region associated with the billing info
If you’ve used Google Ads, AdSense, or other paid Google services before, your profile is likely already created. If not, it will be generated automatically during setup.
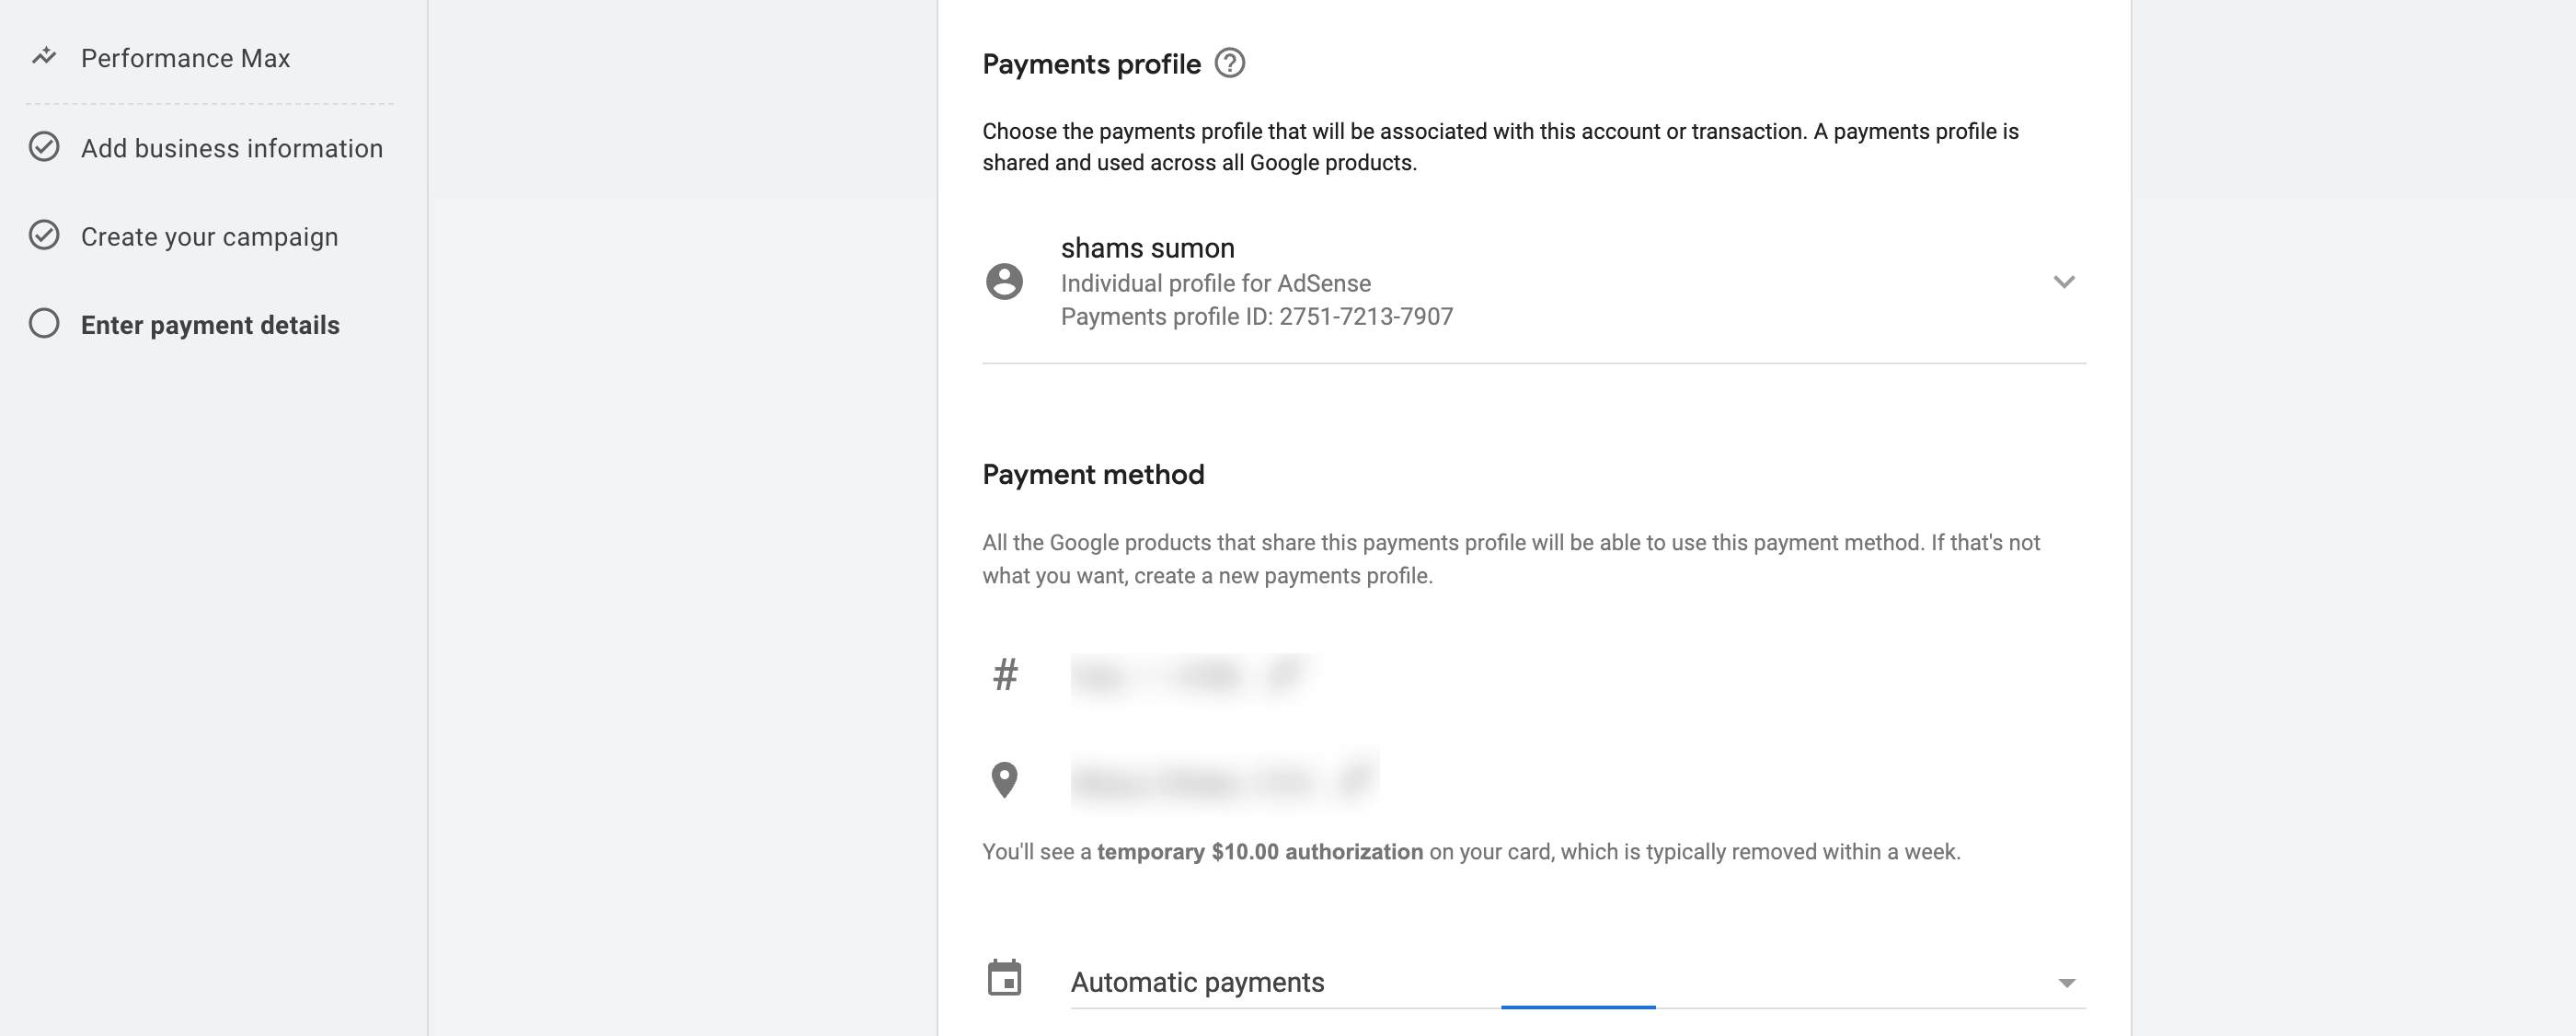
Payment Method
This is where you add your credit or debit card. Google will charge this card as your ad spend accumulates. You might see a temporary $10.00 authorization hold – this is just a test charge to verify the card, and it usually disappears within a few days.
Payment Setting
By default, it’s set to Automatic payments. This means:
- Google charges you only after your ads start running
- You’ll be charged either after 30 days or when your spend reaches a billing threshold (e.g., $350), whichever comes first
This is the safest and most beginner-friendly option because you only pay for what you’ve actually spent.
Review and Publish Your Google Ads
This is your last chance to double-check everything before your campaign goes live. It’s important to pause for a moment and review carefully, because once published, Google may start spending your budget immediately.
Go through this quick checklist to ensure everything is correctly set:
(i) Business Info
- Is your business name accurate?
- Is the landing page working properly?
(ii) Goal Selection
- Have you chosen the right campaign goal (e.g., Purchases, Leads, Page Views)?
- Is the conversion action set up and working?
(iii) Targeting
- Are your search themes (keywords) relevant to your product?
- Is your location targeting correct (country, region, or city)?
- Have you chosen the correct language?
(iv) Ad Assets
- Do you have 3–15 short headlines (under 30 characters)?
- Do you have at least 1 long headline (under 90 characters)?
- Have you added 2–5 descriptions?
- Did you upload a square and a landscape image?
- Did you include a video or allow Google to auto-generate one?
(v) Ad Extensions (Optional but Recommended)
- Are your Sitelinks helpful (e.g., Pricing, Features, Docs)?
- Is the Call to Action button set to match your goal (e.g., “Sign Up”, “Learn More”)?
(vi) Bid Strategy & Budget
- Is your bid strategy set to “Conversions”?
- If you used Target CPA, is the value realistic based on your product price?
- Did you set a daily budget you're comfortable with (e.g., $10–$20/day to start)?
(vii) Payment
- Did you add a valid payment method?
- Is the correct billing profile selected?
Once you’ve reviewed everything and feel confident, click Publish. Your ads will start running shortly after.
Bonus: How to Set Up Keywords in a Search Campaign
If you want more control over who sees your ad, especially on Google Search, then Search campaigns are a better fit than Performance Max. Unlike Performance Max, which relies on Google’s automation, a Search campaign lets you manually enter keywords that trigger your ads.
This is useful when:
- You know exactly what users are searching for (e.g., “WordPress SEO plugin”)
- You want to avoid spending on irrelevant clicks
- You need to test specific keyword segments (e.g., pricing vs feature intent)
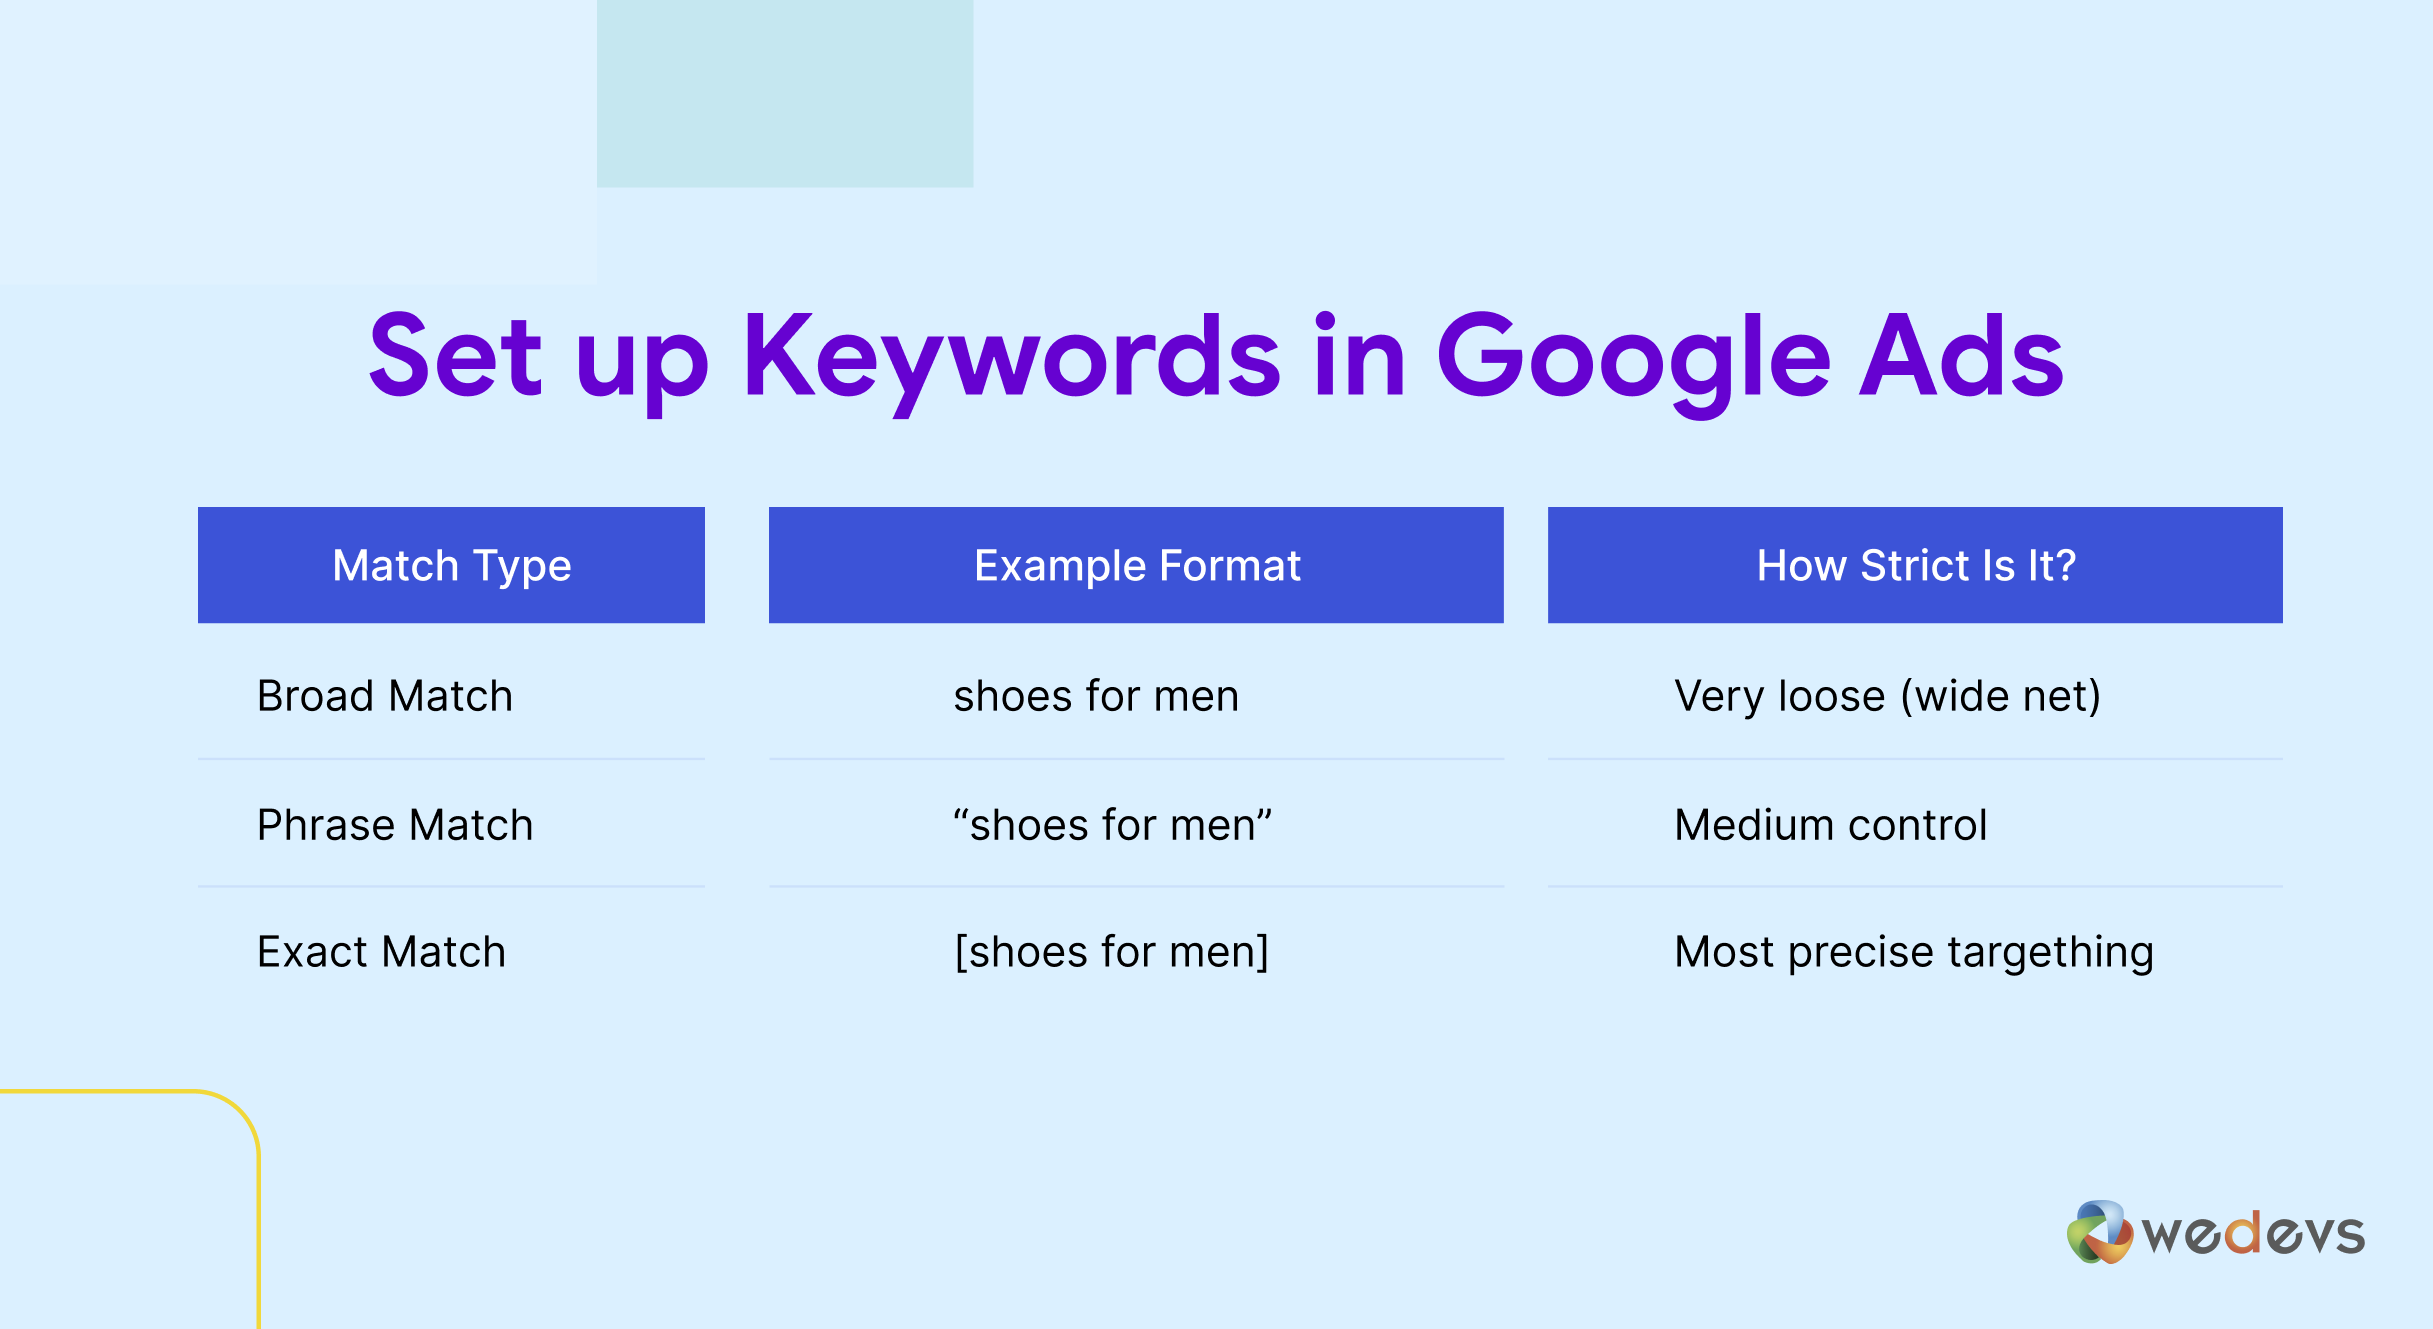
When adding keywords to a Search campaign, you’ll need to choose a match type. This tells Google how closely a user’s search must match your keyword to trigger your ad.
Here are the 3 types:
1. Broad Match
- Format: Just enter the keyword normally (no symbols)
- Example keyword:
shoes for men - Your ad may show for:
buy leather shoes,best boots for guys,men's footwear deals
Google will match your ad to related searches, not just your exact phrase. It’s the most flexible and brings the widest reach, but can be imprecise.
Use this if you're starting broad and want to test audience behavior. But monitor your search terms report closely.
2. Phrase Match
- Format: Put the keyword in quotation marks
- Example keyword:
"shoes for men" - Your ad may show for:
best shoes for men,shoes for men under $50,leather shoes for men
Your ad will show when someone types a query that includes your phrase in the same order, with extra words before or after.
Great for balancing reach and relevance.
3. Exact Match
- Format: Put the keyword in square brackets
- Example keyword:
[shoes for men] - Your ad may show for:
shoes for menor very close variations likemen shoes
Your ad will only trigger for searches that match your keyword exactly or are extremely similar.
Use this for the highest level of control and intent precision.
If you're just getting started, begin with Phrase Match for balance. Then test Exact Match for your top-converting keywords.
Also check – Google Ads vs Facebook Ads: Which One is Better for Your Business
Google Ads Terms That You Should Know
Before you start optimizing and tracking your campaign, it’s important to understand some of the basic terms you’ll see inside your Google Ads dashboard. These terms help you measure performance and make smart decisions.
I. Impressions
The number of times your ad was shown to someone on Google or across the web.
Example: If your ad appeared 1,000 times, that’s 1,000 impressions.
II. Clicks
The number of times people actually clicked on your ad.
Example: If 25 people clicked your ad after seeing it, that’s 25 clicks.
III. CTR (Click-Through Rate)
The percentage of impressions that turned into clicks.
Formula: (Clicks ÷ Impressions) × 100
Example: If you had 1000 impressions and 25 clicks, your CTR is 2.5%.
IV. CPC (Cost Per Click)
How much, on average, you paid for each click.
Example: If you spent $20 and got 10 clicks, your CPC is $2.00.
V. CPA (Cost Per Acquisition)
The average amount you spent to get one conversion (like a purchase or form submission).
Example: If you spent $50 and got 5 sign-ups, your CPA is $10.
VI. Conversions
A conversion is the action you want people to take after clicking your ad — such as buying a product, signing up, or submitting a form.
You define what counts as a conversion during setup.
VII. Conversion Rate
The percentage of clicks that turned into conversions.
Formula: (Conversions ÷ Clicks) × 100
Example: If you got 100 clicks and 5 conversions, your conversion rate is 5%.
VIII. Quality Score
A score (1 to 10) Google assigns to your keyword based on ad relevance, landing page experience, and expected CTR.
Higher scores = better performance and lower cost.
IX. Budget
The average amount you’re willing to spend per day on your campaign.
You can change this anytime based on your goals and performance.
X. Ad Rank
Ad Rank determines where your ad appears on the page (or whether it appears at all) in the search results. It’s calculated based on your bid, ad quality, expected impact of ad extensions, and other factors.
Example: Even if you bid lower than a competitor, your ad can appear above theirs if your ad is more relevant or has a higher Quality Score.
A higher Ad Rank means:
- Better ad position (top of the page vs bottom)
- Lower cost per click (you pay less for a better spot)
Are You Ready to Set up and Run Google Ads?
Running your first Google Ads campaign might feel overwhelming at first, but as you’ve seen, it becomes much easier when you understand the interface step by step.
Now that you’ve seen the complete walkthrough from setting goals to publishing your campaign, you’re ready to take action. So go ahead, log in to your Google Ads account, and start growing your audience with targeted, trackable, and results-driven advertising.
Need help reviewing your first campaign or choosing between Search and Performance Max? Drop your questions in the comments, we’re here to help.
Want to know about Facebook Ads? Check out our step-by-step tutorial on How to Run a Facebook Ad to learn everything about it!