

How to Set Up WooCommerce Email Marketing Automation (Step-by-Step Guide)
Email marketing is one of the most powerful ways to reach your customers, especially if you run an online store with WooCommerce. But sending emails manually takes a lot of time and effort. With automation, you can automatically send personalized emails to your customers based on their actions, like when they sign up, place an order, or abandon items in their cart, which can save you a lot of time.
According to a 2025 report by Omnisend, although automated emails made up only 2% of all email traffic, they generated 37% of all email-driven sales. Another study from Campaign Monitor found that businesses using email automation earn 320% more revenue per email compared to those who don’t use automation.
However, configuring email automation for WooCommerce isn't difficult. Once you have the right tool in place, the rest will get easier. In this post, we'll cover a step-by-step guide on how to set up WooCommerce email marketing automation to help grow your business. Keep reading this post till the end.
What Is WooCommerce Email Marketing Automation?
WooCommerce Email Marketing Automation refers to the process of sending emails to your customers automatically based on what they do on your online store. You don’t have to send each email manually. Instead, you can set rules so the system automatically sends the emails to the eCommerce customers based on their activities.
For example, if a customer adds a product to their cart but doesn’t buy it, you can send them a reminder email after a few hours. Or, if someone buys something, you can send them a thank-you email with related product suggestions. These emails go out without requiring your consent every time.
This helps you save time and stay connected with your customers. It also helps you make more sales because you are sending the right message at the right time. Explore the best WooCommerce email marketing plugins.
Benefits of WooCommerce Email Marketing Automation
Before we jump into the main discussion, have a few more minutes to skim through the benefits of WooCommerce email marketing automation. This will make you rethink why you should reconsider this in your online eCommerce marketing.
- Saves you time by sending emails automatically
- Sends the right message at the right time
- Increases your online store’s sales
- Helps bring back customers who didn’t finish their purchase
- Builds better relationships with your customers
- Makes your store look more professional
- Keeps customers updated without extra work
- Helps you welcome new users with automated greetings
- Sends product suggestions based on past purchases
- Increases customer loyalty and repeat buying
- Tracks email performance to improve future campaigns
- Works even when you are offline or busy
Here is a detailed guide on what email automation is and its benefits.
Types of WooCommerce Email Marketing Automation
Here are some of the most popular types of WooCommerce Email Marketing Automation you can use to grow your online store and keep your customers happy. These automated emails are triggered by what your customers do in your store. Let’s look at the most popular types:
1. Welcome Emails
Welcome emails are sent when someone or a customer signs up for your store or creates an account. It’s a great way to say hello and make a good first impression. You can also include a discount or special offer to encourage a first purchase.
2. Abandoned Cart Emails
If a customer adds items to their cart but doesn’t complete the checkout, it's called cart abandonment. This type of email reminds the customer to come back and finish the purchase. It often includes a message like ‘You forgot something!' and sometimes a small discount to help close the sale. Check how to write car abandonment emails for conversion.
3. Order Confirmation Emails
These emails automatically go out right after a customer places an order. This type of email confirms the purchase and shows the order details. Though they are basic, you can use them to recommend similar products or ask customers to follow you on social media.
4. Post-Purchase Follow-Up Emails
A few days after someone receives their order, you can send them a thank-you email. You can also ask for a product review or suggest related products they may like. This can help you increase customer engagement and trust.
5. Re-Engagement Emails
If a customer hasn’t visited or bought anything for a long time, you can send an email to bring them back. It can be a ‘We miss you' message with a special offer or just a friendly check-in.
6. Birthday or Special Occasion Emails
You can send emails to customers on their birthdays, during holidays, or special occasions, like Halloween, Black Friday, and Cyber Monday. These emails can include warm wishes and special discounts. These can make customers feel special and increase loyalty. Here's a quick tutorial on how run an email campaign.
7. Product Recommendation Emails
Based on what customers have viewed or bought before, these emails suggest new products that customers may like. This type of email helps increase the chances of more sales.
How to Set Up WooCommerce Email Marketing Automation (Step-by-Step Guide)

The theoretical part is over. Now, in this section, we'll cover a step-by-step tutorial guide on how to set up WooCommerce email marketing automation.
Pre-requisite for the Tutorial
But as already said, it's impossible to automate email manually. You need a tool to do this. There are many email automation tools. But as your eCommerce site is built on WordPress, it's better to try the weMail plugin.
weMail is a comprehensive email marketing plugin for WordPress. You can use it for various purposes, from lead generation to sales-driven marketing. Once you have the plugin installed and activated on your site, follow the steps explained below in the tutorial.
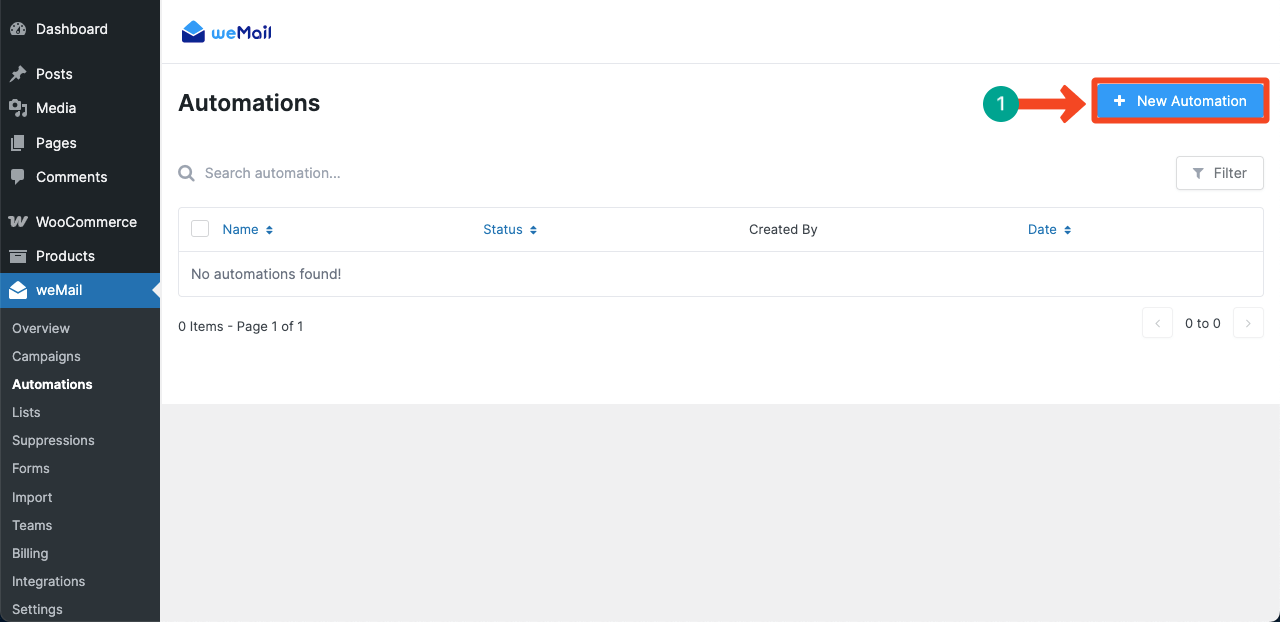
Step 01: Go to the weMail's Automation Option
After the plugin is installed, navigate to weMail > Automations.
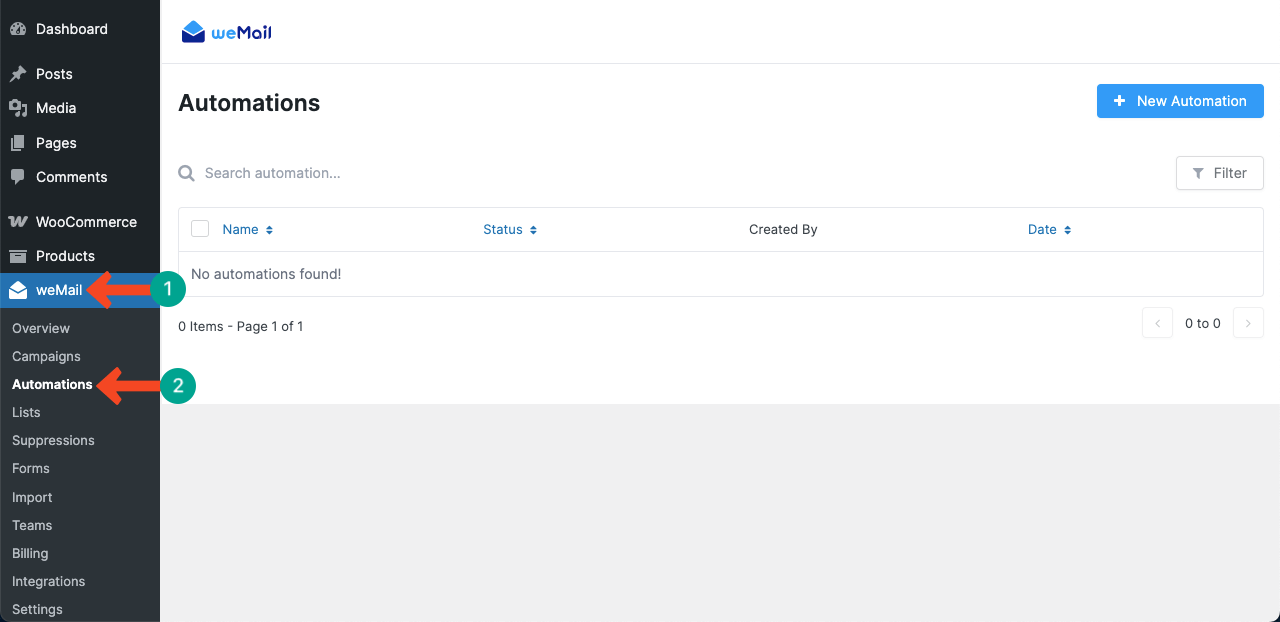
Click the + New Automation.
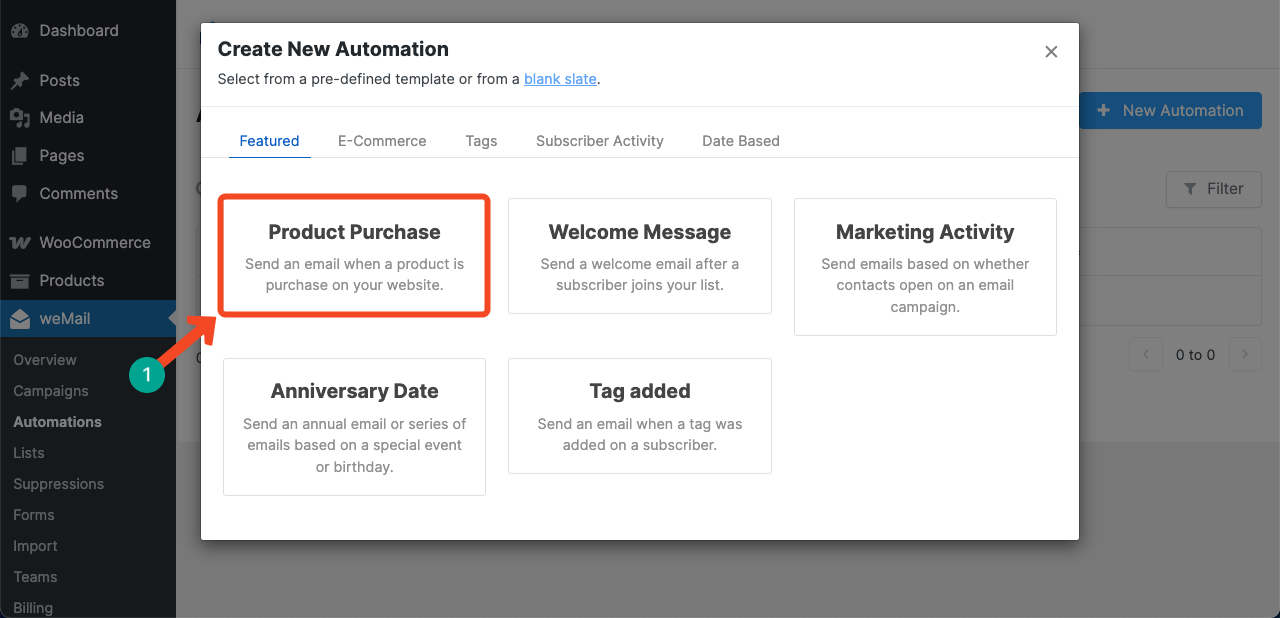
Step 02: Create a New Automation
A pop-up will show up. You will get some readymade automations. You may select any of them if their names match the automation you want to create.
As you are configuring for WooCommerce email automation, select the Product Purchase option.
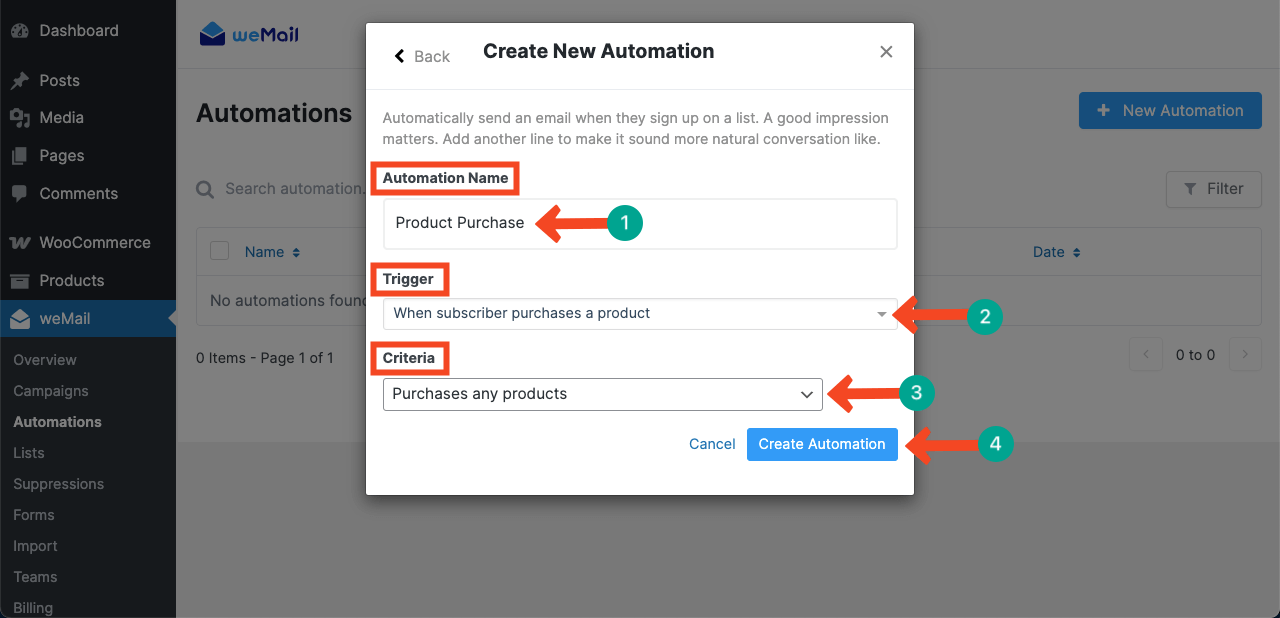
A new pop-up will show up. Write a name for the automation. We have named it Product Purchase.
Next, select a trigger. Click the dropdown icon. A list will open up. Choose an option from the list.
In the same way, select a criterion by opening the dropdown list.
Once everything is done, click the Create Automation button.
Step 03: Map Out the Email Automation Workflow
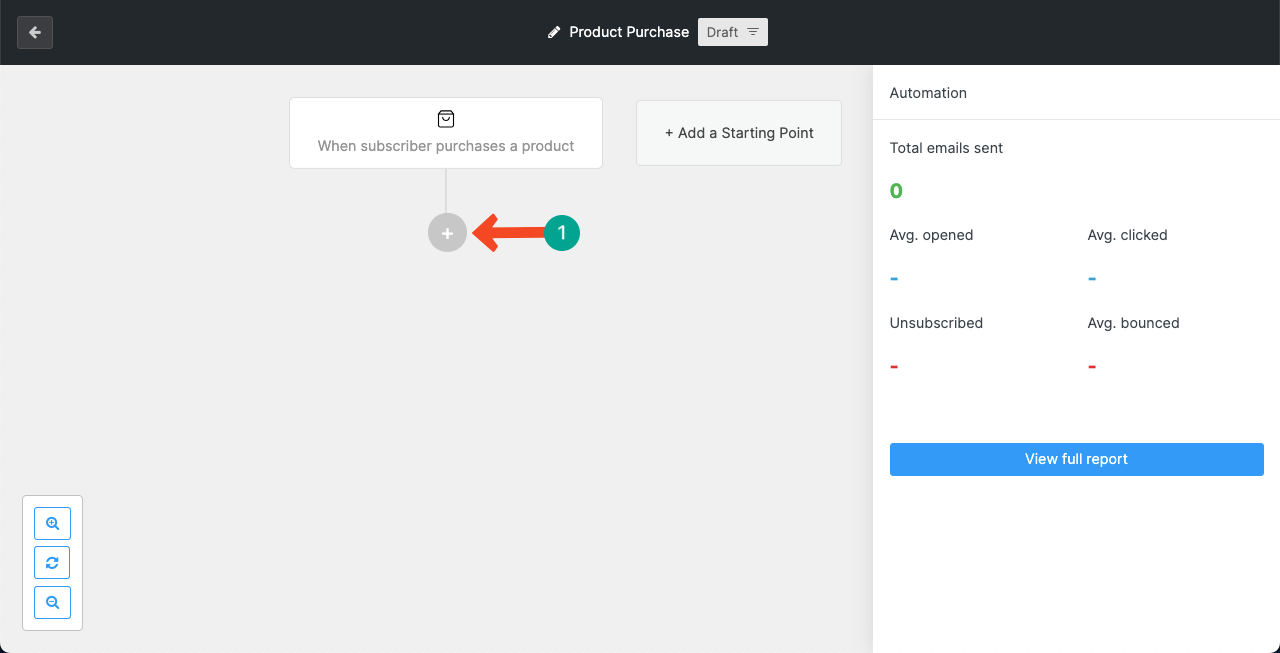
A whiteboard will appear on your screen. Here, you have to add steps one by one to configure the email automation workflow. By default, the first step is ‘When subscriber purchases a product (your selected list).'
Note: Based on the trigger you select, the default first step will change. As we have selected the Product Purchase Trigger for the automation, you can see the ‘When subscriber purchases a product' as the default first step.
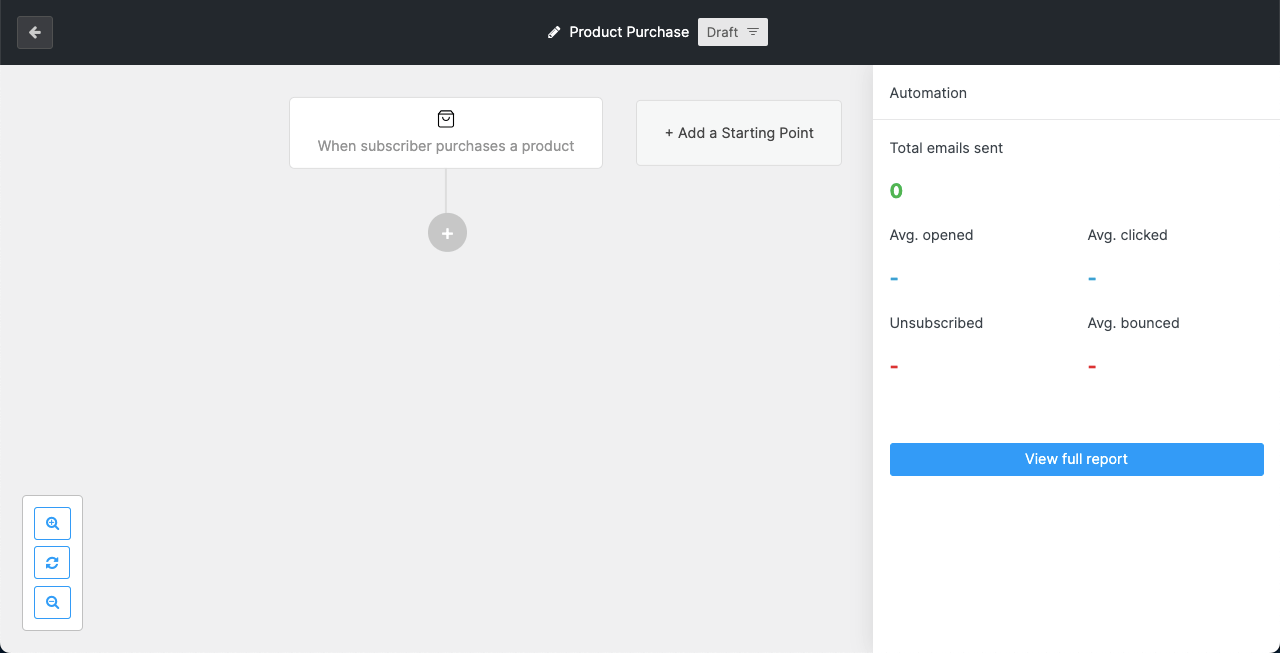
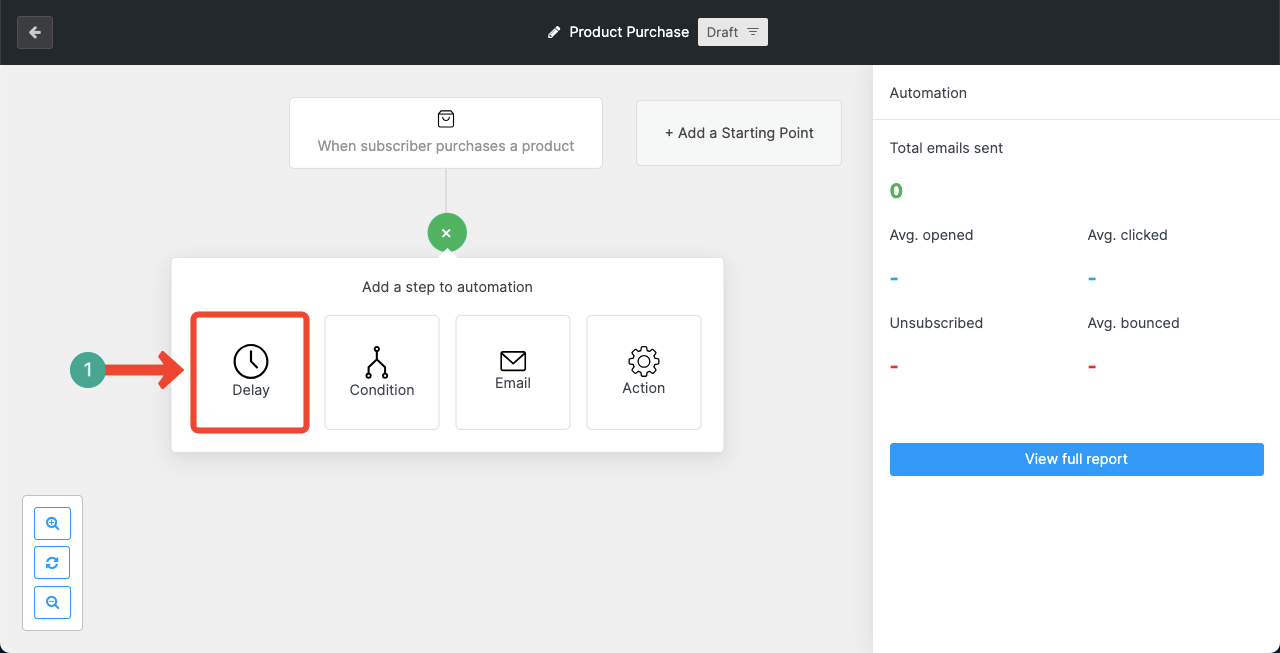
To add a new step, click the (+) plus icon on the canvas.
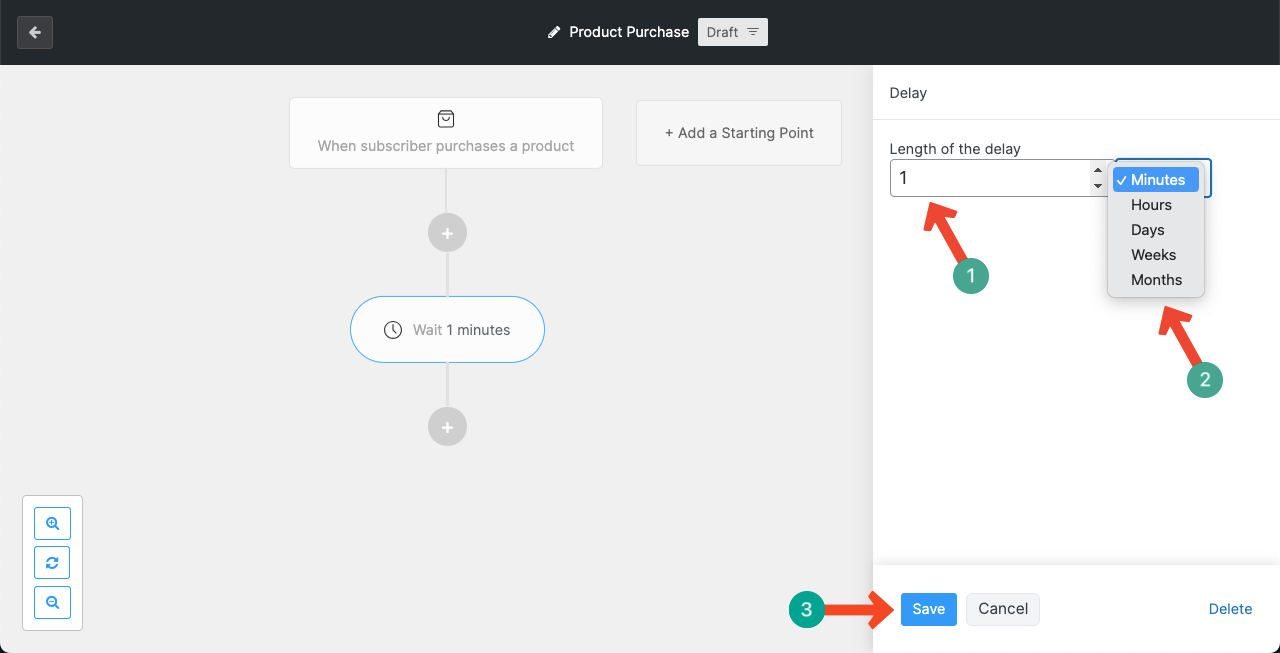
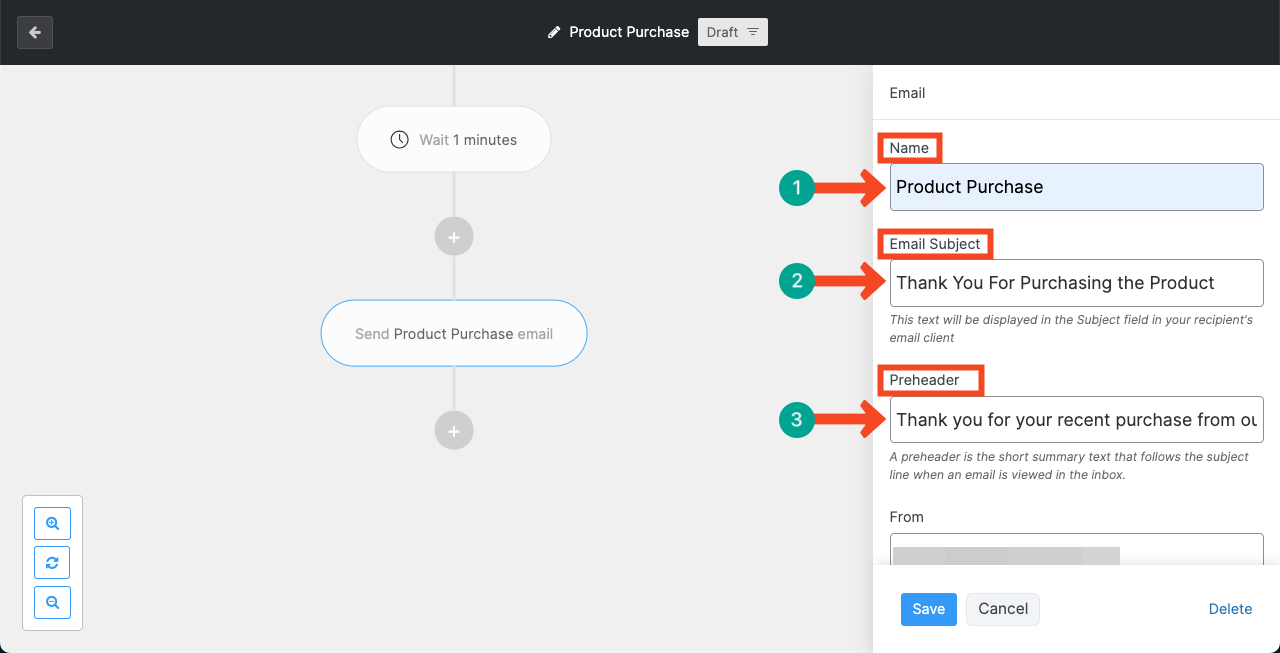
Select the Delay option for the second step of the workflow.
Set minutes or hours after which the email will be sent to the customer.
Once the delay time is set, select the Email option if you don't want to add any other option in between.
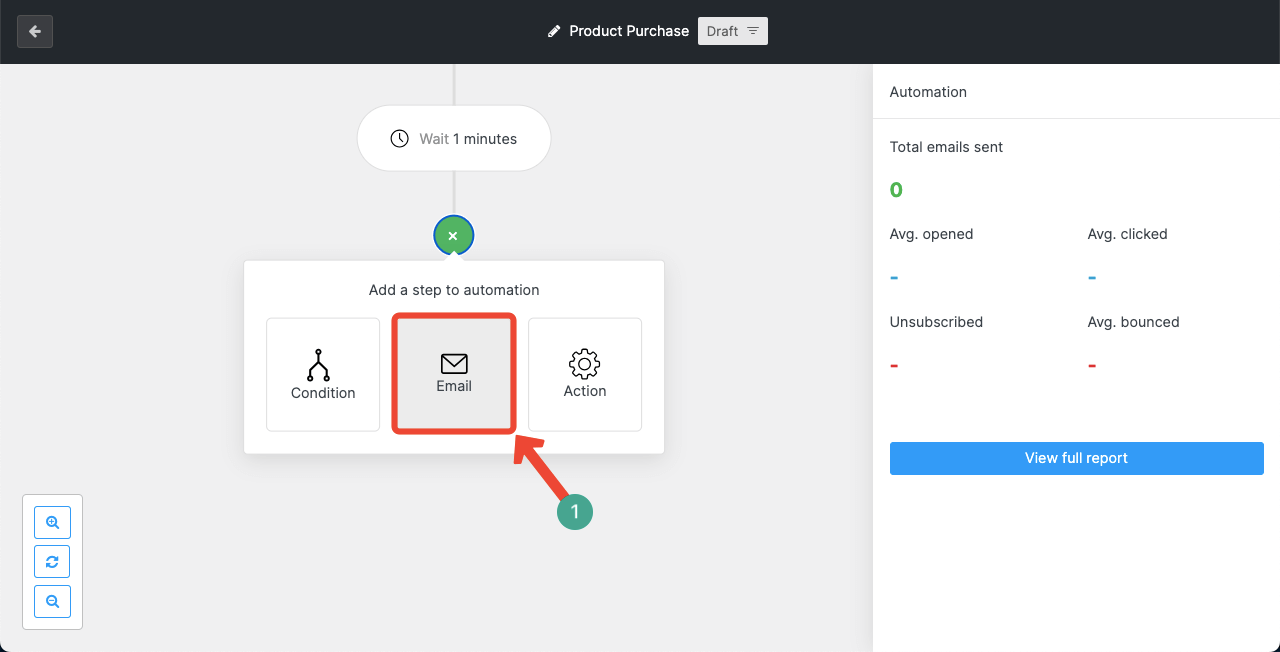
You may name this step (optional).
But the mandatory parts are, you have to write an email subject and a message (on the placeholder).
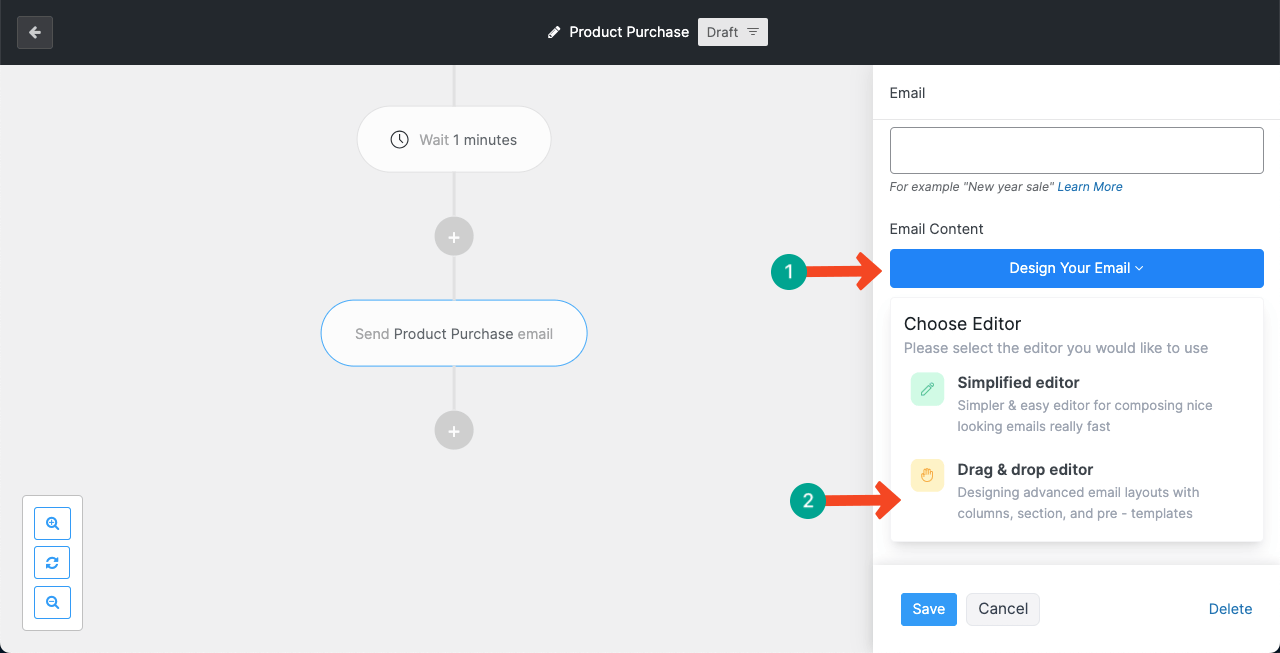
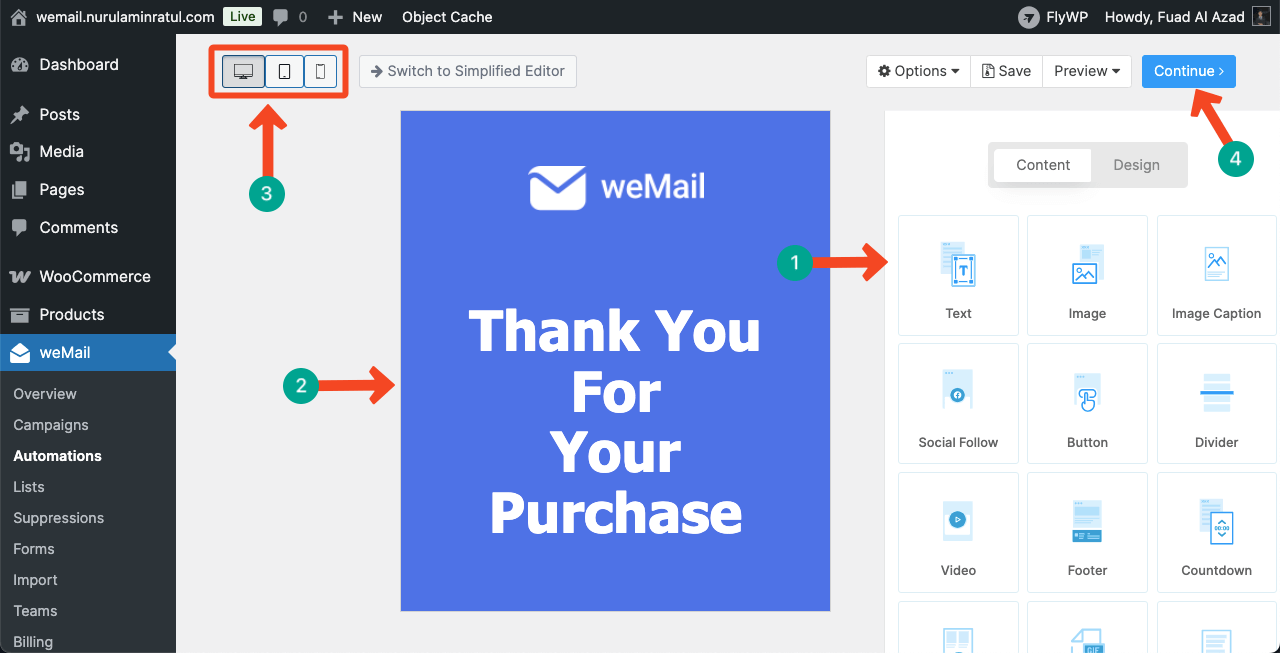
You can even send a great-designed template with the email as well. To do this, by scrolling the right sidebar, come down to the section shown in the screenshot below.
Click the Design Your Email button. You may choose Simplified Editor or Drag & Drop Editor. (Simplified Editor acts like the classic editor, and Drag-&-Drop offers an interface which is similar to page builders).
For this tutorial, we are selecting the Drag & Drop Editor.
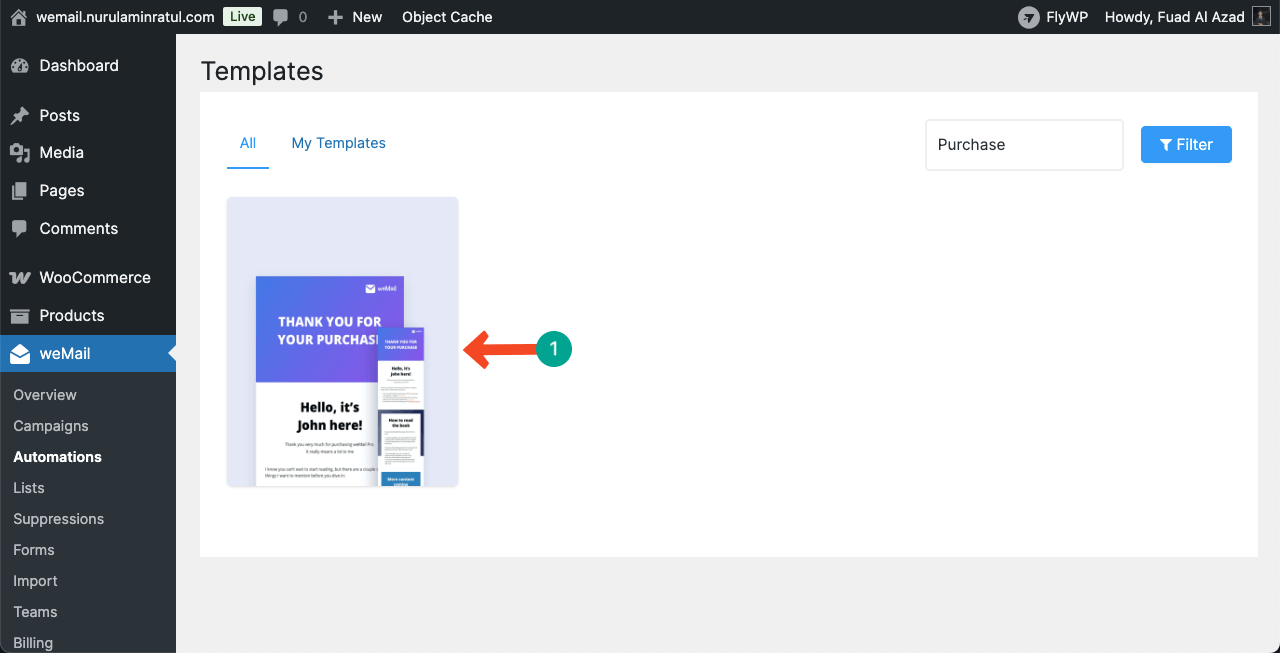
You'll come to the weMail template library. Choose a template you like. You can even filter the right one to save time by writing suitable keywords in the search box on top.
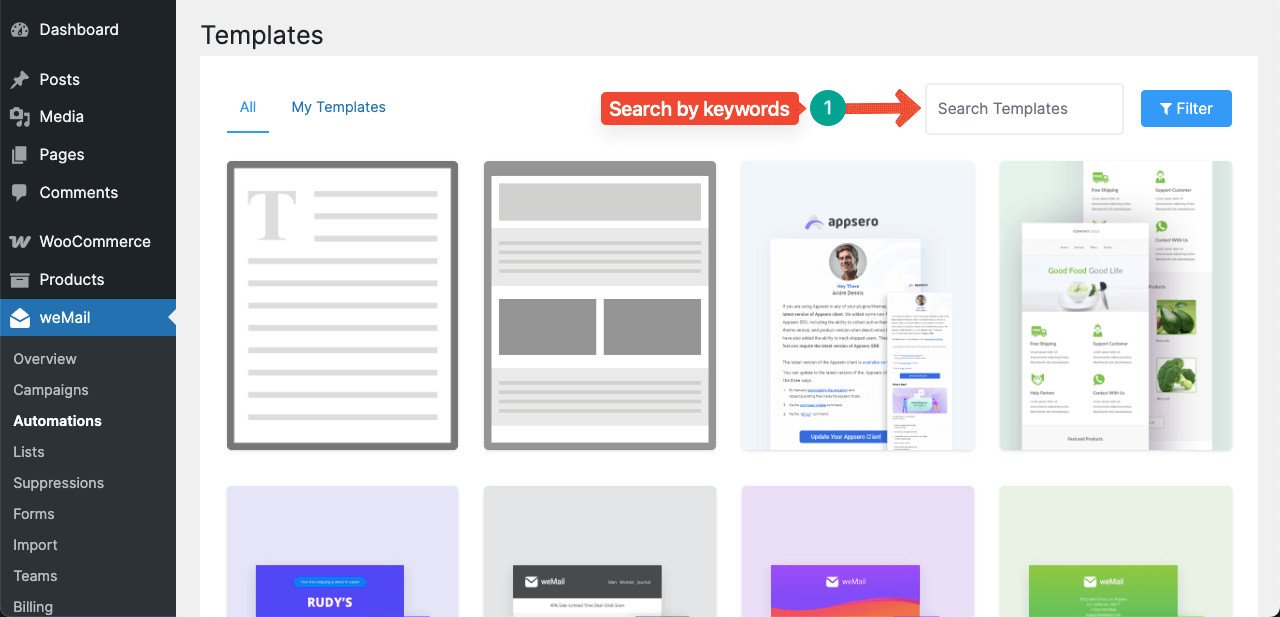
You can see that we have filtered the library and found a template that goes with today's automation tutorial. Click to open the template.
Once the template is opened, you can customize its message, add message elements, optimize it for mobile devices, and change design stylization.
When everything is done, click the Continue button on the top right corner. This template will be set for the email.
When the template configuration is done, you will come back to the map-out canvas again. Click the Update button.
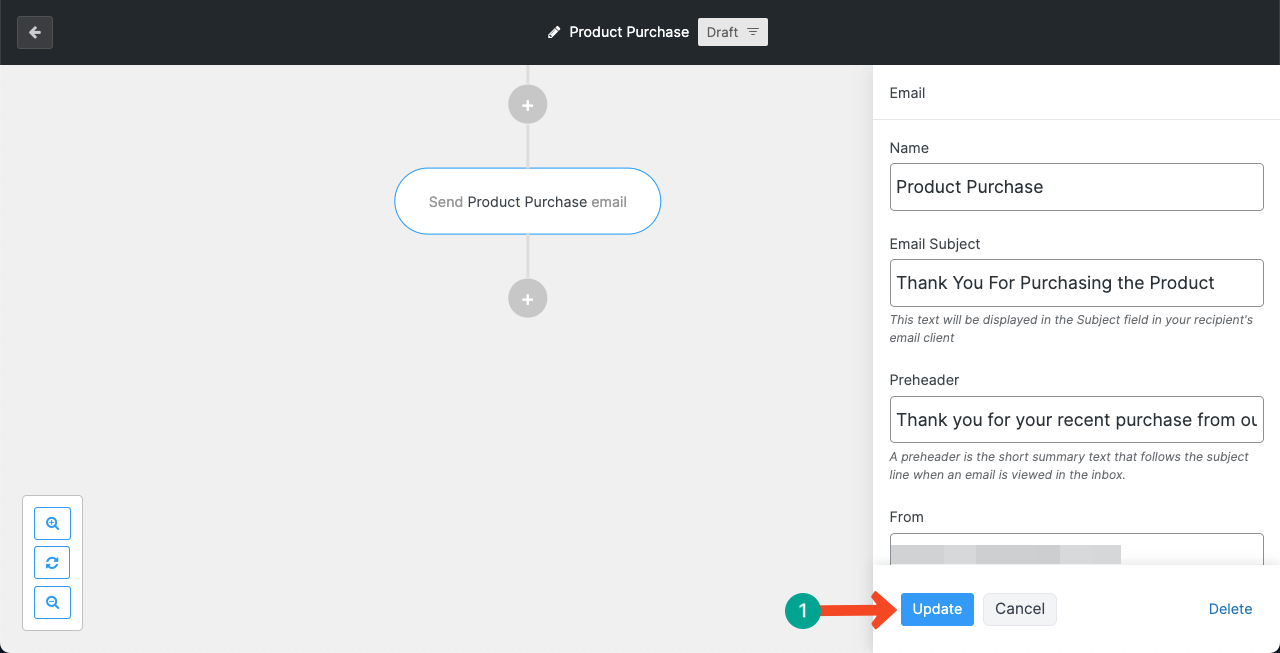
So, WooCommerce email automation for sending a ‘Thank You email' after a product purchase is done.
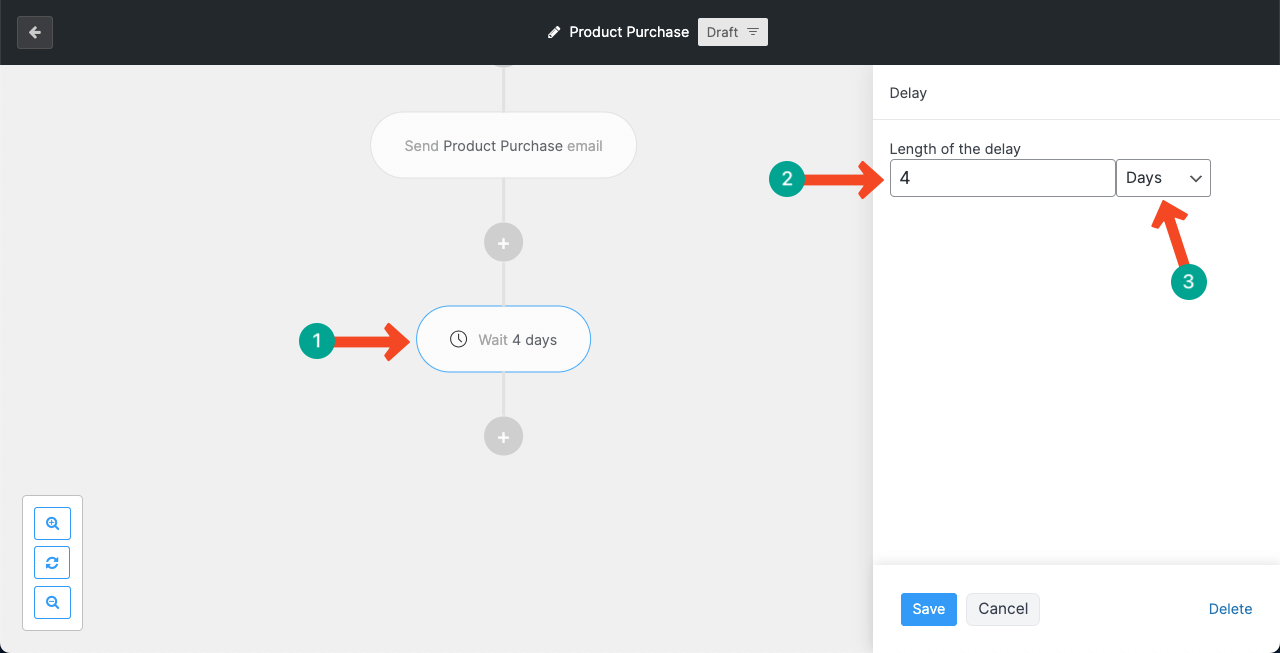
Step 04: Add A New Automation After That
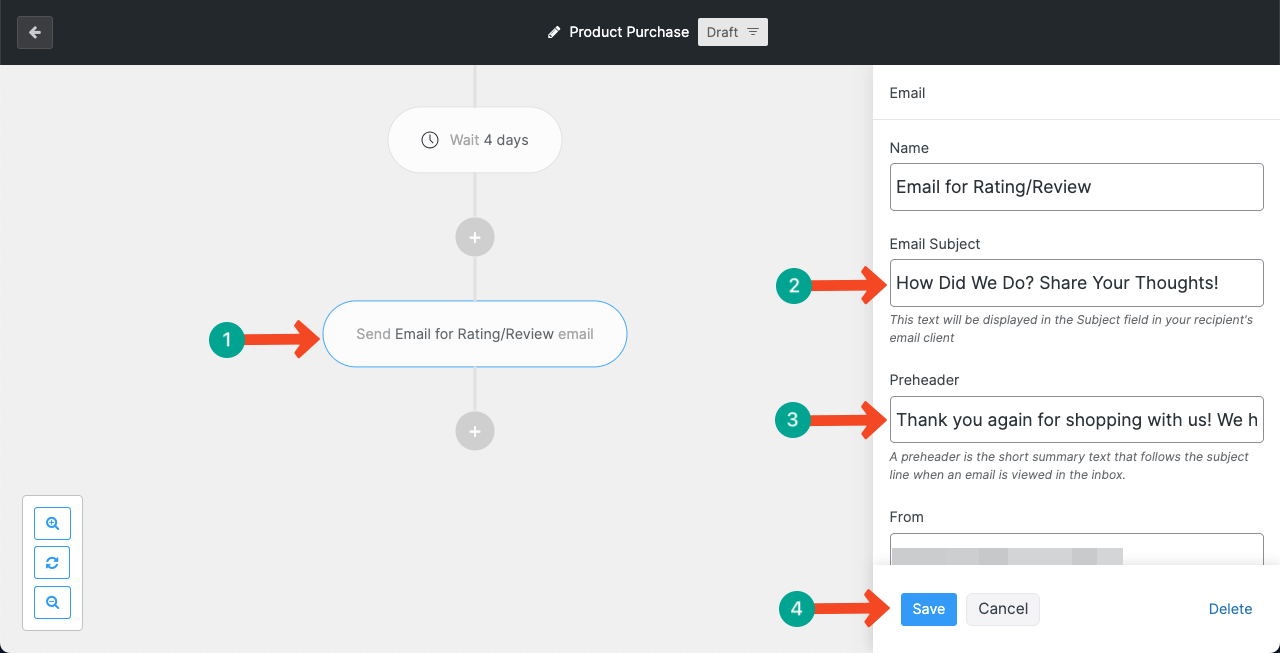
You can add more and more steps after to keep automating emails. For example, after the Thank You Email, you can automatically send them emails asking for a rating/review for the product.
To do this, add a new step specifying a 4-day delay.
Add the Email option again as we show you above.
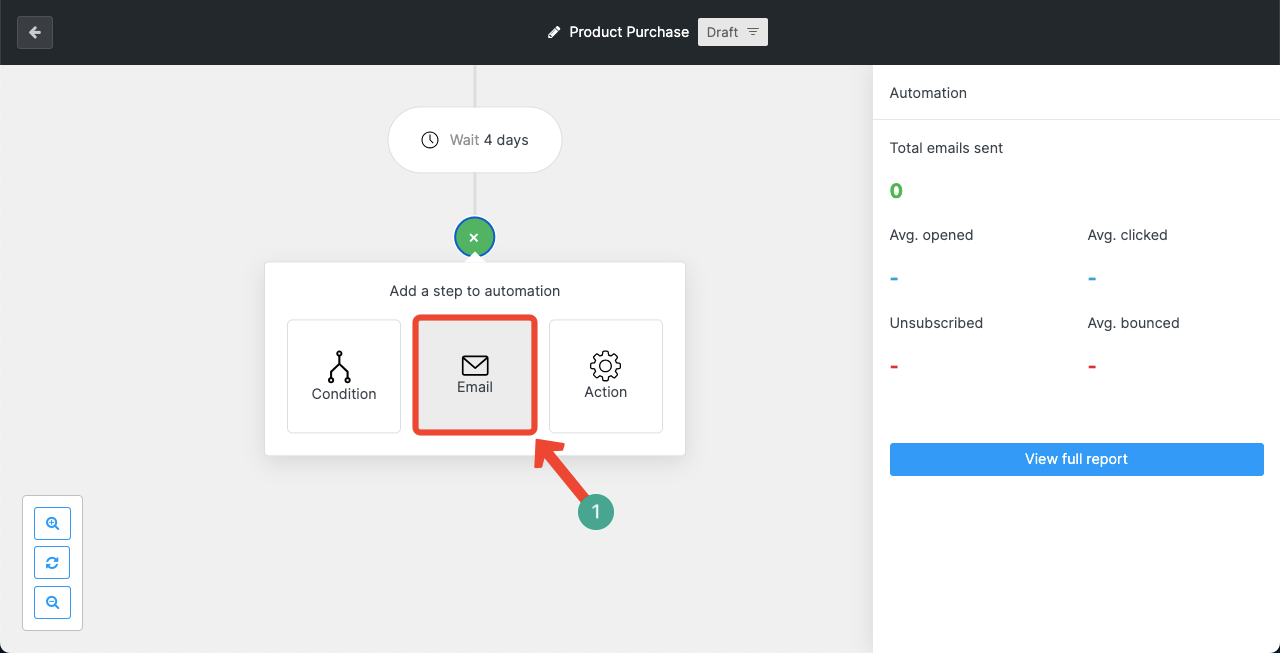
Write a catchy email subject and a description that can make customers share their feedback with you or in the respective rating/review option on your WooCommerce product page.
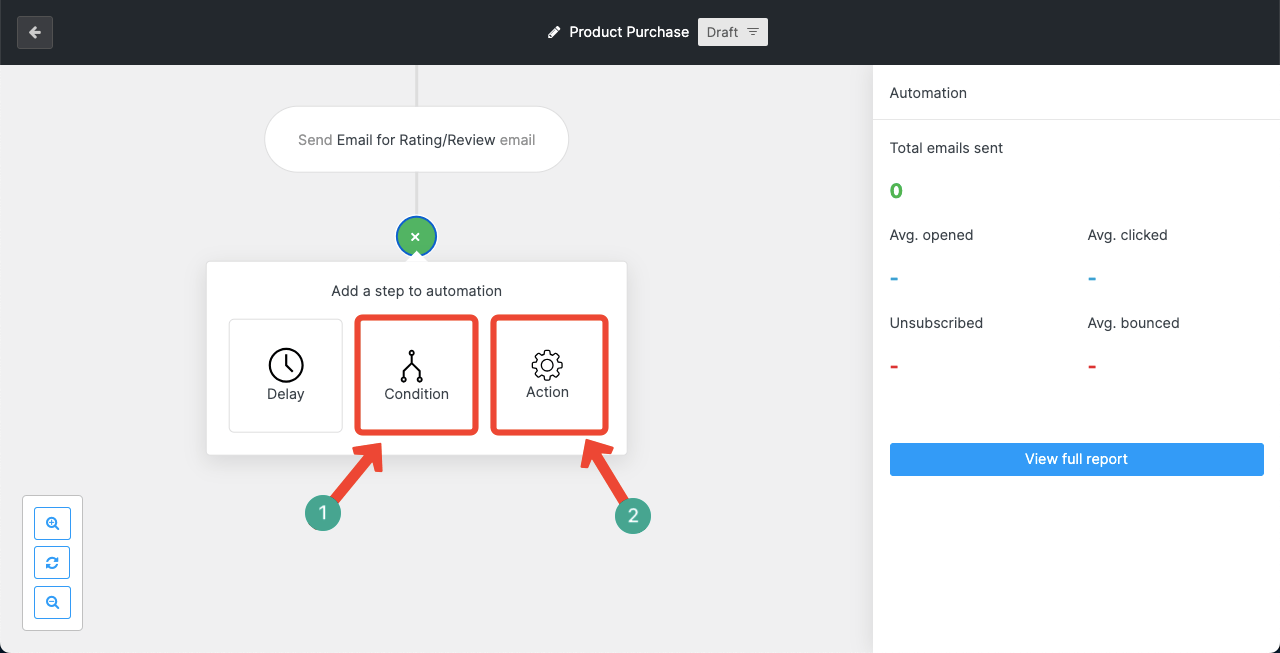
You may end here or keep adding more automation options.
Step 05: Keep Adding More Automation Options (Optional)
In the same way, you can keep adding more automation options. You can even create a long automation workflow map to send multiple emails over months or target a campaign period at regular intervals based on the audience's usage.
For example, after sending an email to an audience member, you can use the action option to automatically add them to another email list and more.
Additionally, you can set up more advanced automation for the audience using yes/no choices from the condition option.
Note: Both Condition and Action cover numerous options, not only what we have mentioned in the above texts.
So, your automation is ready. From now on, whenever someone purchases something from your store, the configured emails will automatically be sent to them.
Best Practices for WooCommerce Email Automation with weMail
To make the best of WooCommerce email marketing automation, there are several key points you must consider carefully. Missing any one of them may backfire. So, take a look at them below.
a. Use Clear and Catchy Subject Lines
Your subject line is the first thing people will see. Make it short, clear, and interesting so receivers want to open the email. This can help avoid clickbait and always stay honest. Take a look at the best email subject line tips to increase conversions.
b. Segment Your Email List
With weMail, you can group your users based on their behavior, like what they bought, where they live, or how often they shop. With this, you can send more personal and relevant emails.
c. Set Up the Right Triggers
Make sure your automation rules are well-planned. For example, send a welcome email after sign-up, a cart reminder after 2–3 hours of inactivity, or a follow-up email a few days after purchase.
d. Keep the Email Design Simple and Mobile-Friendly
Use a clean design that looks good on both desktop and mobile. Avoid too many images or buttons. With weMail's drag-and-drop builder, you can do it easily. Here's a discussion on the best email design best practices.
5. Add a Clear Call-to-Action (CTA)
Each email should guide the reader to do one main thing, like “Shop Now,” “Leave a Review,” or “Use Your Discount.” Make the CTA button big, clear, and easy to find.
6. Test and Improve Your Emails
Use weMail’s reporting tools to track open rates, clicks, and conversions. Run A/B tests on subject lines or content to see what works best, and make changes based on the results.
What More Can You Do with weMail

weMail's usability isn't limited only to email automation. As already said, it's a comprehensive email marketing plugin for WordPress. You'll find lots of useful features in this plugin that you are bound to fall in love with after using it once. Take a look at the things you can do more with weMail other than only automation.
1. Create and Send Newsletters
With weMail, you can easily design and send beautiful email newsletters to your customers. These newsletters are great for sharing updates, new products, sales offers, or blog posts. You can use weMail’s drag-and-drop editor to create emails without writing any code.
2. Grow Your Email List
weMail helps you collect more email addresses using sign-up forms and pop-ups. You can place these forms on your website to turn visitors into subscribers. You can also connect weMail with many popular form and pop-up builder plugins. Learn how to grow email lists.
3. Run Email Campaigns
You can send one-time or scheduled campaigns to promote special events, flash sales, or holiday offers. This is perfect for seasonal promotions or important announcements. You can also choose specific segments of your audience to send more targeted emails.
4. Track Performance with Reports
weMail gives you helpful reports so you can see how your emails are doing. You can track open rates, click rates, bounce rates, and more. These insights help you understand what’s working and what needs to change.
5. Manage Subscribers Easily
With weMail, you can manage all your email subscribers in one place. You can import and export contacts, create tags or segments, and even remove inactive users to keep your list clean and active. Explore some effective tips on how to manage email subscriptions.
Final Thoughts!
Finally, WooCommerce email marketing automation is a smart way to save time and grow your online store. You don’t have to send emails manually every time. Using a tool like weMail makes this process even easier. You can create welcome emails, cart reminders, thank-you messages, and more from one place.
weMail also helps you segment your audience, design emails with a drag-and-drop builder, and track how each campaign performs. So, if you are struggling with email marketing and setting up precise automation for your online businesses, we recommend that you try the weMail plugin right away.
Hope you won't be disappointed. If there is anything you want to know about weMail and email marketing, let us know through the comment box. We are ready to help you out anytime.