

ChatGPT API Key Not Working? 5 Steps to Generate and Activate it in 2026
Need to connect your app to the latest GPT-5.2 or o-series models? Generating a ChatGPT API key (now managed via OpenAI Projects) is the first step to building AI-powered tools, automation scripts, or custom agents.
Getting your key takes exactly 5 minutes. This updated 2026 guide walks you through the 5-step process – from account creation to billing – plus a working code example to test your key immediately. Let’s get your application live.
Quick Answer: How to Get an OpenAI API Key in 2026
- Log in to your account at platform.openai.com
- Go to Dashboard → API Keys
- Click Create new secret key
- Add billing under Settings → Billing
- Set a usage limit under Usage → Limits
Your key is now ready to integrate into your app.
What Is ChatGPT API Key and Why You Should Use It?
A ChatGPT API key is a unique identifier that allows you to access and utilize the ChatGPT API. This API serves as an interface between ChatGPT and external applications.
By integrating the ChatGPT API, you can seamlessly incorporate ChatGPT's capabilities into your own applications. This will help you to unlock a wide range of advanced language processing features.
That means the API acts as a digital key that authenticates you as a user and allows you to make requests to the ChatGPT API to receive AI generated responses in return.
The ChatGPT API key is particularly valuable for developers working on projects that involve:
- Natural Language Processing (NLP): ChatGPT's ability to understand and process human language makes it an ideal tool for NLP-focused applications, such as chatbots, virtual assistants, and text summarization tools.
- Machine Learning (ML): Developers can utilize ChatGPT's language processing capabilities to enhance ML models, particularly in areas such as sentiment analysis, topic modeling, and text classification.
- Content Creation: ChatGPT's ability to generate creative text formats, like poems, code, scripts, musical pieces, emails, letters, etc., can be leveraged by content creators to develop engaging and original content.
- Chatbots and Conversational AI: ChatGPT's ability to engage in natural and meaningful conversations makes it an essential tool for developing advanced chatbots and conversational AI applications.
- Education and Research: Educators and researchers can utilize ChatGPT to explore the potential of language models in education, such as personalized learning, language learning tools, and automated grading systems.
Now, let's focus on how you can generate a ChatGPT API key!
How to Generate ChatGPT API Key – 5 Steps Tutorial for Beginners

Generating the ChatGPT API key isn't as difficult as it sounds. You can create it all by yourself only following 5 steps. Here are those steps:
- Create an Account
- Navigate to the API Section
- Generate ChatGPT API Key
- Add Billing to Activate Your API Key
- Set a Usage Limit (Optional but Smart)
Now, let us show you the tutorial in detail with the necessary images so that you can easily understand what you need to do. Keep reading!
Step 01: Create an OpenAI Account
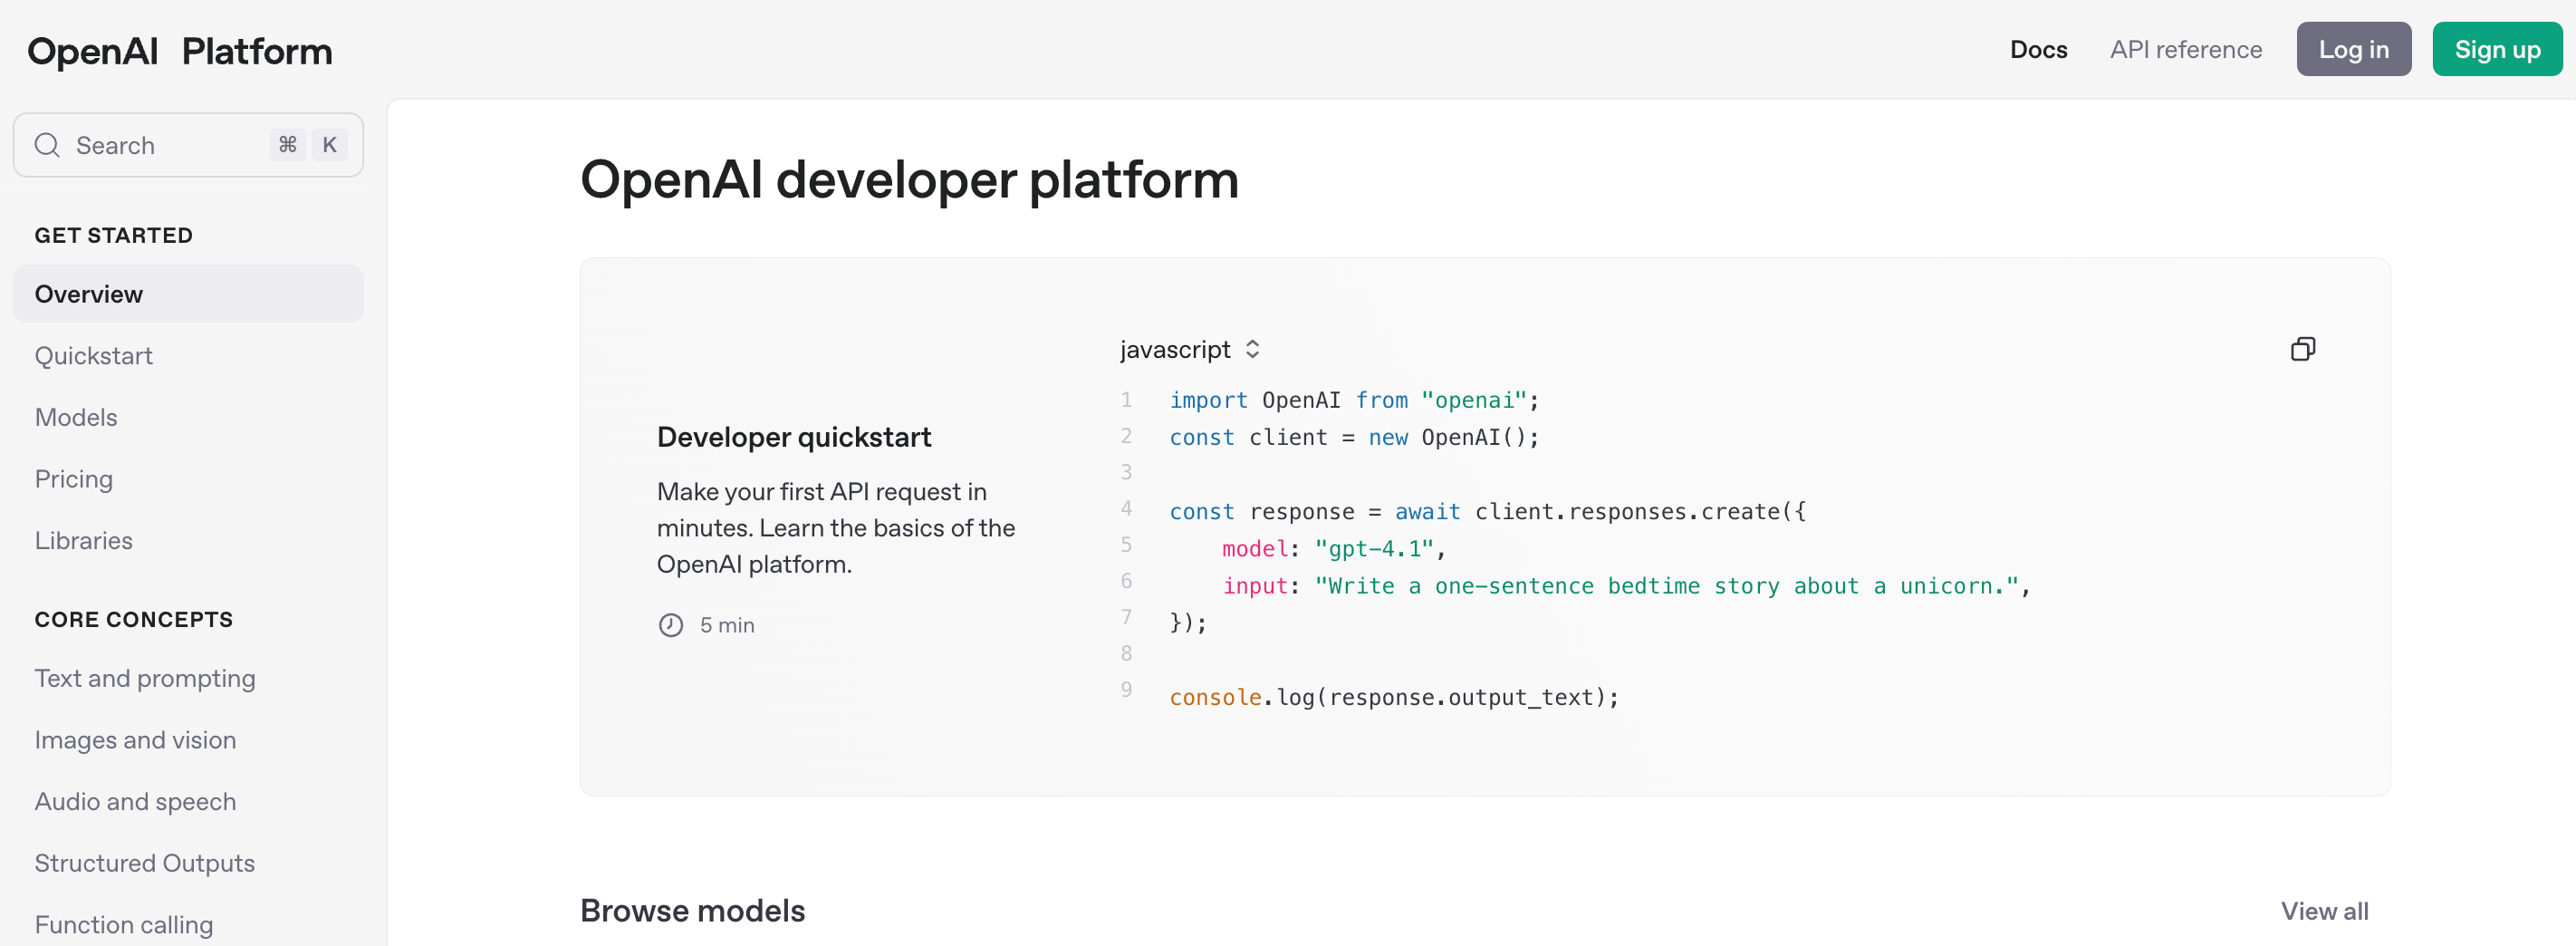
If you haven't already signed up for the OpenAI platform, you need to sign up there to generate a ChatGPT API key. To do that, go to the OpenAI official website and find the Sign-up option.
Now insert all the necessary information to create your account within minutes. Also, you may be required to verify your phone number or email ID. If it's necessary, do it without having a second thought!
Step 02: Navigate to the API Section
Once you have successfully created an OpenAI account, the next step is to locate the API section within the platform. This is where you will generate your ChatGPT API key, which will grant you access to the language model's capabilities.
- Click on the “Dashboard” option from the menu.
- Find the “API keys” option from the left settings bar and click on the option.
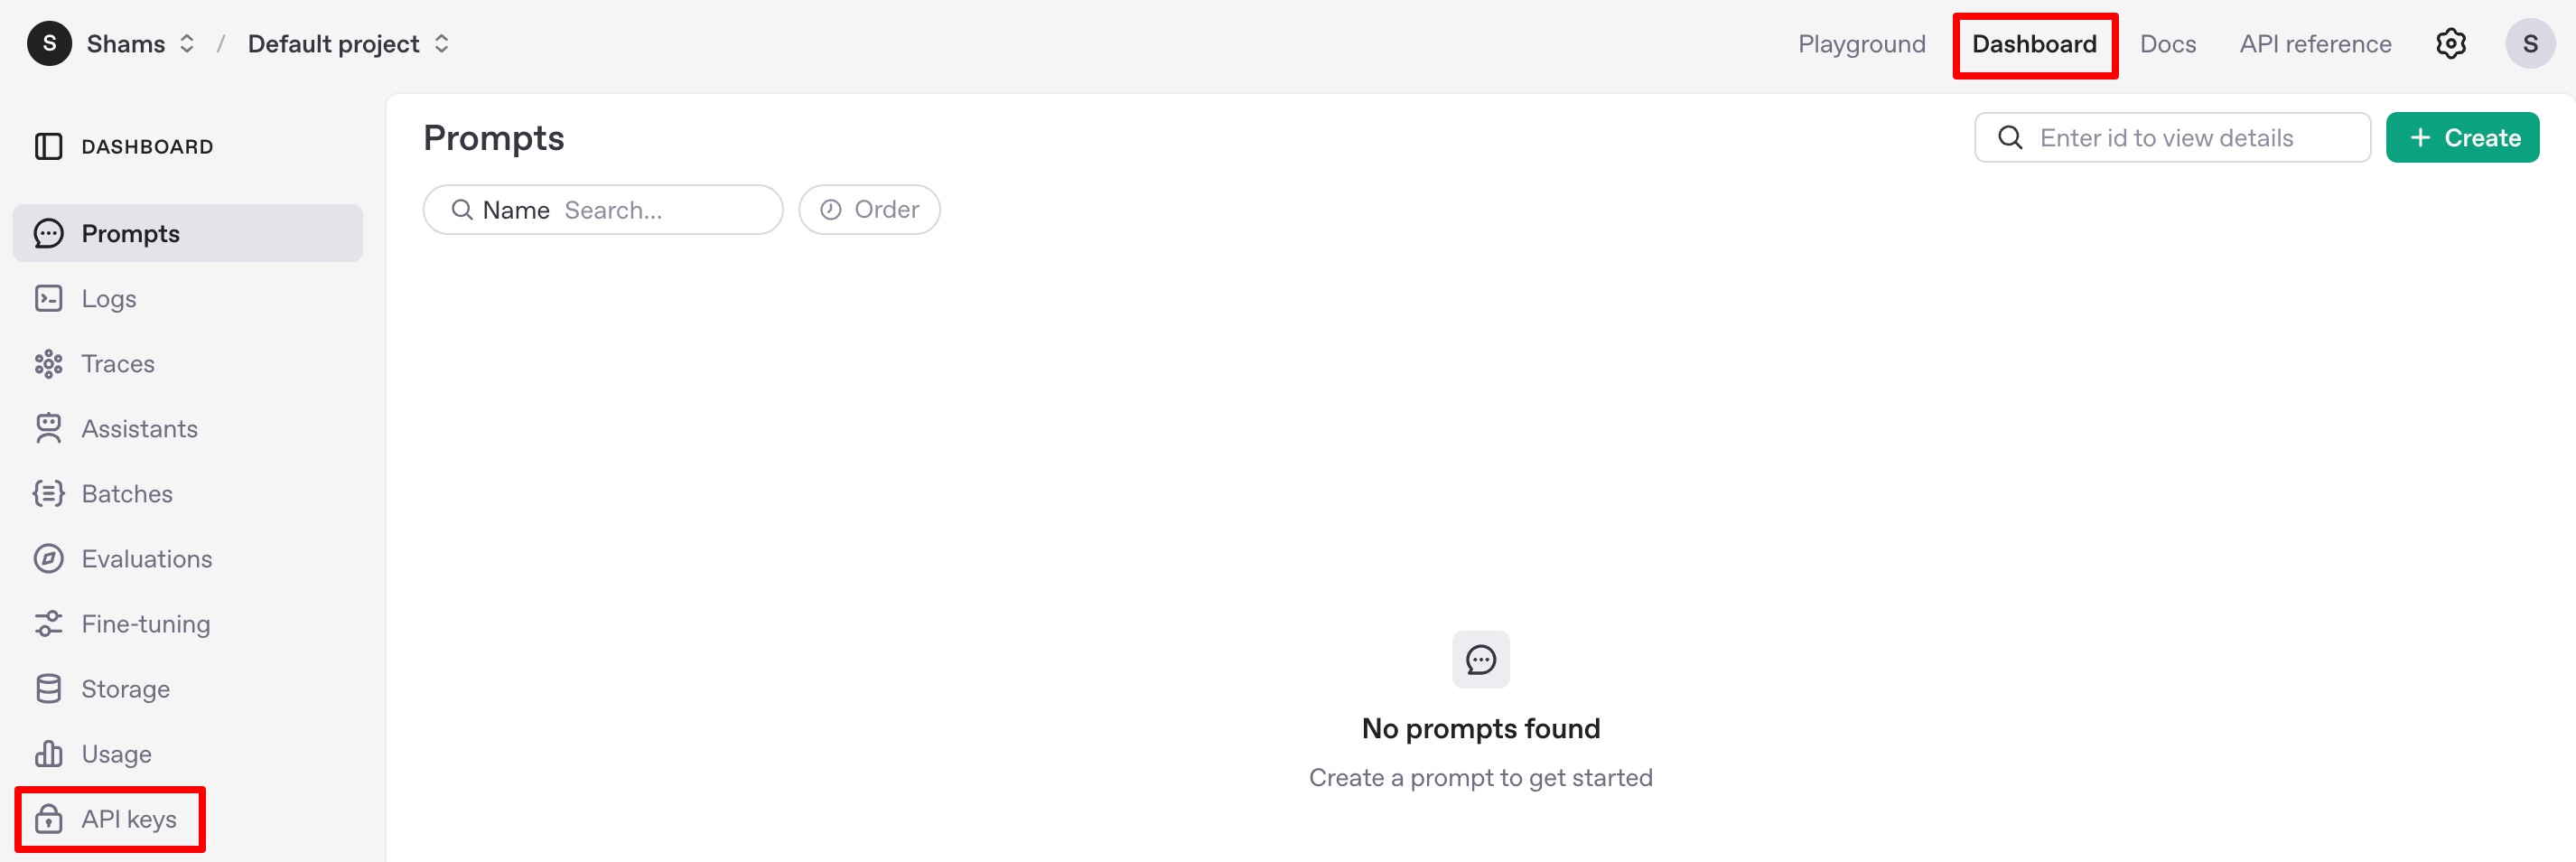
- Upon clicking on the “API” tab, you should be redirected to the API Keys page. This page will provide you with an overview of your existing API keys and the option to generate a new one.
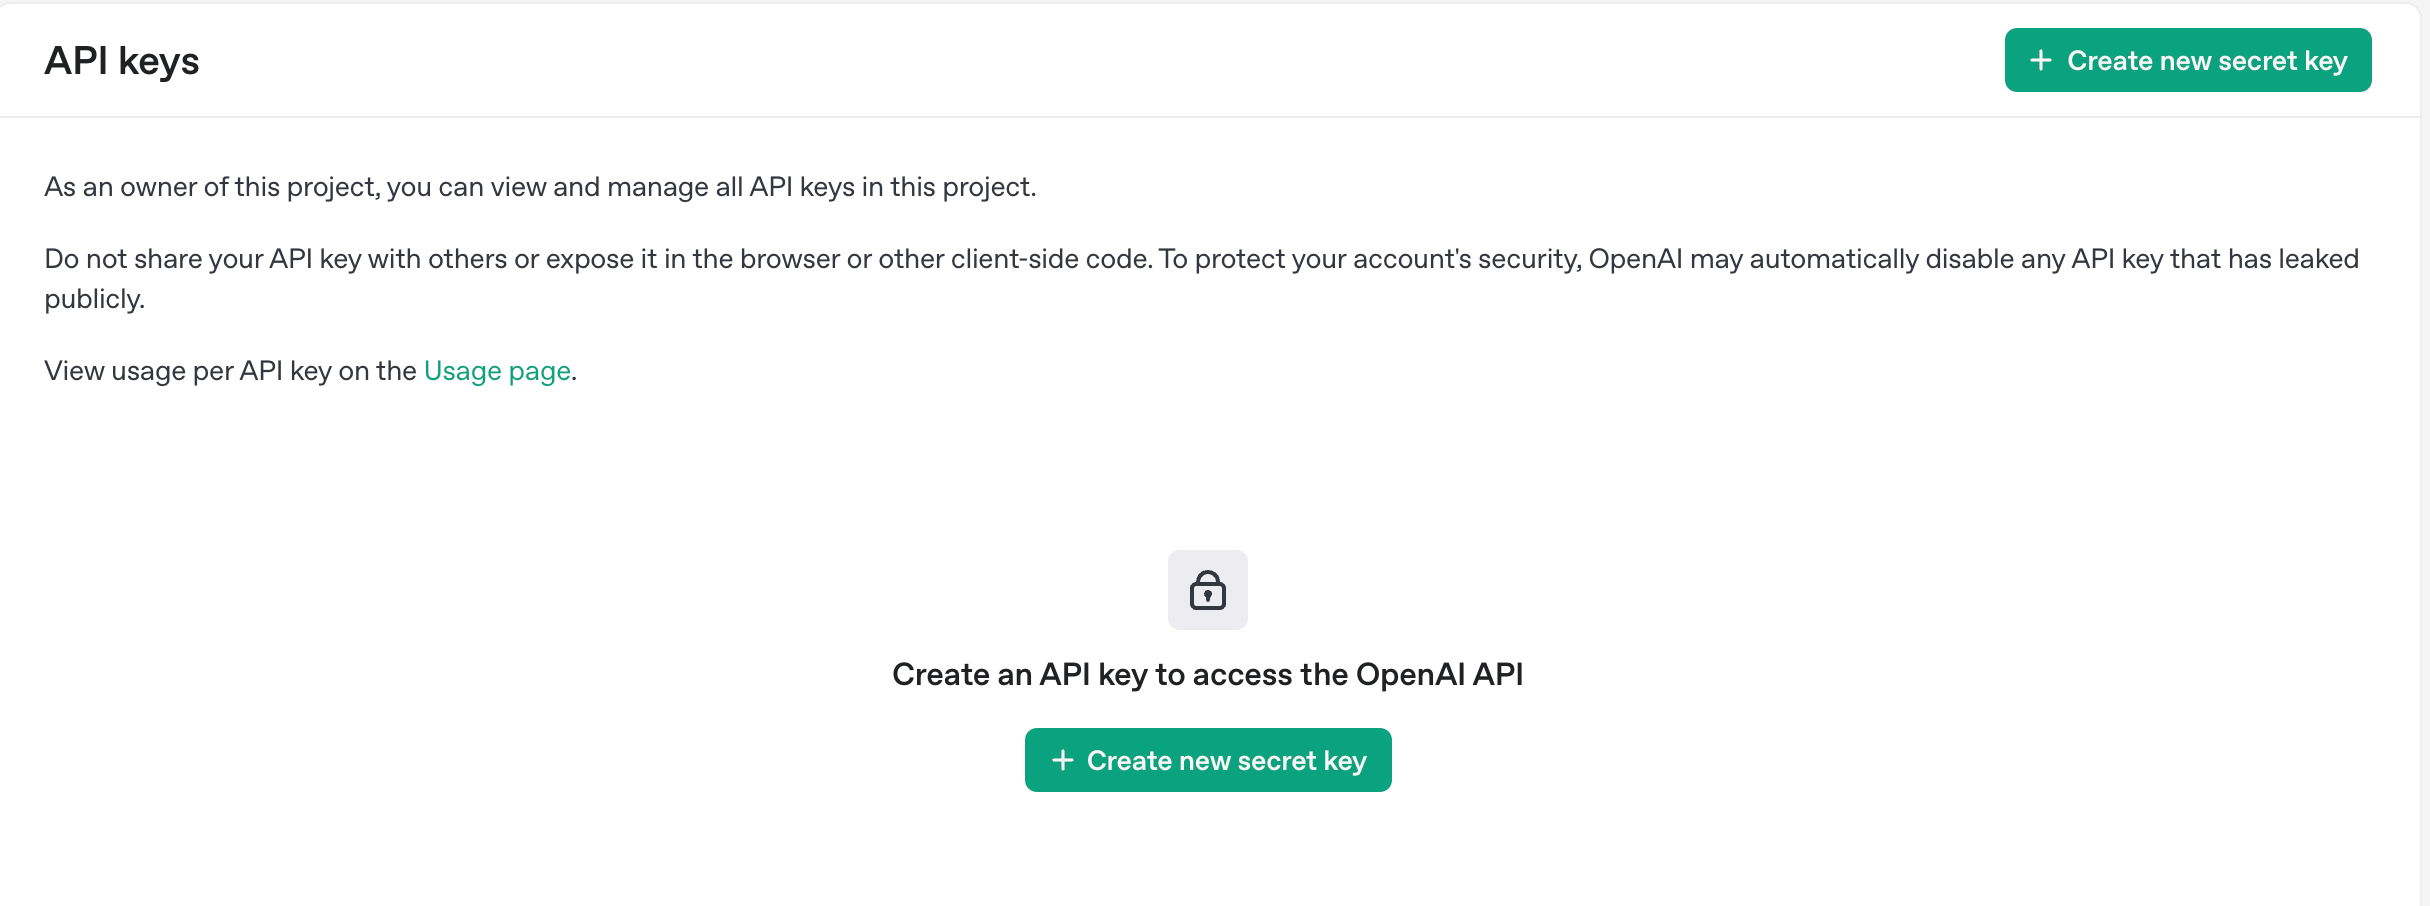
Step 03: Generate ChatGPT API key
To generate an API key, click on the ‘+Create new secret key‘.
Note: If the “Create new secret key” button isn't working that means you haven't verified your phone number. You'll get an option to verify your phone number at the top of this page, simply verify your phone number and continue the next steps.
- A pop-up window will appear on your screen. This window will contain a field where you can enter a descriptive name for your API key.
- Provide a meaningful name for your API key, such as “My ChatGPT API Key” or “Project X ChatGPT API Key”. This name will serve as a reminder of the purpose or project associated with this key.
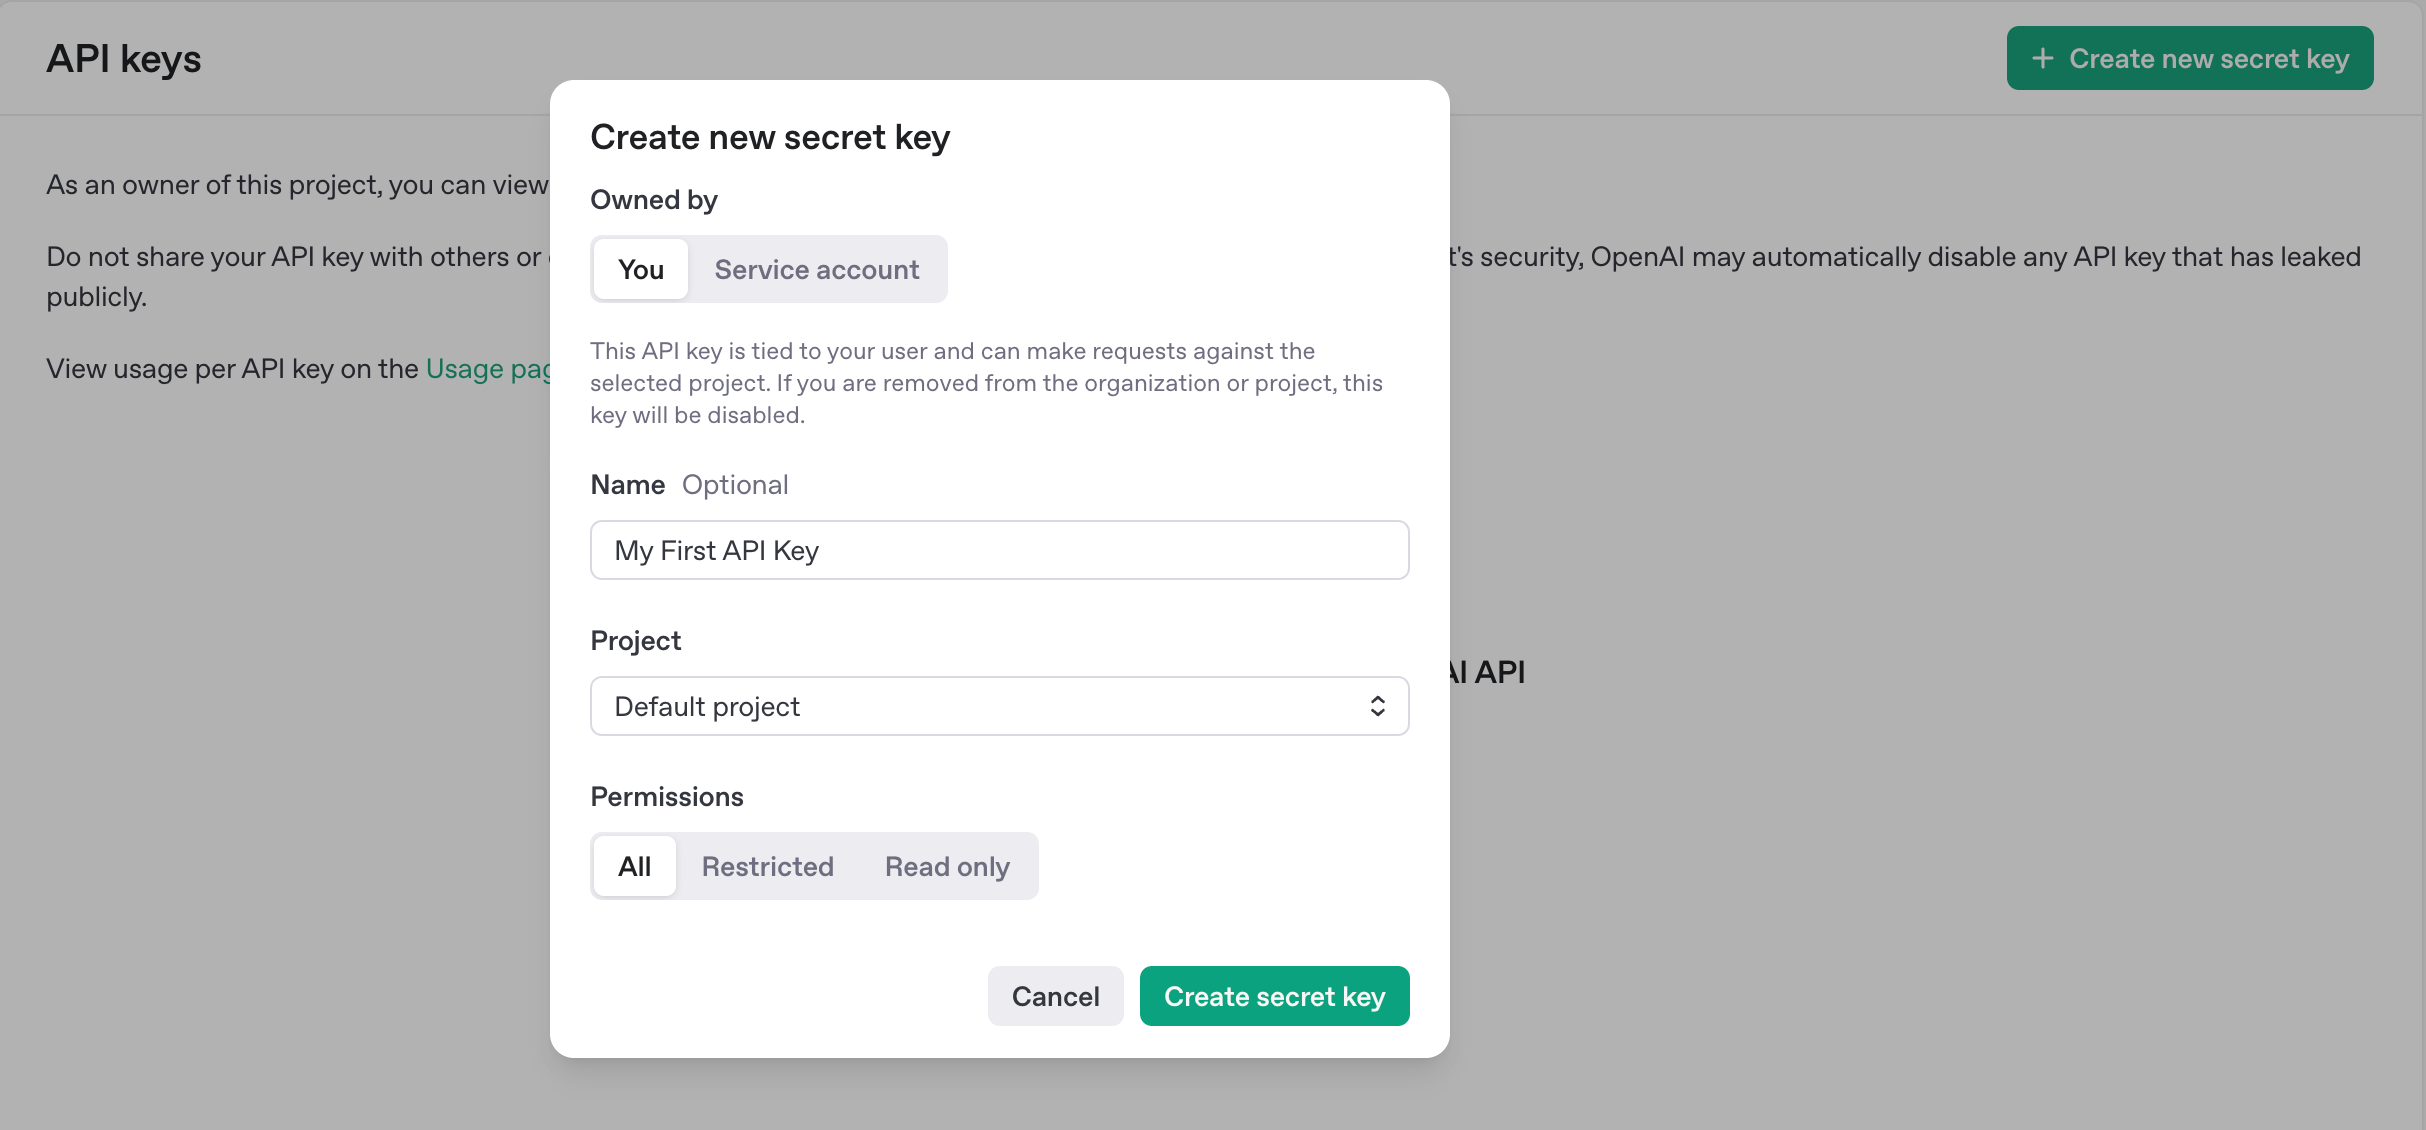
- After entering a suitable name, click on the “Create secret key” button within the pop-up window. This action will finalize the generation of your API key.
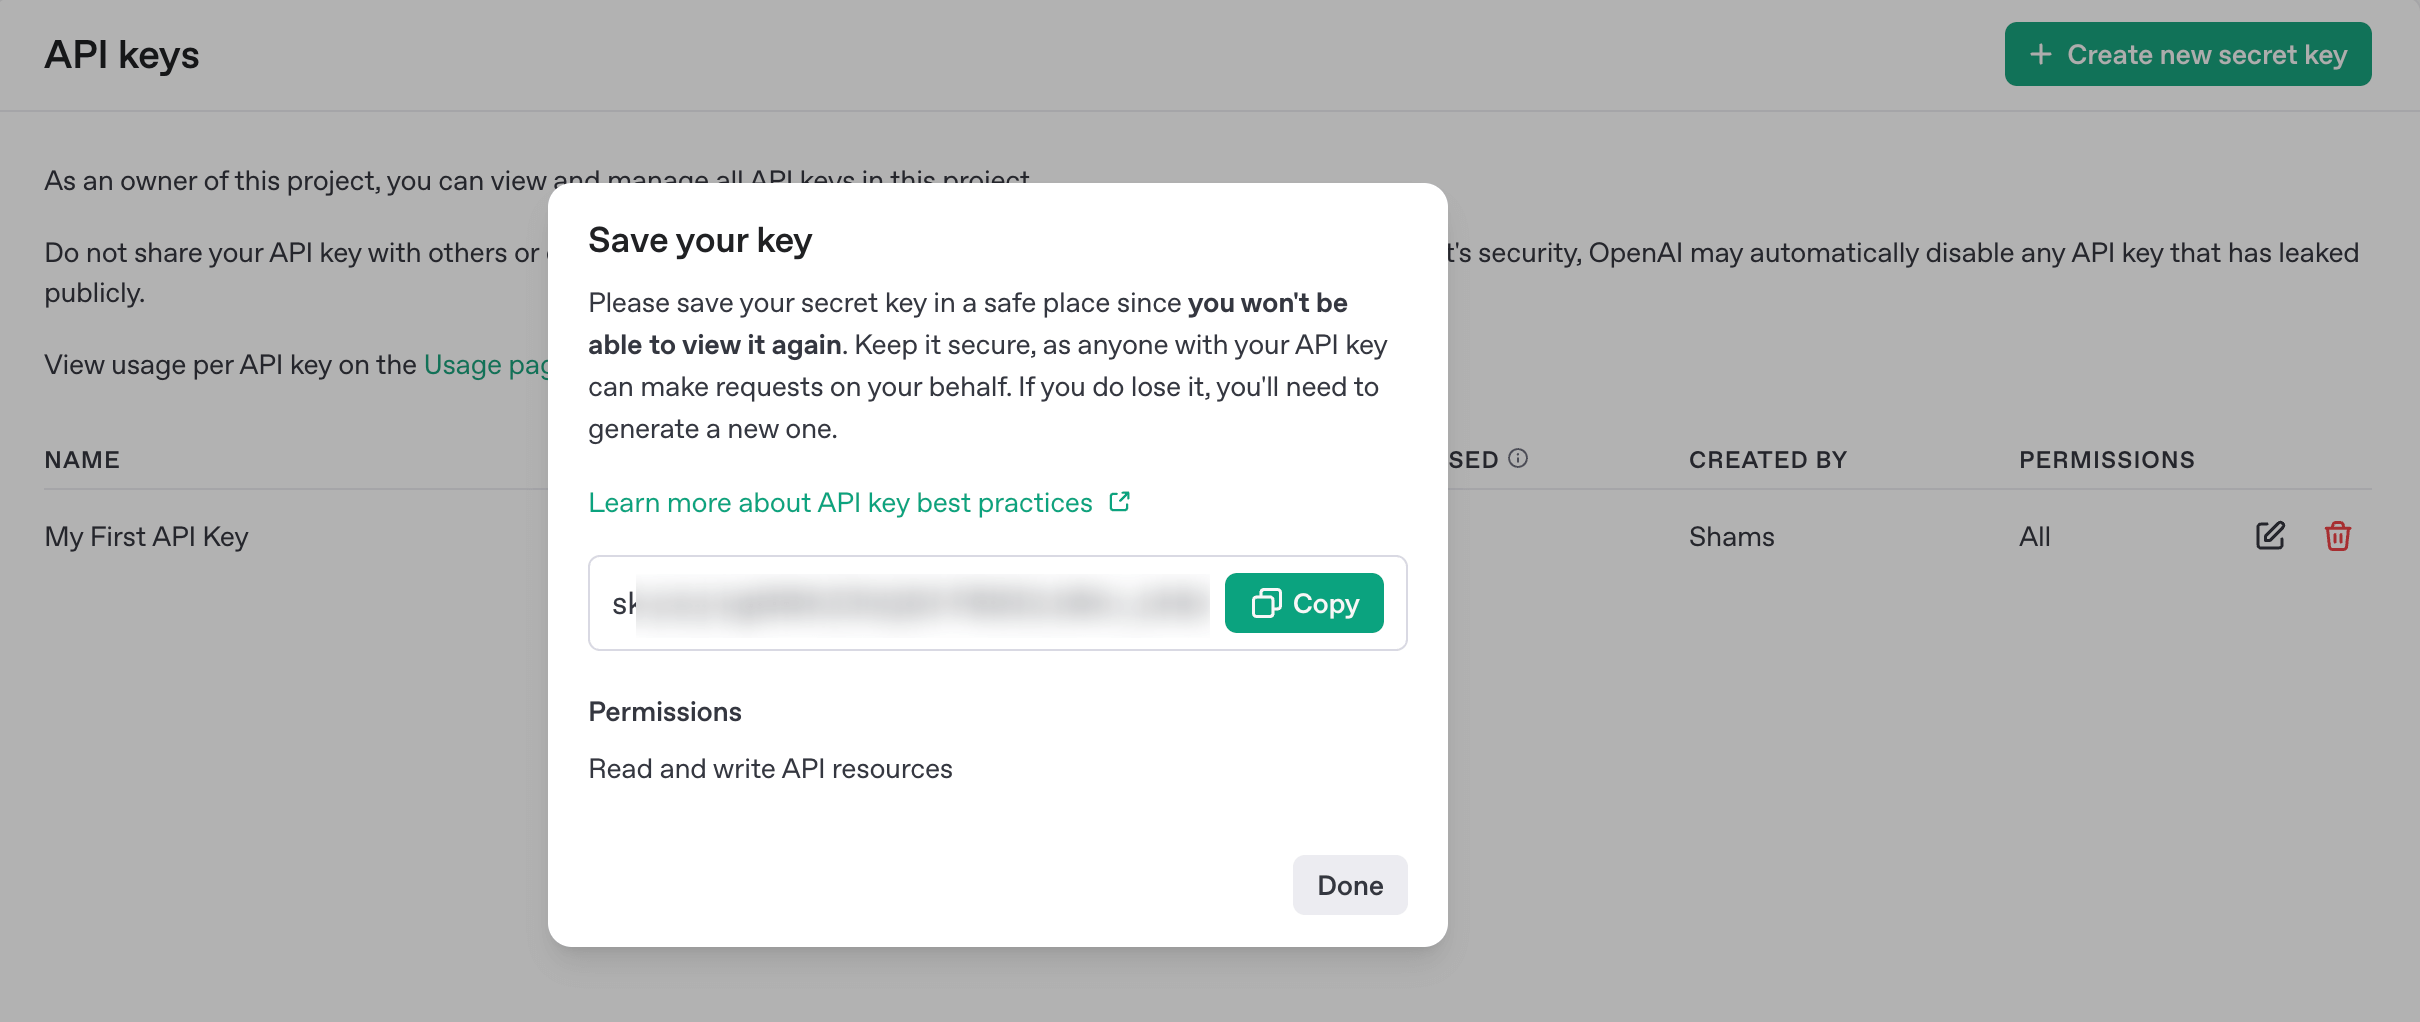
- Copy the API key and store it securely in a password manager or other secure location. Never share this key with anyone else, as it grants access to your ChatGPT account.
Congratulations! You have successfully created your ChatGPT API key. Now you can integrate it with any of your applications to leverage the power of ChatGPT.
Step 04: Add Billing to Activate Your API Key
Creating the API key isn’t enough. To actually use it, you must add a valid billing method.
Without billing, your API requests won’t go through. You’ll get an error every time. It’s like having a car but no fuel.
OpenAI needs a payment method on file, even if you’re only planning to use a small amount or testing it out. They charge you only for what you use, not a flat monthly fee.
Now, let’s add your billing info and unlock the full power of the API.
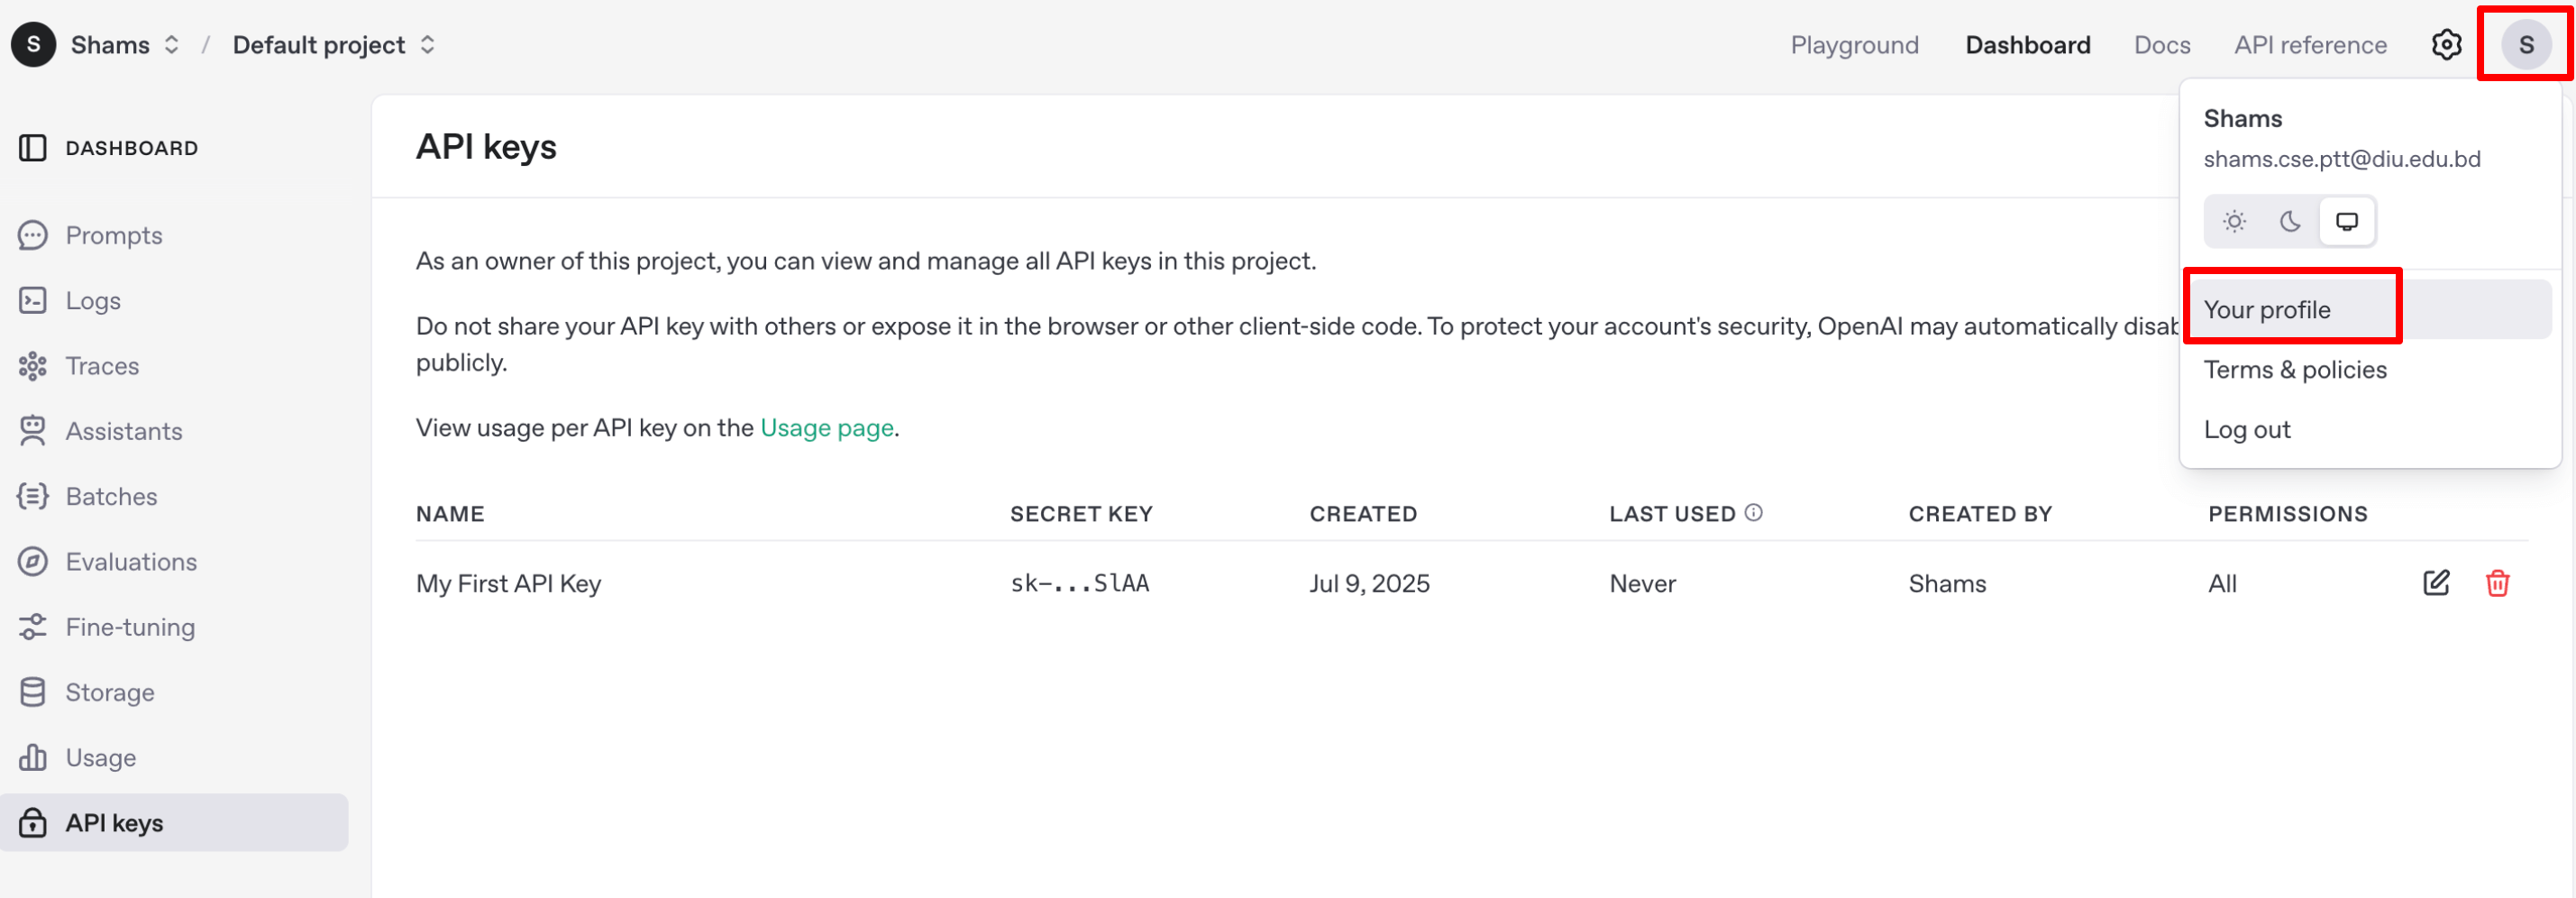
- Click on your profile icon and then click on the ‘Your profile‘ option.
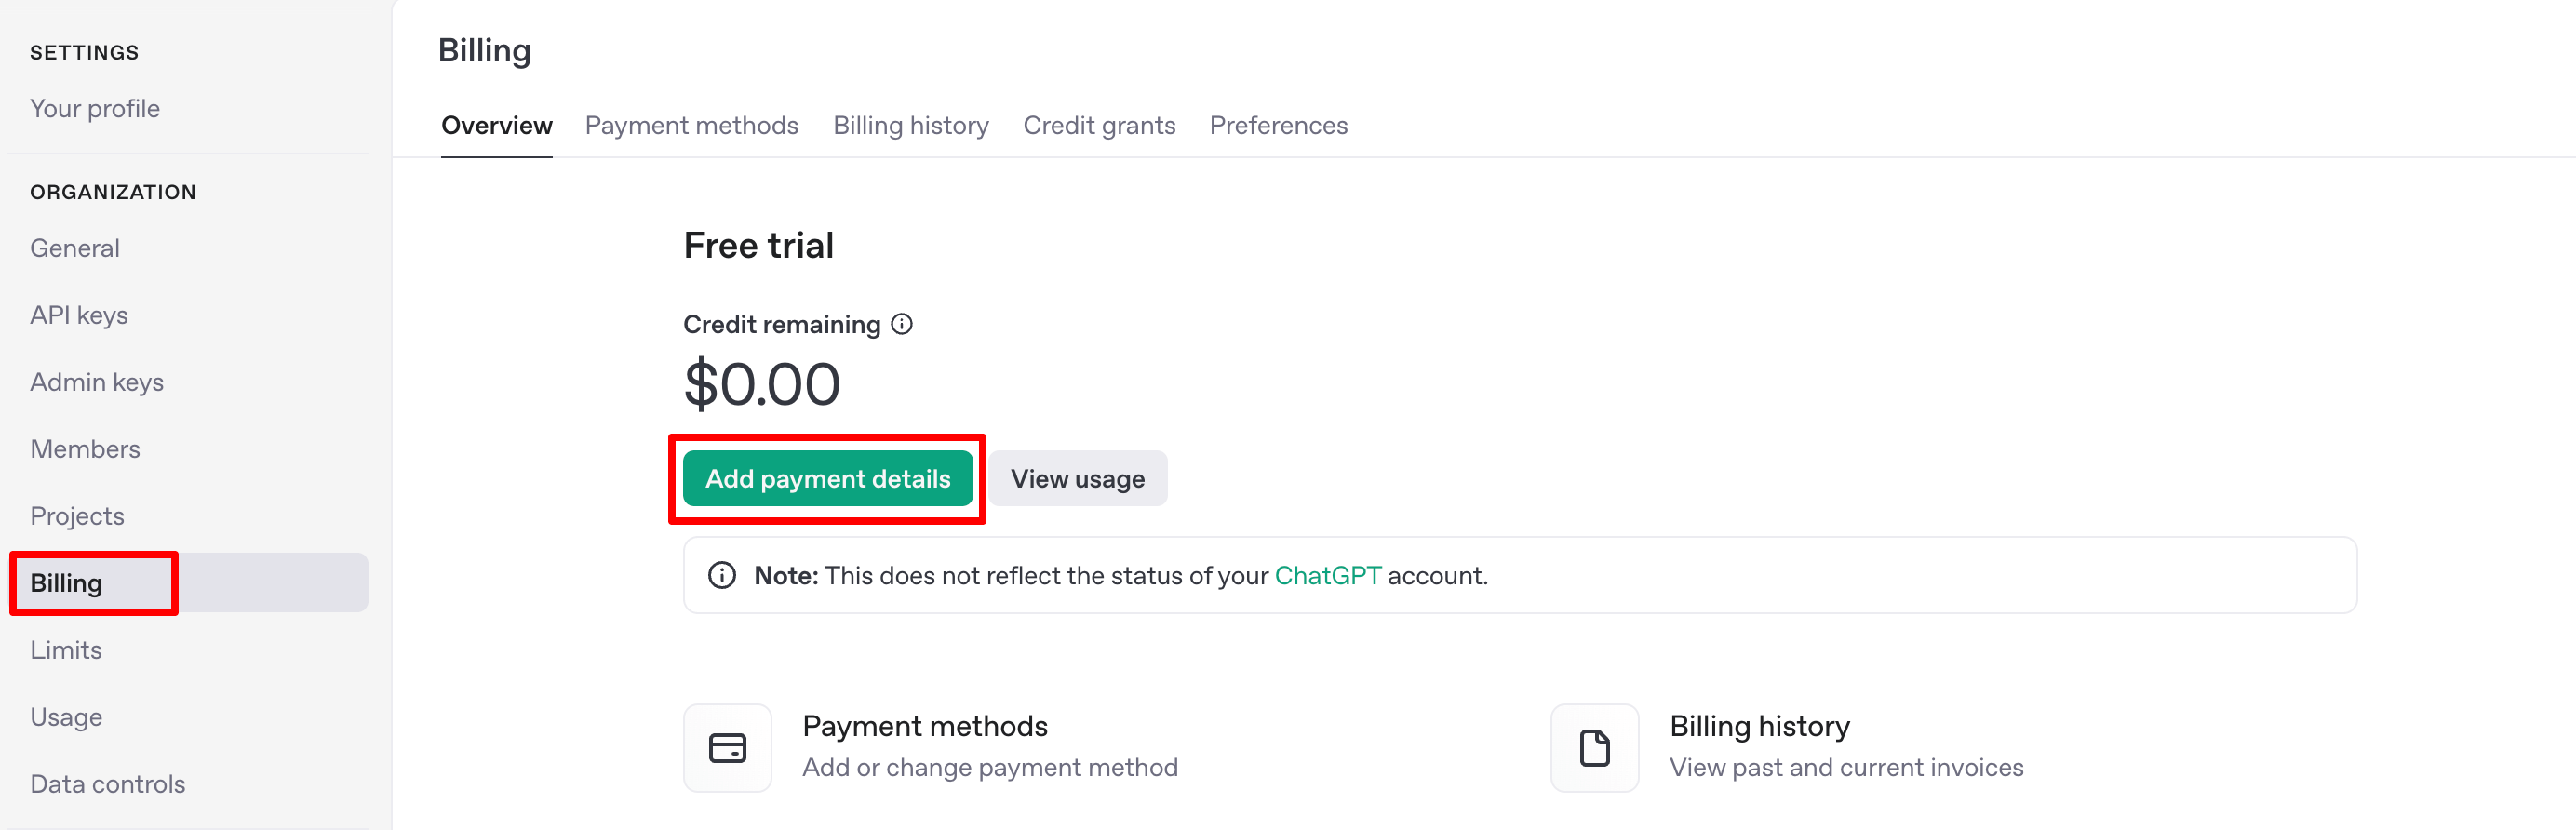
- From the next screen, click on the ‘Billing‘ option and then hit the ‘Add payment details‘ button.
- Fill in your credit or debit card number, expiry date, CVC, and billing address.
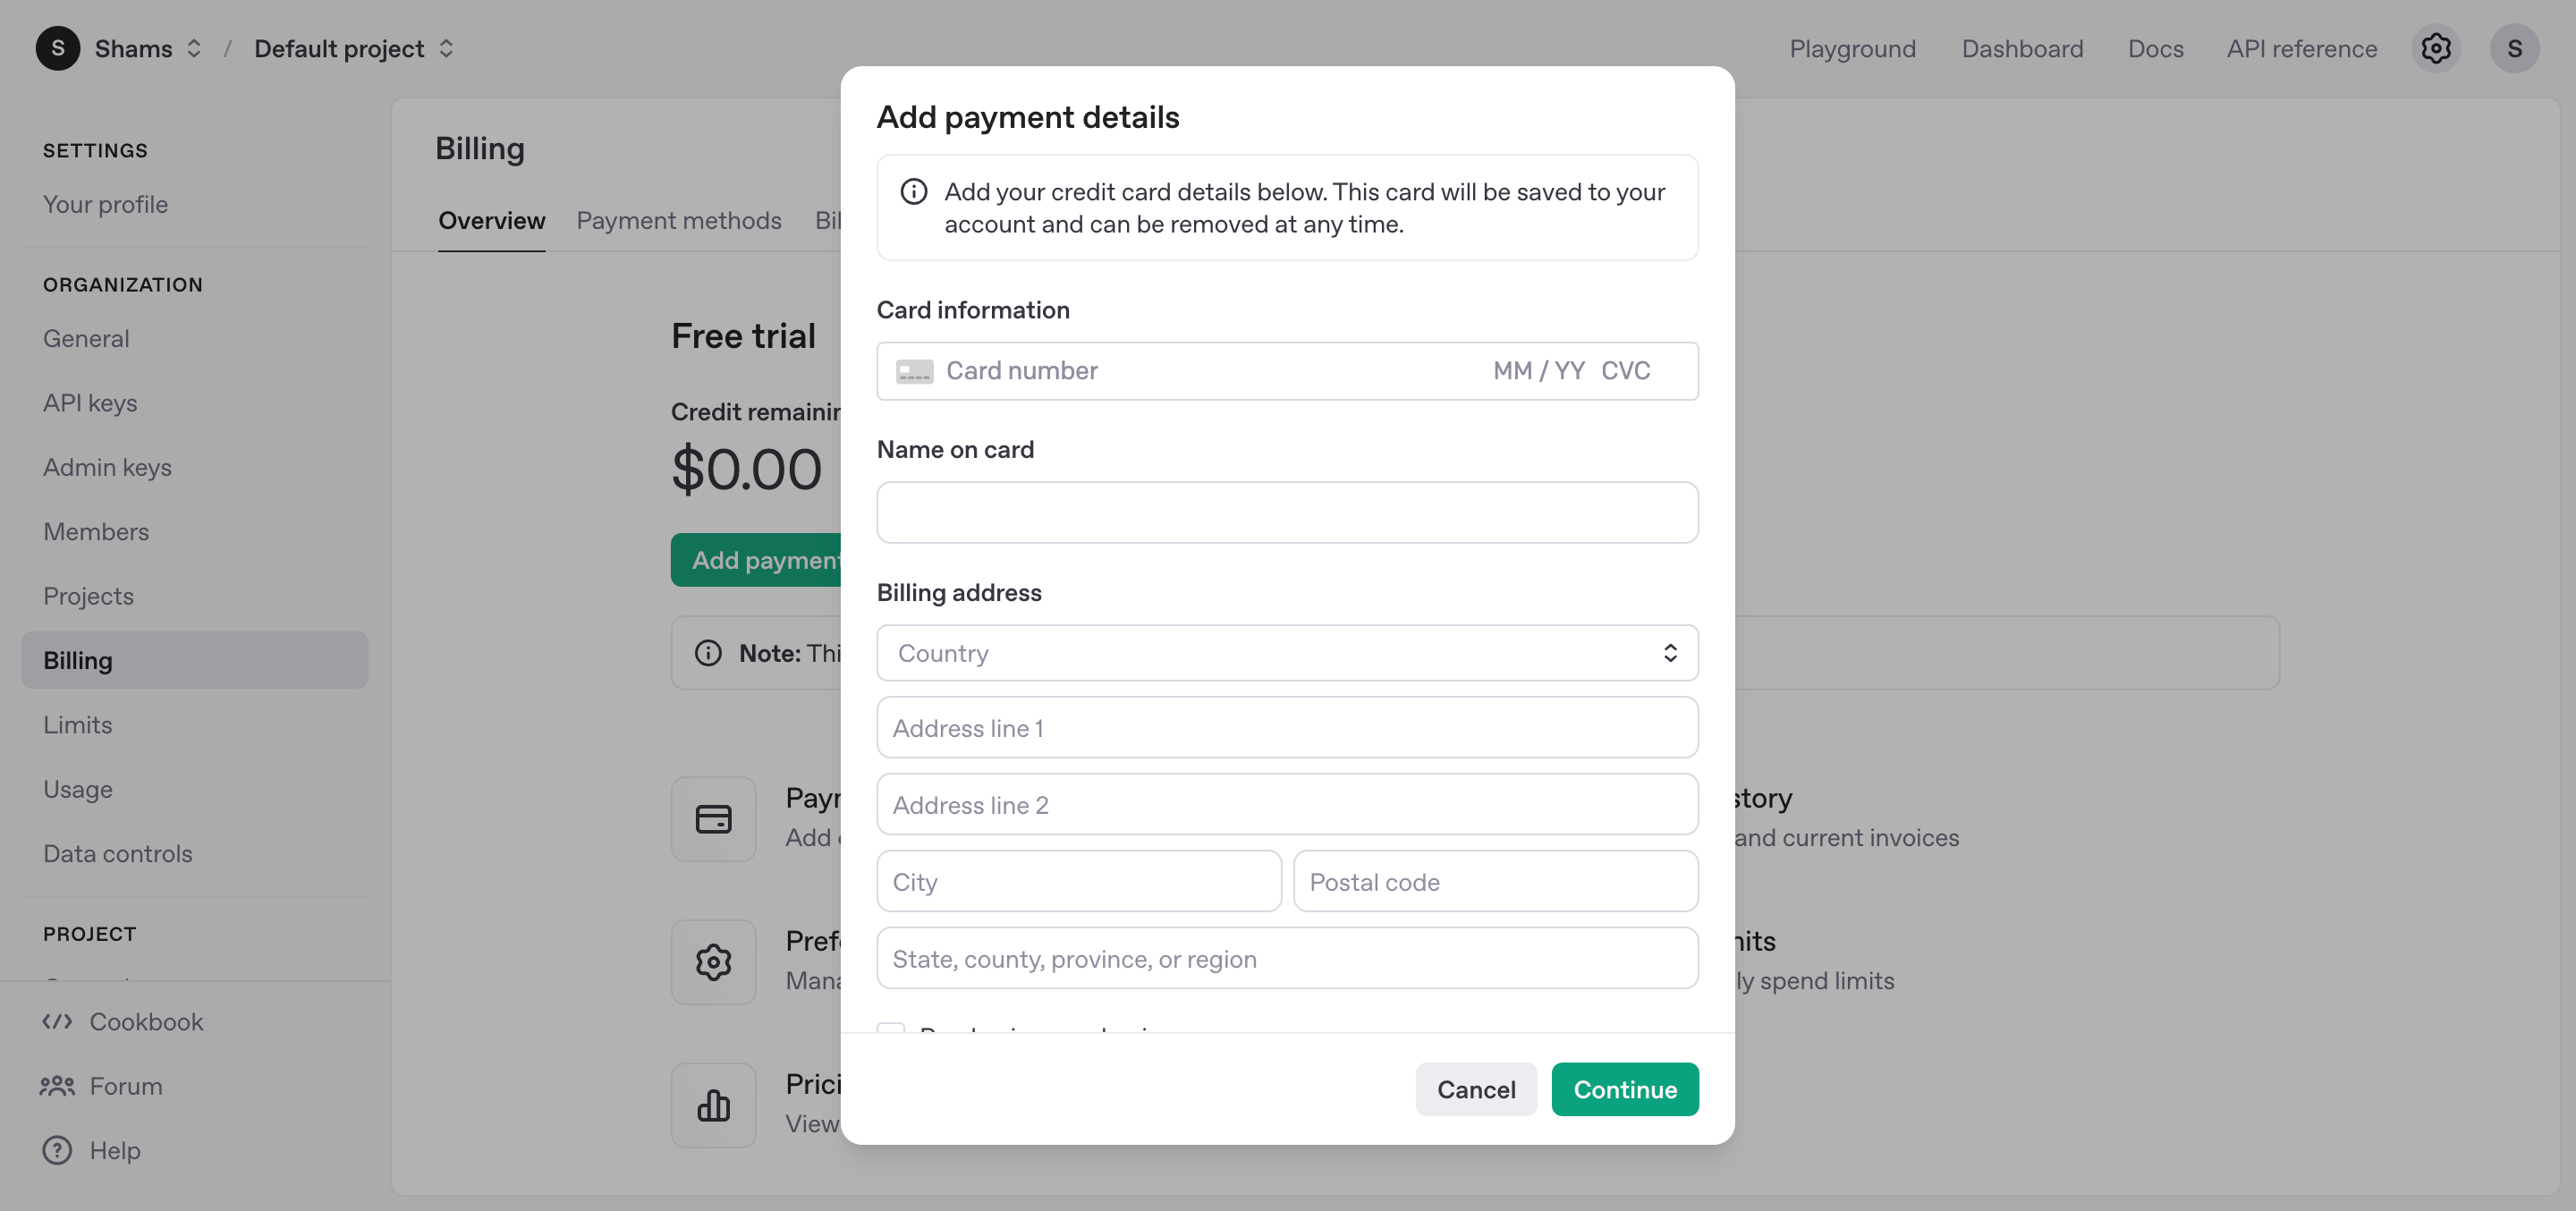
- That’s it! Once your card is added, your API key becomes fully active and ready to use.
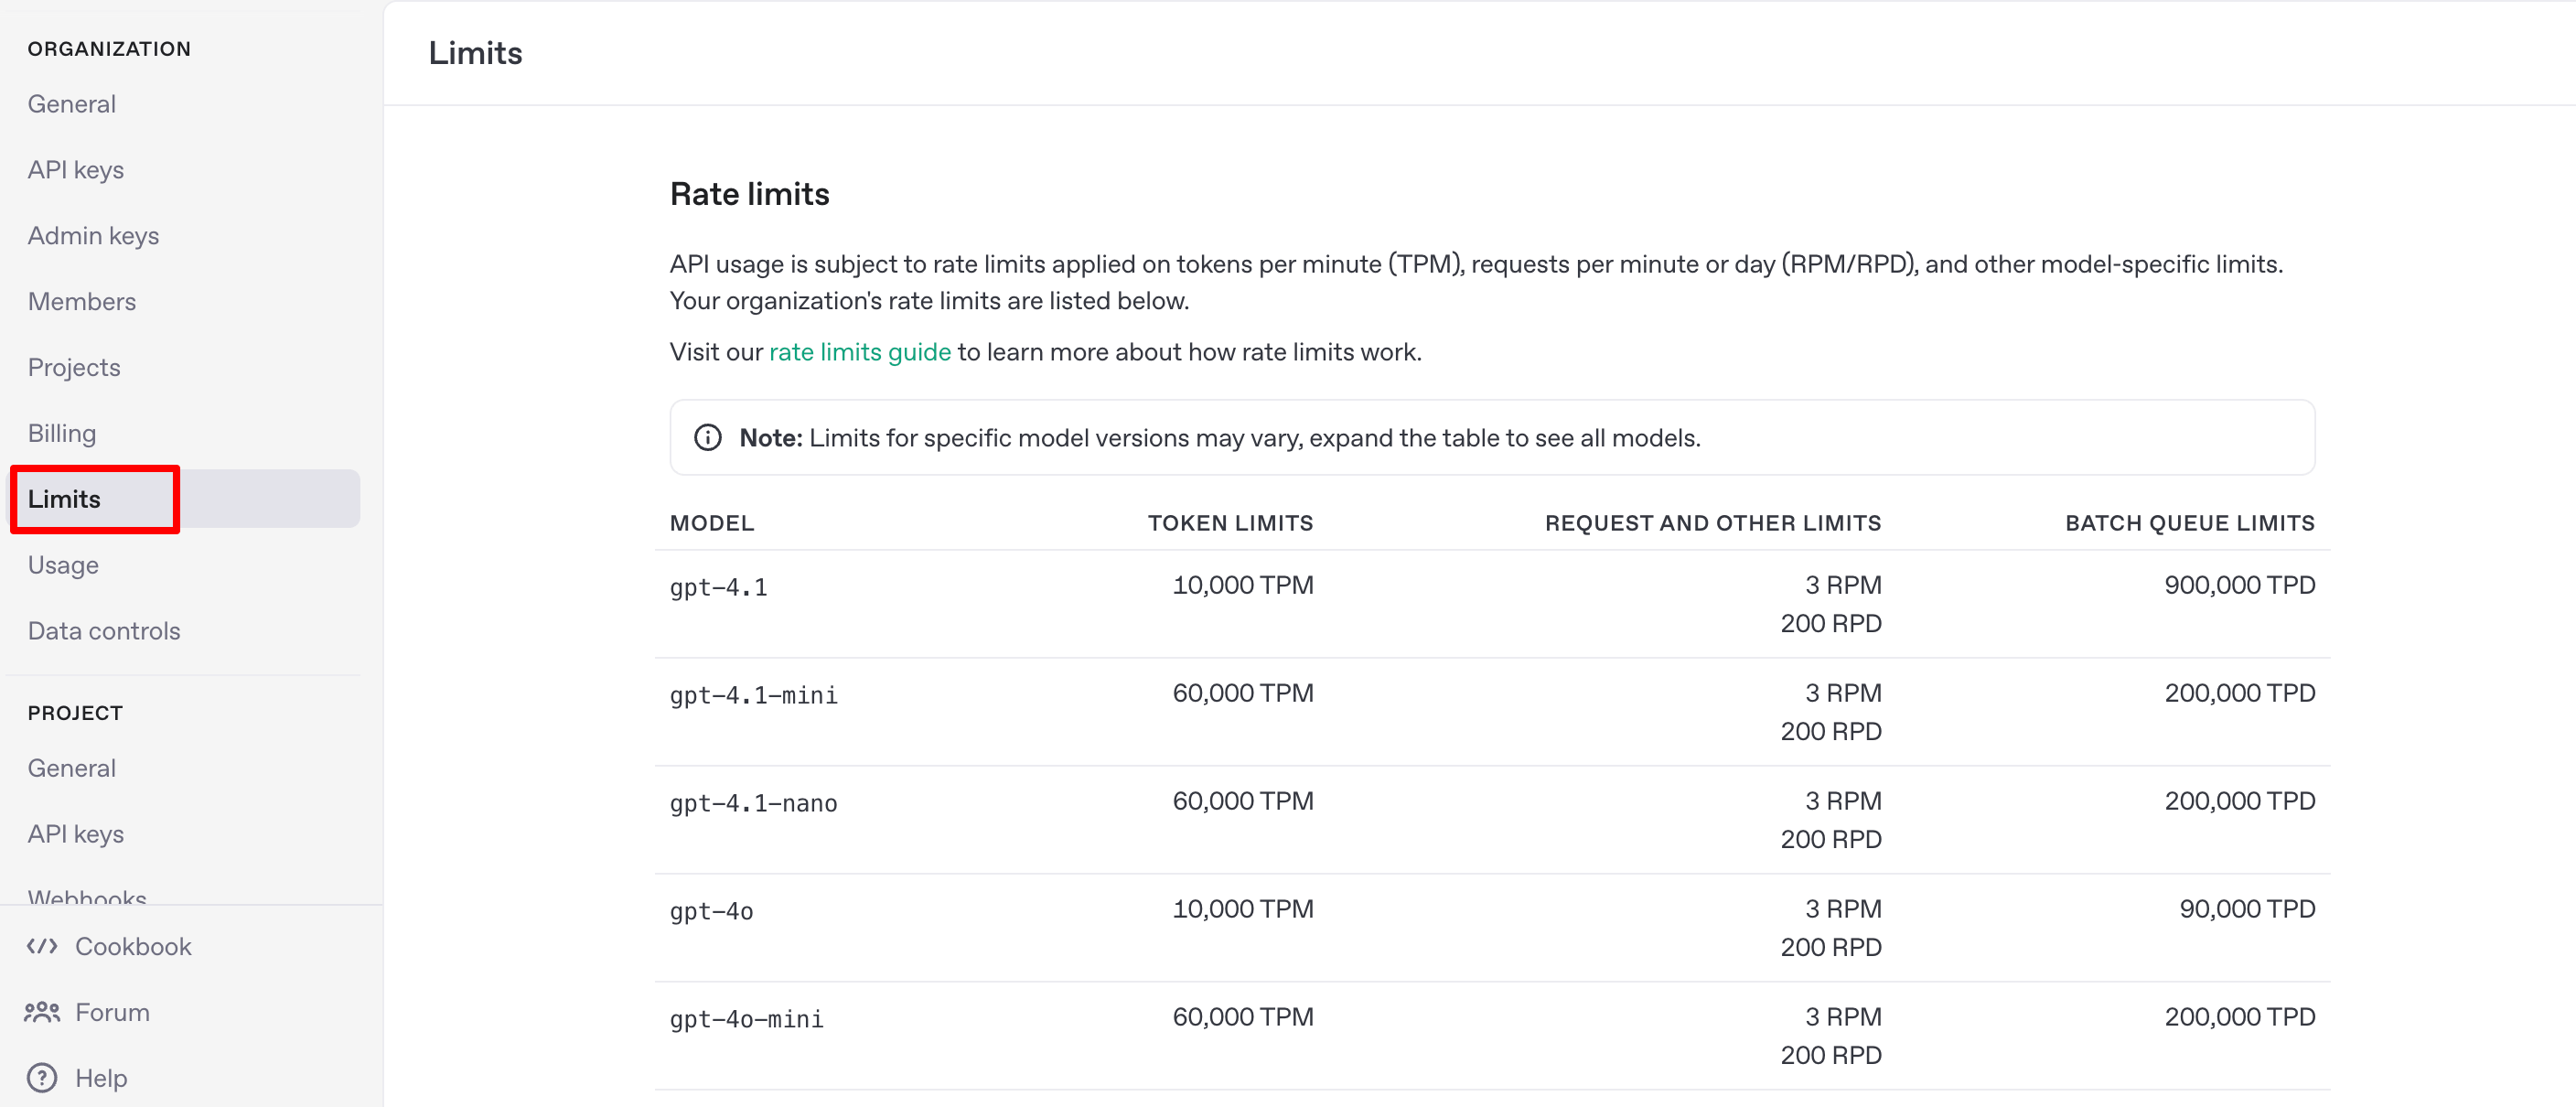
Step 5: Set a Usage Limit (Optional but Smart)
You’re not required to set a usage limit but you absolutely should.
Without a cap, your API usage can go unchecked. That means if a script goes wild or someone misuses your key, you could end up with a huge bill. Not fun.
A usage limit helps you stay in control. It’s like putting a monthly spending cap on your API budget.
Here’s how to set it:
- Click on ‘Limits' option from the left menubar and set an amount you’re comfortable with. Even $5 or $10 works for testing.
That’s it. Now you’ve got your safety net in place.
To make your article truly helpful and SEO-friendly for 2026, this section should be the “reward” at the end of the technical setup. By providing both a quick terminal command and a Python script, you cater to both casual users and serious developers.
Bonus Step: Test Your Key (The “Hello World” Moment)
Now that your billing is active and your key is generated, it’s time to make sure everything is working correctly. You don't need to build a full app yet; you can run a simple test in seconds.
Option A: Quick Test via Terminal (cURL)
This is the fastest way to verify your key without writing any code. Open your Terminal (Mac/Linux) or Command Prompt (Windows) and paste the following (Replace YOUR_API_KEY with your actual secret key):
curl https://api.openai.com/v1/chat/completions \
  -H "Content-Type: application/json" \
  -H "Authorization: Bearer YOUR_API_KEY" \
  -d '{
    "model": "gpt-4o",
    "messages": [
      {"role": "developer", "content": "You are a helpful assistant."},
      {"role": "user", "content": "Say 'Your API is working!' in 3 languages."}
    ]
  }'
Option B: Integration via Python (OpenAI SDK)
If you are a developer, use the official Python library. In 2026, the openai library (v2.0+) is the standard for high-speed AI integration.
- Install the library:
pip install openai - Run this script:
from openai import OpenAI

# Initialize the client with your key
client = OpenAI(api_key="YOUR_API_KEY_HERE")

try:
    response = client.chat.completions.create(
      model="gpt-4o",
      messages=[
        {"role": "user", "content": "Tell me one fun fact about AI."}
      ]
    )
    print("Success! Response from GPT:")
    print(response.choices[0].message.content)

except Exception as e:
    print(f"Error: {e}")
Pro-Tip: What if it fails?
If you get a 401 Unauthorized error, double-check that your API key is copied correctly. If you get a 429 Quota Exceeded error, wait 60 seconds; sometimes it takes a moment for the billing system to register your new payment method.

Troubleshooting: 5 Common API Errors (and How to Fix Them)
Even if you follow every step, you might encounter an error message. Don't worry, most are quick fixes. Here is a breakdown of the most common issues in 2026:
| HTTP Code | Error Message | What it Actually Means | The Quick Fix |
| 401 | Invalid Authentication | Your API key is incorrect, revoked, or has a typo. | Re-copy the key from your dashboard. Ensure there are no extra spaces in your code. |
| 429 | Quota Exceeded | You have no “Credits” left in your account. | Check Billing: OpenAI now uses a prepaid system. Add at least $5 to your “Credit Balance.” |
| 429 | Rate Limit Reached | You are sending too many requests too fast. | Slow down your requests or implement “Exponential Backoff” (retrying with a delay). |
| 403 | Permission Denied | Your key doesn't have access to this specific Project or Model. | Go to Project Settings and ensure your API key has “All” permissions enabled. |
| 503 | Engine Overloaded | OpenAI's servers are temporarily too busy. | This is on their end! Wait 30 seconds and try again, or check status.openai.com. |
Bonus 01: How to Revoke Your ChatGPT API Key If It's Needed
If you suspect that your API key has been compromised or misused, revoking it is the most effective way to prevent unauthorized access to your ChatGPT account. This could happen if you accidentally shared your key with someone else, if your device was hacked, or if there was a security breach on the OpenAI platform.
Let's check how you can revoke your ChatGPT API key!
- Log in to your OpenAI account and navigate to the API Keys page.
- Find the API key you want to revoke. The API Keys page will typically display a list of all your generated API keys, along with their names and creation dates.
- Click on the delete button.
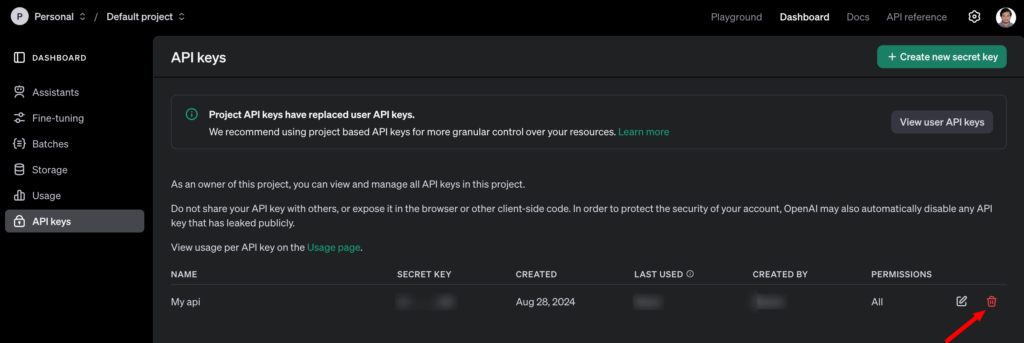
- After clicking on the Delete/Trash button, a confirmation prompt may appear asking you to verify that you want to revoke the selected API key. Click on the “Confirm” or “Revoke” button to proceed.
Once you have followed these steps, the selected API key will be revoked and can no longer be used to access ChatGPT's features. If you need to revoke multiple API keys, repeat the process for each key you want to disable.
Bonus 02: Mistakes to Avoid While Generating ChatGPT API Key
You should be aware of some mistakes that many users commit while generating and using the ChatGPT API key. Here we have listed a few mistakes that you should always avoid:
- Creating multiple API keys without a clear purpose: Each API key should be associated with a specific project or application. Having too many keys can make it difficult to track usage and identify potential security issues.
- Sharing your API key with unauthorized individuals: Your API key is like a password; never share it with anyone else. This could allow unauthorized access to your ChatGPT account and compromise your projects.
- Storing your API key insecurely: Store your API key in a secure location, such as a password manager or an encrypted file. Avoid storing it in plaintext or sharing it through insecure channels.
- Not revoking compromised API keys: If you suspect that your API key has been compromised, revoke it immediately to prevent unauthorized access. You can revoke keys from the API Keys page on the OpenAI platform.
- Not monitoring API usage: Keep an eye on your API usage to identify any anomalies or unusual activity. This can help you detect potential security breaches or misuse of your API key.
Related: ChatGPT for eCommerce: Elevate Your Online Sales with Essential Strategies
Frequently Asked Questions About OpenAI API Key (2026)
Is the OpenAI API free in 2026?
No. The OpenAI API is not completely free. You must add a payment method before using it. You are charged based on how many tokens your application uses. There is no fixed monthly fee unless you subscribe to a specific plan.
Do I get free credits when creating an OpenAI API key?
Free trial credits are not guaranteed. In most cases, you must add billing before your API key becomes active. Check your dashboard to see if any promotional credits are available.
Why is my OpenAI API key not working?
Your API key may not work for these reasons:
- Billing is not added
- The key was copied incorrectly
- The key was revoked
- You exceeded your usage limit
- Your request format is incorrect
Start by checking billing and usage limits in your dashboard.
Why does OpenAI say I must add a payment method?
OpenAI requires a valid payment method before processing API requests. Even small test requests need billing activated. Without it, your API calls will return an error.
How much does the OpenAI API cost per month?
There is no fixed monthly fee. You pay based on usage. The cost depends on the model you use and how many tokens your application processes. You can set monthly spending limits to control costs.
How do I set a usage limit for my OpenAI API key?
Go to your dashboard and open the Usage or Limits section. Set a monthly spending cap. This prevents unexpected charges if your app makes too many requests.
How do I revoke or delete an OpenAI API key?
Open the API Keys section in your dashboard. Find the key you want to remove and click Delete. Once deleted, the key will stop working immediately.
What happens if my OpenAI API usage exceeds the limit?
If you exceed your monthly limit, your API requests will fail. To continue using the API, increase your spending cap or wait until the next billing cycle.
Do You Have Any Further Queries?
That's all from our side.
We have described:
- What is a ChatGPT API key
- How you can generate ChatGPT API key
- How to revoke a ChatGPT API key if it's needed
- ChatGPT Pricing plans, and
- A few common mistakes that you should avoid while generating ChatGPT API key for you.
That means now you know everything about the ChatGPT API key and we can certainly say that you will be able to create ChatGPT API keys all by yourself for your applications.
That being said, if you have any further confusion regarding this topic, feel free to share that with us using the comment box below. We are all ears!